Friday, 16 December 2016

Mamhead Album–Backgrounds and Leaves

I spent some time in the studio this afternoon and made some more progress on my mini-album about our woodland walk last summer.

I wasn’t entirely happy with the frame around one of the photographs so I painted it with Interference Green Perfect Pearls. Some time ago I made a palette for my Perfect Pearls so that I could use them like watercolours. These little mica powder paints are so versatile! I thought the frame was a lot better after painting than it did before.

To make the paired page for this one, I created a background using an 8 x 6-inch piece of American Cardstock in white (what I have made most of the other pages from). It was created with a mixture of four distress inks (Iced Spruce, Bundled Sage, Pine Needles and Forest Moss) which I rubbed on the non-stick craft sheet and spritzed. I smooshed the card around in this but wasn’t quite satisfied with the result, so I added some Emerald Green Brushos, followed by some Emerald Isle Infusions to give a nice mottled background. The final step was to use a soft brush to add some dry Interference Green Perfect Pearls, and I spritzed the whole thing with water to set the Perfect Pearls, and dried it with my heat gun. The paper now has a lovely shimmer to it, which doesn’t really show on the photos.

Here’s the result. It is quite wrinkly so it’s gone under a pile of heavy books overnight, which should flatten it out OK.

Here’s a mock-up of the paired pages.

Once the background piece is flattened, I can cut it in half and use one for each copy of the album.

In the course of making it, I used a couple of pieces of kitchen paper to mop up the excess ink. The piece on the left now has all its white covered with ink and is ready for use in projects, and the one on the right is maturing nicely!

Here are the paired pages so far, with some of the photos not yet mounted on pages. I will either use suitable backgrounds from my backgrounds folder, or create new ones for these.

Turning to the traced parchment pages, I had a piece of deeply textured hand-made paper which I thought went particularly well with the gold page.

It needed a bit of distress ink added, so I selected several, and some of my home-made ink blenders to apply the ink lightly to the raised texture of the paper, beginning with Aged Mahogany.

This was followed by Dried Marigold.

Adding Frayed Burlap.

Finally, Vintage Photo, which I also used to distress the edges.

By this time, most of the Aged Mahogany had been obliterated, so I added some more.

By this time I was really happy with the result, and gently applied some gold gilding wax to the raised texture of the paper using my fingertip.

I then added some of the leaves made from inked Glassine Paper, using Pinflair gel glue so as not to flatten the hand-embossing I’d done on them. These leaves have a dull metallic sheen which goes very well with the inked background and with the gold of the tracing on the other page.

Here are the two pages side by side.

I am going to do something similar with the other traced pages, creating background pages with no photos on them, but with texture and colour to echo that of the traced page. These will add a bit of interest to the album and be a nice exercise in mixed media and an opportunity to experiment a bit.

Tuesday, 13 December 2016

WOYWW 393

I’m doing this on Tuesday night because I’ve got a busy day tomorrow. It’s so nice to have something on my desk to show, after neglecting my studio for so long. I’ve managed to put in a few sessions this week and it makes me realise just how much I’d been missing it. Here’s my drawing zone again, with mini-album pages laid out.

I’ve been doing more work on my mini-album about Mamhead woods, and have now progressed to the stage where I’m working out which pages should go together. I still have a few pages to make with the as yet unmounted photos, so I am choosing suitable backgrounds for them, to go with pages I’ve already done.

If you scroll back to my previous posts you can see how I’ve done the new pages. I’ll share a few pics here.

Leaf making:

These are a mixture of die-cut leaves and leaves cut with Sheba, my Cougar cutting machine. The middle-left ones are made from glassine paper and were cut by hand. All have been hand-embossed and are ready to embellish the various pages.

The purple pages I showed you last week, now complete.

I added gold embossing, using a nice grungy background stamp. I love this effect.

I cut a frame to go round one of the photos I’d manipulated and didn’t really like the border.

Designed in Inkscape on the Mac, and then cut from white card on Sheba, and then darkened with Black Soot distress stain and a touch of the pewter one, and spritzed with water to blend a bit.

Here’s the completed page together with its partner.

For the left-hand page I embossed some card with the Cuttlebug and added a bit of silver gilding wax. I deliberately chose a photo of trees with tall straight trunks to complement the picture on the right. I may add some text.

I’m now working on a double page spread with pics of my hubby and his friend walking ahead of us. I took another of my pieces of inked kitchen paper and tore strips which have been applied with gel medium, and a bit of glitter added to enhance some that was already on the kitchen paper.

Here’s a detail shot of the left-hand page.

There will be some text between the strips of kitchen paper.

I have a sheet of lovely quotes about trees and woodland which I found online, and I shall add these at various points through the book.

I’ve also been really busy clearing out a load of Mum’s stuff, finally finishing clearing her kitchen (bar the cleaning). There is someone in our church who had a disaster in her home and we are all doing what we can to help replace all their stuff which was ruined. A great incentive to get on with this job!

The lady from the forum has now posted her piece after her Skype interview with me last week. I feature in it a LOT! It’s great, and has links to art therapy sites etc. There have been quite a few responses to it, all very positive. As well as emailing her privately about it I’ve also thanked her on the forum and have contributed further to the thread and asked again about getting our own art board. We shall see. This thread is a “public” one, so visible outside the forum, and if you are interested, click here.

Health Update

I’ve been suffering with a very frequent and extremely severe gripping pain in one leg which the doctor said was a nerve pain so I’ve been put on gabapentin which has certainly helped. He told me to make a physio appointment because he thinks it’s coming from my back, but I think it is more likely to be an ME-related pain (stupidly forgot to ask him that!).

Today I went again and saw another GP because on Saturday night I developed a very painful and swollen knuckle joint and the pain was spreading to the next joint. She said it was osteo-arthritis and I should continue what I was doing, applying ibuprofen gel and the flare should subside in about a week. My fingers are looking like sausages and I told my hubby I didn’t want sausage fingers! – and to go all gnarled and old… He said “You poor old thing,” and I said, “A little less of the ‘old’ if you don’t mind!” and then he started calling me SausageFingers.

Try saying ShoshiSausageFingers when you’ve had a few.

Tonight I told him I couldn’t possibly lose the use of my hands – I’m an artist! He said I could apply glue and glitter with my mouth. Nice.

I did mention to the GP this morning about the leg pain and she said, “Well, you know ME pains – they wander all over the place!” and said it was quite likely to be that, and was pleased that the gabapentin was doing the trick.

I’ve got the support garments lady coming back to see me tomorrow afternoon, to sort out the alterations that need to be done to the first pair of support pants they’ve made for Miss Piggy (my hernia). They are only minor problems, and once they’ve sorted them and I am happy, they will go ahead and make up the remaining two pairs that I can have in a year.

Happy WOYWW and have a great creative week, everybody.

Sunday, 11 December 2016

Pairing the Pages of the Mamhead Album

I’ve now made quite a few pages for the album and was finding that many of them didn’t have suitable partners to form a double-page spread. I still have quite a few unmounted photos printed out in various sizes and tonight I decided I’d better start creating some pages to pair with the ones I’d already made.

However, before starting that, I completed the purple pages by sticking down some hand-embossed leaves. I wasn’t able to do this yesterday as the heat-embossing had warped the pages so badly that they had to spend the night under a pile of heavy books, which more or less sorted the problem – any further warping should be controlled once the pages are stuck to the pages on their reverse.

Here are the two pages in close-up.


I left these pages to dry. The Pinflair glue does take a long time to dry, but it creates a very good, strong bond, and at the same time it adds dimension as it is a clear gel.

Moving on to another page, I chose two photos of my hubby and his friend walking ahead into the distance. One was already digitally mounted onto a printed background so I just had to work on the left-hand page. I chose a piece of 12 x 12 cardstock from my stash – this card is almost black, with a slight sparkle to it which I thought would look good with the bits of glitter, and also pick out the dark shaded areas in the two photos.

You can see from the picture that using another sheet of inked kitchen paper, this time in pale blues and purples. I chose this particular sheet to tie the sky colours of two photos together. There are some patches of spray glitter on this paper and as it had been use to mop up acrylic paint and gel medium, in places it was a bit stiff, and also the 2 layers would not pull apart.

I didn’t want to cover the whole of the background with this paper as I had done with the purple pages, so I tore strips from it and used them to embellish the black page, some going under, and some going over, the photo. I deliberately tore strips long enough to go onto the other page, to tie the two together as their backgrounds were radically different.

The page pairs showing the inked kitchen paper stuck down with soft gloss gel medium.

While it was still set, I added a bit more glitter, sprinkling it on very sparingly, and then laid a piece of baking parchment over it and ran my brayer over it to make sure the glitter was firmly stuck down. I aligned the two pages exactly, and stuck the excess paper strips onto the right-hand page. Once I was satisfied that it was lined up correctly, I snipped the pages apart with sharp scissors. I propose adding some text between the applied strips – a quote from the Bible celebrating friendship, and if I continue onto the background of the other page, this should tie the pages together still further.

Here is a detail shot of the left-hand page.

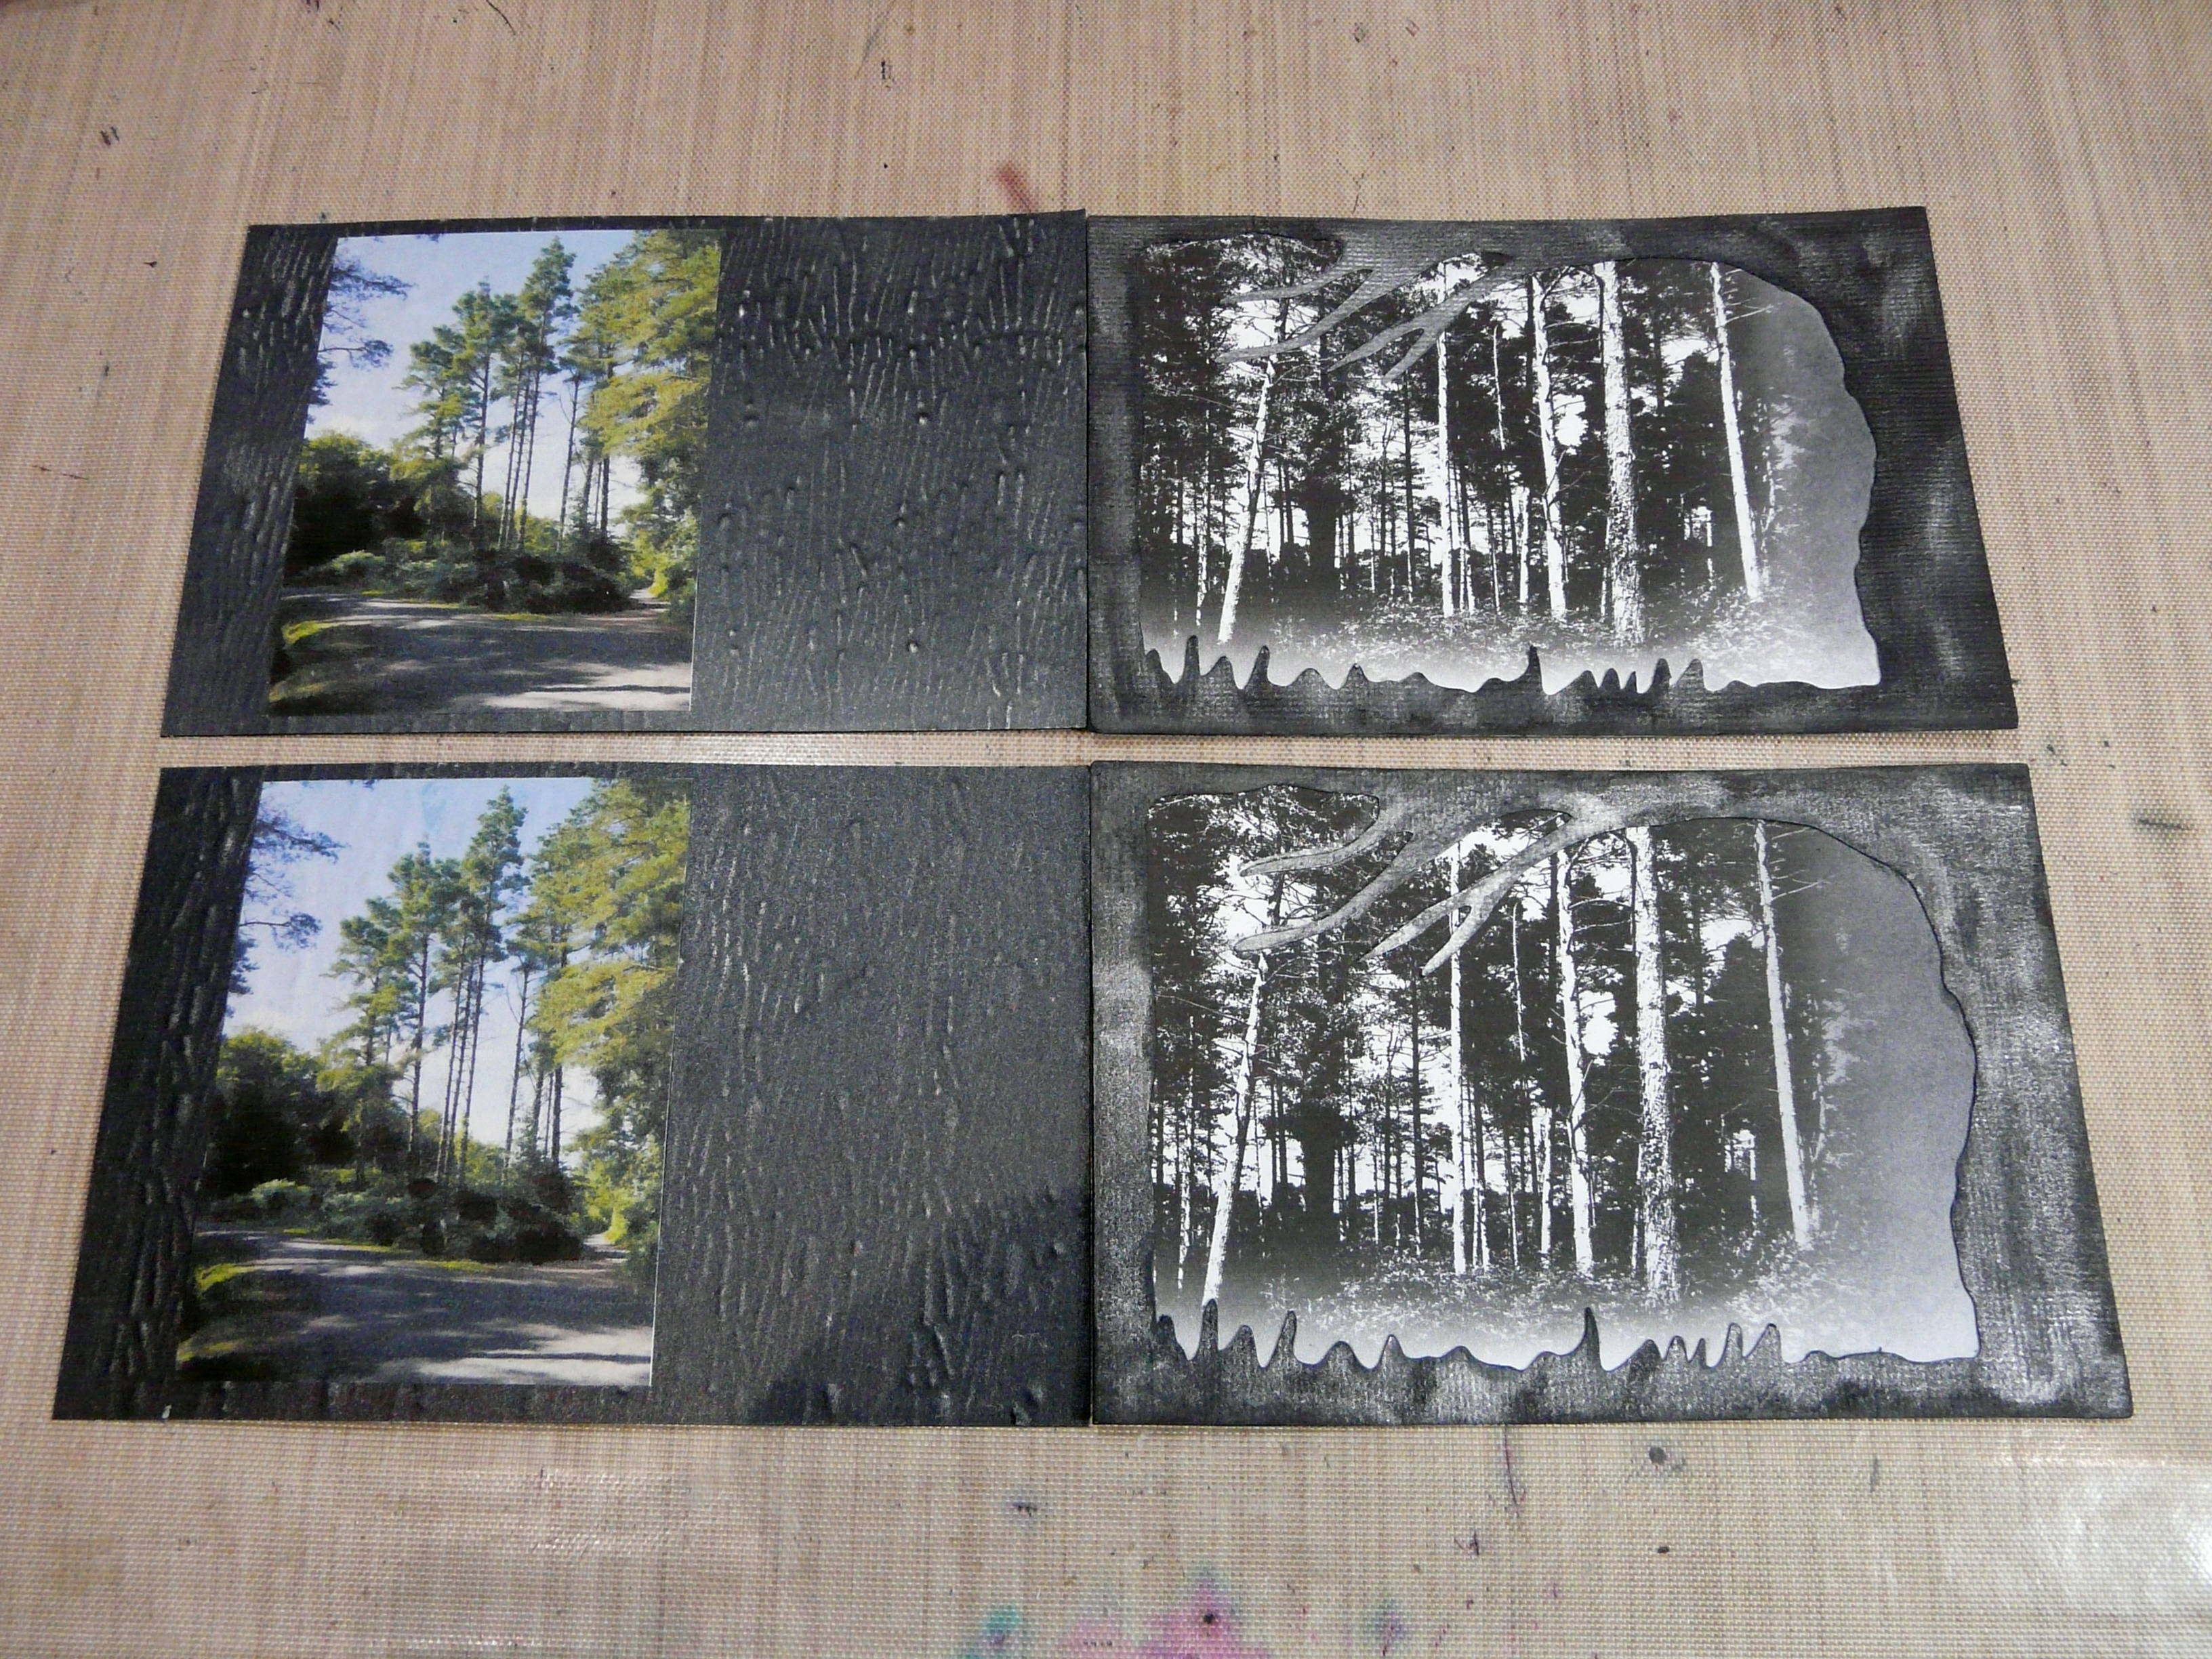
Moving on to another page, I chose some more of the slightly sparkly black card to make a page to go with the negative photo with the tree frame that I cut yesterday. I wanted a woodgrain effect on this page, so I chose one of my transparent plastic texture plates designed for cake icing! I always pick up unusual things if I think I can make art with them, and this has encouraged me to keep an open mind whilst out and about, and I often buy things for my art that were designed for another purpose entirely!

In the photo you can see the two pages lying on top of a piece of the untreated black sparkly card. I have embossed the pages with the woodgrain texture plate (which you can jut see in the transparent packaging – it is transparent itself), and have rubbed them lightly with silver gilding wax to highlight the texture.. Quite a nice soft subtle effect, I think.

Here are the pages paired together. I deliberately chose a photo with tall tree trunks to compliment the printed image on the right hand side. The photos were stuck down with soft gloss gel medium and the texture on the background ties the two pages together quite well.

In the above photo you can see that I have darkened the right-hand side of the photo where it fades out (as I mentioned in my previous pot) – I used black soot distress ink and an inkylicious ink duster, and while it’s not perfect, it is an improvement.

Here is a detail of the woodgrain page which shows the texture quite nicely.It gives the impression of looking at a view through a doorway in a creosoted wooden fence!

I have plenty more pages to find partners for, and once this is done, I can think about adding text to some of the pages. It’s starting to shape up now.

Saturday, 10 December 2016

More Work on my Mamhead Album

I spent a few hours in the studio today and made good progress on the mini-album I am making about our walk in Mamhead Woods.

For the first time for ages, I got Sheba (my Cougar cutting machine) going again, and after spending far too long messing about trying to get my Windows and Mac computers to talk to each other on the network (success at last!), I designed a little frame for one of the pages, and cut it out, adding some leaves at the same time to use up the card. Here are the pieces being removed from the machine’s cutting mat.

This frame was to go around the black-and-white photo you can see above, because I wasn’t quite happy with the faded-out edge I’d created, and as you can see, one of the two print-outs had a white border along one edge which wasn’t intentional. I couldn’t be bothered to print them out again and thought the addition of a frame would enhance the page anyway.

Here is one of the frames with some black soot distress stain added.

I dried this off with my heat gun and then daubed on some brushed pewter distress stain. I like these metallic ones.

This was a bit blotchy so I spritzed it with water and again dried it with the heat gun, deliberately moving the water around so that the pewter blended a bit better with the black. I was more satisfied with this result.

Here is the frame in place on the page.

I forgot to take a picture of it after I’d added some black soot distress ink to the right hand side, to darken the faded-out white part which I didn’t like. I left the faded-out part at the bottom because it looks a bit like mist, and the bottom of the frame throws the photo back into relief quite nicely. There will be photos in a future post.

I then moved on to colouring the leaves I’d cut out. Here are the oak leaves getting their first shade of green distress stain.

The second shade. Again, I forgot to photograph the third!

You can see the final result in the next photo, anyway – after applying the third shade all over, to blend the colours, I spritzed the leaves lightly with water for further blending, and dried them with my heat gun.

This photo shows the leaves being hand-embossed.

The completed oak leaves.

I had a couple of scraps left over from a project I made ages ago – this first scrap is a piece of glassine paper that I had coloured with alcohol inks and scrunched up – it was far too gorgeous to throw away so it had ended up in my backgrounds folder awaiting a suitable project in the future, and I thought it would be ideal for this project.

I cut out as many leaves as I could, using my Heartfelt Creations Botanical Wings die in the Cuttlebug.

This is the other scrap from that same project – a piece of card coloured with distress inks. You can see that I have turned some of the leaves over – I really like the mottled effect of the messy back of the card, so decided to use some of each, for variety.

Here are all the die-cut leaves.

This is the complete set of Cougar-cut and die-cut leaves, all embossed and ready for use. I am not sure how many I shall use, but I’ve got plenty to choose from, anyway. Clockwise from top left: die-cut inked scrap card, right side; die-cut inked scrap card, wrong side; oak leaves cut with Cougar cutting machine and inked with distress stains; die-cut leaves which I coloured some time ago with Infusions; die-cut leaves made from glassine paper coloured with alcohol inks.

Here are the remaining leaves that I cut with Sheba, waiting to be coloured.

I then moved on to do some further work on the purple pages I made the other day. I didn’t like the hard edges of the photos that I’d attached to these pages, and had a brainwave, remembering having done some random gold embossing on a project some time ago, so I got out the Bitty Grunge stamp set and added some spots of gold embossing randomly across the pages and on the photos, which softened the effect, and at the same time added a bit of metallic shine and richness.


I applied a very light dusting of gilding wax to a few leaves ready to apply to the pages.

The trouble is, heating the pages enough to melt the embossing powder caused them to warp quite badly. I have put the pages under a pile of heavy books and will leave them for a day or two to flatten out, before applying the leaves with Pinflair glue to prevent the hand-embossing from getting flattened. I am hoping the pages will be flattened sufficiently, but if not, I am trusting that being glued to other pages will keep them flat!

So – good progress made today! I also messed around with the pages I’ve made so far (most of which will require further embellishment) to try and decide which pages would go together but wasn’t happy with any of them! I’ve still got quite a few small photos to mount, and I shall think a bit more carefully about how I do that, so that I create reasonable pairs for those pages I’ve already done.

Watch this space.

Tuesday, 6 December 2016

WOYWW 392–More on Mamhead Album

This week I’ve managed to do a tiny bit more on the Mamhead Woods album that I am making to commemorate a walk we had with friends in the summer – a stunningly beautiful area of woodland outside Exeter, pretty well on our doorstep! How blessed we are to live in such a scenic part of the country.

Here is my drawing zone.

You can see some of the pages with the parchment overlay with tracings, now painted, and a couple of “logs” that I have made, lying on my light panel with its translucent cutting mat. On the left are some backgrounds, and at the back is my ATG gun, the wooden Turkish Delight box that holds my drawing pens, and various knives, scissors and other bits and pieces. Here are some detail shots of what I’ve been doing.

I’ve taken the photos with the parchment tracing overlays and added some colour. Here is the fern. I coloured it with coloured pencils in 3 shades of green.

I painted this one with gold Perfect Pearls.

This one was done with copper Perfect Pearls. Unfortunately the photo hasn’t really caught how shiny and metallic it looks.

The two metallic pages together. I am pleased with this effect.

I had a couple of small photos with purple flowers in amongst the greenery, and I searched through my collection of inked kitchen paper to see if anything would go. This particular sheet was used to mop up some Dylusions spray inks and I absolutely love the rich colour and the random patterns created in the paper. What’s brilliant about kitchen paper is that it is 2-ply, and you can pull the layers apart and get two identical sheets! For my two identical albums, this is ideal. I chose the best way to use the sheets and cut them in half.

The picture below shows how much better this inked kitchen paper looks against a purple background than with a white card backing, so I cut the pages from this purple card rather than using the white card pages I’ve used so far.

I cut the kitchen paper slightly larger than the pages and stuck it down using soft matte gel medium, folding the edges round the back to give a nice clean finish.

Here are the two identical sets of pages side by side, with the photos in place, also stuck down with soft matte gel medium. As they are tending to curl as they dry, I have left them with some heavy books on top, and by morning they should be nice and flat.

I was rummaging through the papers in my drawing zone and came across the teabag stains I made on watercolour paper – drying teabags in this way leaves fabulous marks that can be used for different things. So far I’ve mostly done tiny Zentangle drawings on them, but as I looked at these round teabag stains, I could imagine them as logs cut through, revealing the tree rings. I drew these with brown coloured pencils and then cut them out. I used the natural creases in the teabag stains to create the cracked effect of the logs.

Here they are in close-up. I am amazed at how wood-like they have turned out! It was a real spur-of-the-moment decision to make these! I am probably going to use them to embellish the album covers.

My Skype interview with the lady from the forum went very well, and using the iPad Pro, I was able to show her the various art works that she was interested in for her feature, and to give her the guided tour of the studio. I am looking forward to seeing what she comes up with on the forum, and I also asked her about our request for a specific art board to be set up. We spoke about the therapeutic benefits of art, and I said that although our request had been rejected because “all the boards are disease-related,” because so many people derive benefit from art when dealing with chronic illness and cancer etc., this aspect of life with illness should be accommodated. She said she would speak to the powers that be, and hopefully we will get there in the end! In preparation for the Skype call, I laid out a lot of stuff around my studio to show her. This is a montage of the photos I took of it all.

That’s all the art for this week.

Today we went out for lunch and I was so impressed with the way that my chicken chorizo dish was served that I had to photograph it!

My dessert was equally beautifully presented, but I was so eager to tuck into it that I completely forgot to photograph it.

Last week I did some more cooking, and got very excited by Jamie Oliver’s pork meatballs that he presented on his “Jamie’s Super Foods” programme, so I jotted down the recipe and made it. Full of wholesome ingredients, it was absolutely delicious and definitely one to make again!

There are red onions and apples in the gravy, amongst other things, and there is added fibre and goodness in the meatballs in the form of cannelloni beans. A good, wholesome winter warmer!

For ages I have been meaning to photograph the teddies in the window, and today I finally got round to it. Every day my hubby puts them out so they can look up and down the street, and passers by often look up and smile at them! He can’t remember why he suddenly started doing this, but it’s become a daily ritual for him and it gives people a lot of pleasure!

Phoebe’s operation went really well and the vet ended up removing a total of five teeth. She must have been in quite a bit of discomfort with them as they were not in a good state. The poor little thing had been confined to the bathroom all th previous night with the special non-absorbent litter in the tray, in order to get a urine sample, but she didn’t oblige – she spent the night crying and trying to get out! When she got to the vet’s apparently she produced a lake, after all that time, so they were able to get their sample! She was a bit disoriented when she got home but soon found her feet, and for the past few days she’s been extra clingy and affectionate, and very, very glad to be home, and presumably in a lot less pain now those rotten teeth have gone. She has slept a lot more than usual – she must have been exhausted by her ordeal!

Finally, as I was going to bed last night, I saw that both kitties had cuddled up together on my hubby’s chair. Two tight little balls. They so rarely touch each other, let alone sleep together! Amazing what a bit of cold weather will do.

Have a really creative week, everyone, and happy WOYWW.

Related Posts Plugin for WordPress, Blogger...