Thursday, 29 December 2016

Mamhead Album–Embellishments and Text

Warning – long post, picture-rich.

Today I had a lovely long session in the studio and really cracked on with my pages. They are nearly all complete now, and I shall soon be able to think about binding them into a book.

Today I started adding text to a selection of pages, and adding some leaves and flowers and other embellishments. Here are the pages I have done.

Strong Tower Pages

This is still a work in progress. I am working on the LH page to go with the photo of the path to the obelisk, and I applied some Polyfilla through my own brick stencil that I drew in Inkscape and cut with Sheba (Cougar cutting machine) some time ago.

I sprinkled on three different colours of Infusions, using a soft brush.

Spritzed with water to activate the powder.

I then left this to dry and will work on it another day. I’m not sure how this is going to progress yet.

Friends Pages

I chose two quotes from the Book of Proverbs in the Bible for this page spread – lovely words about friendship, to accompany the two photos I took of my hubby and his friend walking ahead of us in the distance. The quote for the right-hand page I typed on the computer and printed it out, and cut the text into strips which I glued down onto the page.

I used the edge of a credit card to apply ink to the edges of the text strips, and then added a bit more ink to soften the white paper, using an Inkylicious Ink Duster.

The final touch was to distress the edges of the pages, using a home-made blending pad.
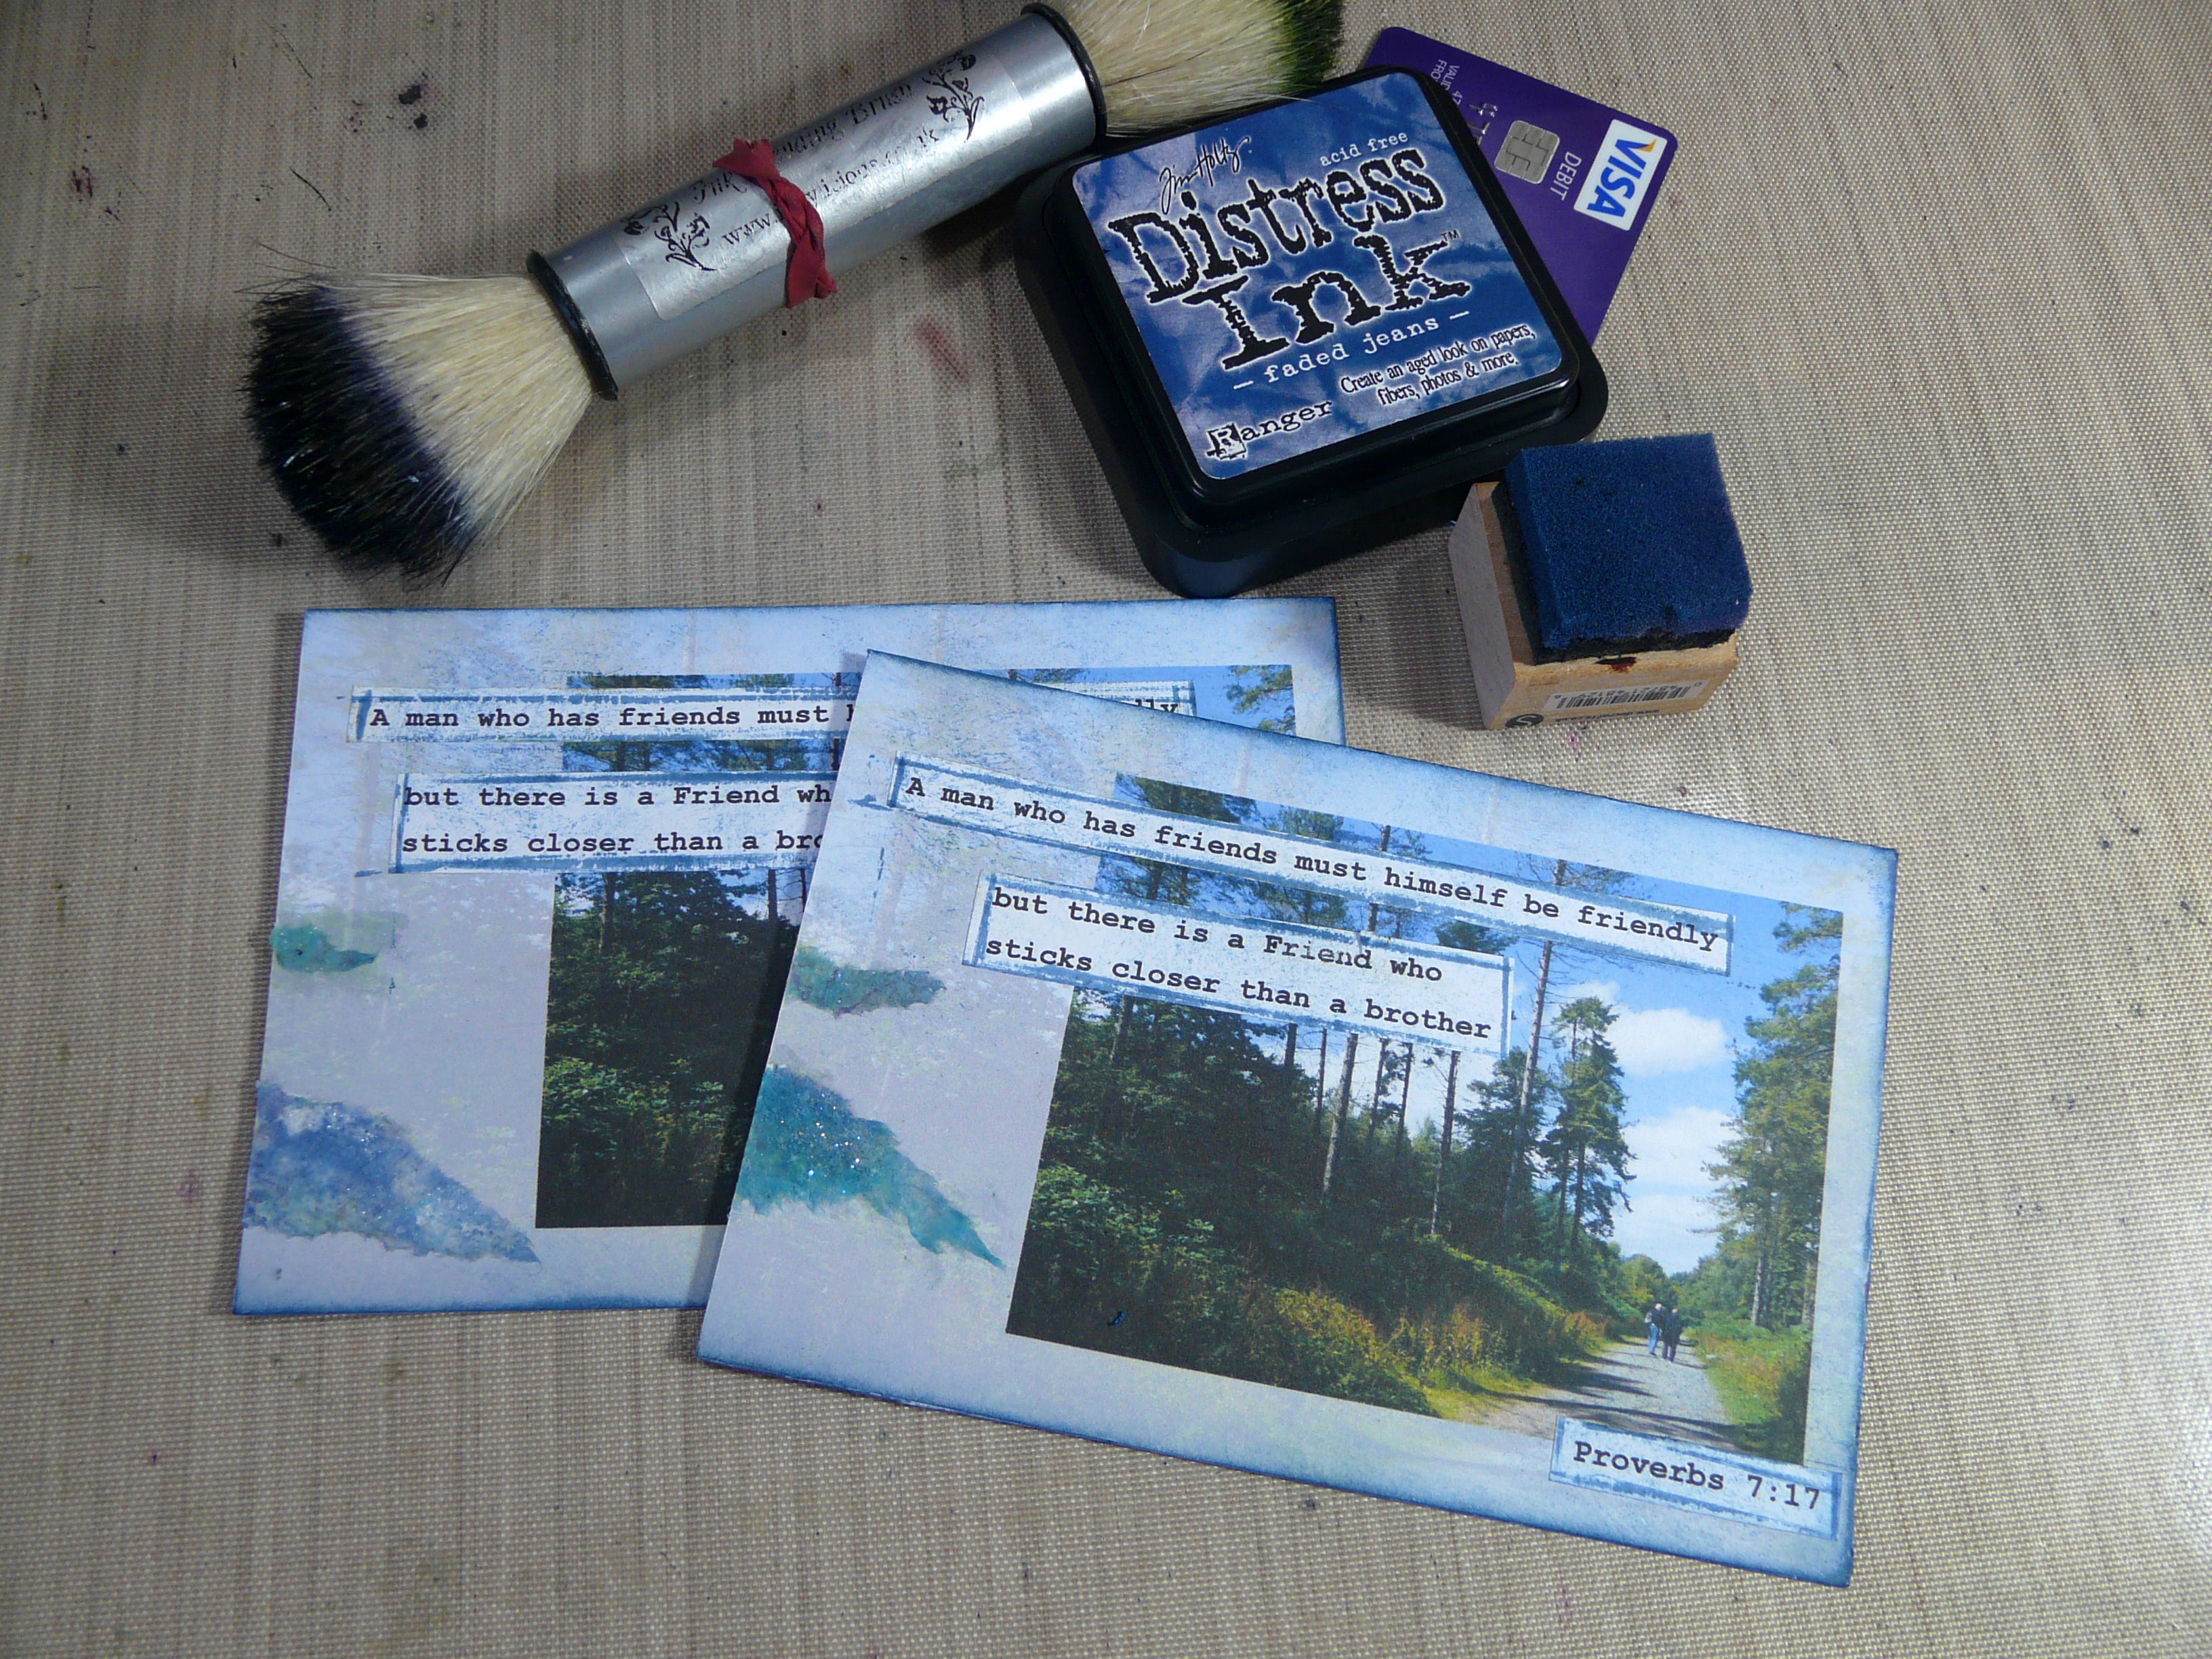
Here is the completed page.

On the left-hand page, I used my white marker pen to add text between the strips of inked kitchen paper.

Here’s a detail shot.

The page pairs. See how the kitchen paper extends onto the right-hand page.

Detail of the pages.

Walk in the Woods Pages

All I needed to do for this was to add some text to the background page that I’d created using black Infusions applied with a fan brush.

The left-hand page.

Queen Beech Pages

This is a quote I made up myself. I have always adored beech trees and consider the beech to be the queen of the wood.

I added text using a permanent black pen outlined with the white marker pen, and distressed the edges using a home-made blending tool.

Detail.

The left-hand page.

Where E’er You Walk Pages

This is one of my favourite songs, from Handel’s opera “Semele.” I discovered online that the words were written by Alexander Pope.

All through our walk in the woods, I had that song running through my head, so I knew I had to include it somewhere in the album. I created the two photographic pages using a faded-out background that is actually a mirror image of itself on the two pages. I added the text with a permanent black pen.

Detail of the text.

The left-hand page.

Seeing Beauty Pages

I paired the two photos I took of beautiful small objects – a butterfly and a fir cone. So often people walk by and never notice the small things, but I’ve always had an eye for them and love the perfection of small natural forms.

I added some of the leaves I’d made, using Pinflair glue, after distressing the edges of the pages, using a home-made blending tool. The text was done as before, with the black and white pens.

The paired pages.

The right-hand page.

Yellow Flowers Pages

The yellow flowers page, with the linear-fade photo, had been a problem because I wasn’t sure I really liked it and didn’t know quite how it would fit in. I paired it with my fern tracing page, and with the addition of some of the leaves and flowers, I suddenly liked it – a lot! Again, I attached the leaves and flowers with Pinflair glue.

Detail.

The left-hand page.

Sea Pages

I tore the edges of the sea view photo to reduce the size somewhat, and to soften the effect. I distressed the torn edges with Faded Jeans distress ink. I applied both photos using soft matte gel medium onto a background of some printed cloud paper that I’ve had hanging around for years. I added more of my glittery blue inked kitchen paper to these pages, again using gel medium, and added some text with the black pen. To make it a bit more sparkly I applied some glitter pens in three colours, and Stickles glitter glue in two colours. I had intended to distress the edges but forgot to do this until after I’d applied the stickles, so this will have to wait until the pages are dry.

The paired pages.


The left-hand page.

The right-hand page.

It’s a bit difficult to see the sparkliness of these pages. I have added some fine lines of silver glitter pen to the surface of the sea and elsewhere, adding some glitter pen in two shades of blue.

Finally, here are all the pages I worked on today, with the exception of the Strong Tower page. The curled up text page on the left is now under some heavy books which I hope will deal with that!

It’s really coming together now, and I am so looking forward to completing it and giving a copy to our lovely friends who introduced us to this stunningly beautiful woodland.

Wednesday, 28 December 2016

WOYWW 395

Very late in the day uploading a post for WOYWW but we’ve  been out all day meeting up with friends for lunch – a lot of driving as we met them half way between where we each live. Such a social whirl over the weeks around Christmas that I haven’t had much studio time, but here’s my drawing zone with the next page of my Mamhead album ready to assemble.

I’m using a bit more of the gorgeous blue inky kitchen paper for the background of the photo of the sea – when you get over to the far side of the woods, the view opens right up and you get a simply glorious view right over to Exmouth.

The second photo shows the pages arranged in their pairs. I’ve still got a couple of page pairs to complete, and then I can start adding embellishments and some text, before beginning to bind them together into a book.

Please scroll down to previous posts to see further progress I’ve made on this album.

What a shame I’m not going to finish this project before the New Year! That would have been neat and tidy, wouldn’t it.

Here’s a birthday card I made from a drawing done on the iPad Pro. I downloaded a basic honeycomb pattern and a simple bee outline drawing and coloured them.

We had a quiet Christmas, like the eye in the storm, what with all our meals out! Here’s part of my hubby’s Christmas present to me – a little gingerbread house from Lidl’s.

I’ve got so many Christmas goodies to eat, and we’ve had so many slap-up meals recently that I despaired of my diet – I’ve tried to slot in an extra day here and there (I’m on the 5:2) to compensate for all the Christmas eating, and I’m happy to report that on yesterday’s weekly weigh-day, I’d only gained 1 lb!! I’m trying to ration myself with choccies and other delicious goodies.

I shall be doing my annual review post(s) over the next couple of days.

Happy WOYWW everybody and a happy New Year.

Saturday, 24 December 2016

Mamhead Album–More Backgrounds

Working on the album this afternoon, listening to the carol service from King’s College Chapel in Cambridge – sublime.

During my last session I did some stencilling on my sparkly black card, using Polyfilla One Fill (joint compound), which were now dried.

A couple of backgrounds I made in the last session, too.

The one at the front was made by smearing three colours of distress ink onto my craft sheet, spritzing with water, and smooshing the card around in it. The ones at the back were done with Black Soot Infusions. I sprinkled some onto the craft sheet and sprayed on a little water, and I then painted this in straight bands using a wide fan brush. This background was a mistake because I should have painted the stripes vertically rather than horizontally, but it doesn’t matter because I shall still use them. I sprinkled on a bit of water to make them blotchy and more interesting.

I didn’t quite like the shade of green on the inked ones, so I added a layer of Picket Fence distress stain, smoothing out the unevenness with the fan brush dipped in water.

Here are three backgrounds – on the right, the green ones with the Picket Fence distress stain added; in the middle, the horizontal Infusions ones, and on the left, Infusions painted in vertical stripes as I originally intended.

Taking the stencilled pages, I added a further stencil using Finnabair heavy body transparent gloss gel medium for a bit of contrast.

I didn’t like the flat white of the Polyfilla ones, so I covered the whole page with vertical stripes of painted black Infusions, which toned them down and added a bit of texture. I like how the Black Soot Infusion has a greenish tinge to it.

Paired pages – two pictures of beech trees.

The following background pieces I was particularly pleased with – I saw this technique recently online and was dying to try it.

To get this gorgeous woodgrain effect, I pooled some Golden Sands Infusions onto my craft sheet with water, and painted vertical lines with a fan brush. The walnut pieces give a lovely speckled effect that you so often see in natural woodgrain. The black ones above were based on the same idea but didn’t give such a dramatic effect because the brown speckles of the walnut pieces in the black Infusion don’t show up very well.

I had four different photos of tree trunks that I took in the woods. They were too large for my little pages, so I tore them down to a smaller size, which also gave them a more interesting shape. I distressed the edges with Vintage Photo distress ink, using an Inkylicious Ink Duster.

Here they are, stuck down onto the wood grain pages, using soft matte gel medium.

Finally, here are three more paired pages. I’ve used the blotchy horizontally striped Infusions one to go with the map – this will be the title page of the book.

The vertically-striped Infusions one was made to go with the Zentangle tracing with the numerous tree trunks, and the stencilled one to go with the other Zentangle tracing with fewer trunks.

Once I have finished making the pages and backgrounds, I shall add leaves and text, and maybe some more cut-outs using Sheba, my Cougar cutting machine – I’d like to cut some branches to stick down over some of the backgrounds, and add some leaves. So – still quite a lot of work to do! I am so looking forward to getting on with the binding, and designing the cover. No hope that this will be finished by the end of the year, I don’t think – but I shall do my best.

Tuesday, 20 December 2016

WOYWW 394

At the end of last week, I did manage to do a bit more on my woodland album but since then, a lot’s been going on and no further progress has been made.

Here’s my desk as it is today (Tues. evening).

On the pull-out unit front left you can see the pages I’ve done with their respective pairs. On the desk on the left, on top of my Zentangle album, is a pile of backgrounds including inked kitchen paper, and more backgrounds next to them. There are some embossing folders and texture plates to the right of that, and on the light panel is one of the Zentangle pages waiting for its pair to be made, which will be made from the black card to the right. I’m working equally between this drawing zone, and my main work area over the other side of the room.

Here are the three pages I have been working on.


I am particularly pleased with the first one! For further information, please scroll down to my previous two posts.

Health Update

After seeing the GP and being told to get a physio appointment about the nerve pain in my leg, I got an appointment for yesterday. When I arrived, I told her that I’d subsequently seen another GP at the practice, about the arthritis in my hand, and could she deal with both problems? She said they were only allowed to deal with one at a time! (Strange system…) – but because physio appointments can be self-referrals anyway, I could choose what I wanted to be seen about. I told her the second GP had thought the nerve pain could well be ME-related, and as long as it was better and well-regulated with the gabapentin, she was very happy to deal with the hand problem that was clearly more in need of her services.

She took my medical history (which took a while!) and asked whether I had had any blood tests or a scan of my hand, and whether they had suggested it might be rheumatoid arthritis – I said I’d been told it was osteo, and I’d had no investigations. She said it was definitely inflamed, and that I was doing the right thing with the ibuprofen gel. When she manipulated my finger, it hurt a lot less than I expected, but I’d put on some gel before coming out, which she agreed explained that – it really does help. She said the important thing with arthritic joints was to keep them moving, so she’s given me a hand-clenching exercise to keep doing on and off through the day, but stay within pain limits, i.e. stop when it hurts – and it helps to do it in a bowl of warm water. She said it was very important not to twist the joint – this has caused me excruciating pain – and to prevent that, to tape my index and middle fingers together. This makes a big difference but does hamper me in certain activities – more typos than usual, for instance! Taping is a fiddle and takes about 5 mins to do, as I have to put a piece of lint or similar between the fingers to stop them sticking together and going manky. I have ordered a couple of finger splints from Ebay that will do exactly the same job, but are put on with velcro and are thick and soft enough to keep the fingers slightly apart when in use. They will go on where the tapes currently are, between the finger joints. They will be much easier to put on, and maybe look a bit better too! Hopefully they will come before Christmas.

The support garments lady wasn’t able to come until yesterday, but I’ve seen her now, and she’s taken my pants away with her, marked with safety pins where they are to be altered. She said none of the alterations would be a problem. They will post them back to me once they are done, and if everything is OK, I can contact her again and she will order me 2 more pairs to make up my compliment of three that I’m allowed in a single year on prescription. I’m hoping Miss Piggy (hernia) will behave herself in the meantime and not get any bigger!!

Have a lovely time over Christmas everybody, and happy WOYWW.

Saturday, 17 December 2016

Mamhead Album–Experiments with Gel Medium and Infusions Stencilling

I did a bit more on my mini-album this afternoon, with mixed degrees of success I wanted to try a technique I found a few months ago on Ruth’s blog “A Love to Create” – using Infusions with transparent gel medium through a stencil. I was not as successful as she was, and spent some time trying to get this right. The results were not the same, and that may have been due to my using the wrong sort of substrate – a coated shimmery card which was a bit shiny.

The page I was trying to create was the pair to this one with the tracing on parchment paper which I’d painted with copper Perfect Pearls.

Below is my second attempt. Originally I stencilled around the bottom left corner of the page, using the corner of the stencil. This is a stencil I designed and cut myself using Inkscape and Sheba, my Cougar cutting machine. When I had done the first stencilling I didn’t like it very much, and I had made a bit of a mess with it anyway – I put on too much gel medium and it spread underneath the stencil in places, and it also lifted up some of the surface coating of the card.

I used Finnabair heavy body transparent gloss gel medium and spread it through the stencil onto the card, having masked off the bits I didn’t want at the top left corner. The second time I did this, the results were better, as I didn’t spread it so thickly, and whipped off the stencil immediately – you have to be careful to clean the stencil immediately too, or the gel medium will dry on.

While the gel medium was still wet, I sprinkled on a generous amount of Golden Sands Infusions powder and shook off the excess. I left it to stand for a while to try and get it to soak up the moisture from the gel medium but it remained stubbornly on the surface, and I got impatient and dried it with my heat gun. I rubbed off the excess which would have shed everywhere otherwise.

I wasn’t happy with it – there were some stray Infusions crystals on the background, and the whole thing didn’t look quite right, so I spritzed it with water which activated the loose crystals on the gel medium and on the background. I dried it with my heat gun. The effect was softer and more muted – more subtle – and the background had a slightly mottled spattered look which gave it a bit of texture. The next photo shows “before and after.”

I still wasn’t quite happy with it, so I added a bit of copper gilding wax over the leaves – the Infusions had left quite a rough surface, a bit like Distress Embossing Powder.

Here are the two pages, together with their copper-painted parchment paper pages. I’m fairly pleased with the result. The pages are a bit wrinkly so probably need putting under heavy books overnight to flatten them. It’s hard to photograph this particular card because it’s quite shimmery and shiny – it’s actually darker than this, and lighter than in the above photo. The Treasure Copper doesn’t show up much on this photo, either!

Speaking of which, remember this background I made yesterday?

After being under heavy books for 24 hours it was nicely flattened, and I cut it in half to make two pages, and distressed the edges using Forest Moss distress ink.

Here they are with their paired pages – the desaturated tree trunk with the green leaves. You can see the shimmer on the green background on this photo, as well as on the frame on the other page, painted with the same Interference Green Perfect Pearls.

I didn’t manage to achieve quite as much as I’d have liked today, because of the time I spent trying to get the results I wanted from the Infusions.

Related Posts Plugin for WordPress, Blogger...