Sunday, 23 July 2017

Walk-In Pantry–Making Labels

The pantry project is well-nigh finished. The slab arrived on Friday and it fits perfectly, according to the template the carpenter made, and I have got everything moved into it now apart from the spices on the spice rack, which I will deal with after the electrician has been tomorrow to fit the light.

Yesterday I brought all the spare storage jars down from my studio where I’d been storing them since we moved here, and transferred various bits and pieces into them from miscellaneous jam jars, packets and containers, and had quite a job getting everything to fit nicely in the pantry. I am very, very glad I made all those extra shelves! There are quite a few duplicated items (some even quadrupled or more!) because it was so difficult to manage the old cupboard and there was a lot of stuff at the back that I’d forgotten I’d got. Eventually things will get used up and the pantry won’t be quite so full.

I also spent some time transferring everything from the tiny kitchen in the flat back into my lovely big kitchen. I’ve still got quite a bit of sorting to do, and things are ending up in new places now I’ve got the pantry, but I’ll get it all sorted in the next few days. I also need to clean through the flat kitchen now that the cupboards are all clear.

This evening I made labels for the jars. Yesterday I found some very attractive vintage labels on the Graphics Fairy website – free downloads, and you can print them out whatever size you want. I made three different sizes for the various sizes of jars I’ve got. Most of my jars are coffee jars with nice glass lids with a plastic seal – I’ve used this brand of coffee for years and have always saved the jars, which are designed for other use after the coffee is finished, which I think is a brilliant idea. In Serif PagePlus, I created several sheets of labels, adding the text in each frame, and then I printed them out on 100 gsm copy paper. I sprayed each sheet with a fixative spray to stop the inkjet printing from running.

I brought all the stuff down so I could work from the comfort of the recliner while watching TV with my hubby.

The first job was to cut the labels out roughly, and then fussy-cut them with fine scissors.


I stuck them onto the jars with PVA adhesive, using a brush I’d already ruined with gel medium some time ago. I wanted the labels to be the same height on each size of jar, and my hubby suggested cutting a strip of card for each size, to hold up against the jar and apply the label level with the top of the strip – a quick and easy way to avoid having to measure each one. I have saved these strips of card and will keep them with one or two spare labels (waiting for more coffee jars to become empty!) – having saved the PagePlus file, I can print out any more labels I need in the future, knowing that the design will be identical.

Here are some of the jars with their labels attached.

Once this was done, I painted a layer of regular matte gel medium over the front of each label to seal it, and carefully wiped the surrounding glass clean with a piece of kitchen paper. I want to be able to wash the jars without the labels coming off or getting damaged, and the gel medium should protect the labels from getting dirty in use. The last step was to remove all the slips of paper inserted in the jars to tell me what the contents were! So nice that they are no longer needed. For the first time, I have got everything properly labelled, and not only that, but they look stylish and attractive, too.

The jars are all now back in the pantry on the shelves and they look great!

I shall photograph the pantry again tomorrow to show it complete. It will be easier to do it once there’s a light in there. I still have the magazine racks and hooks to attach to the inside of the door, but won’t do this till the electrician has finished fitting the light.

It looks as if I shall get all this finished before the arrival of the kittens. Today was the first day I used the kitchen again properly, and it was such a joy! My hubby made me laugh because he was on auto-pilot and kept going into the wrong kitchen! I haven’t done this once – probably because my mind is so full of having my own kitchen back, and enjoying the pantry. Having a walk-in pantry, complete with a slab, and manageable shelving, has been a long-time dream of mine – I’ve never had one before and it’s absolutely brilliant.

More photos after tomorrow!

Thursday, 20 July 2017

Walk-In Pantry–Starting to Stock with Food

This morning I started to stack the shelves of my new pantry with food.

When I had my old cupboards it was impossible to see what I had in there without taking everything out, and this meant that I often bought stuff when I already had it. I’m also a bit of a special offers junkie and tend to stock up when things are reduced in price. I have therefore got far too much stuff, and I’m really glad I made all those extra shelves! Now I’ve got the opportunity to organise my supplies better, I should be able to reduce the amount I have to store, and in the meantime, I am going to try and use some of it up with some judicious recipe choices.

I can’t complete the job and get properly organised until the stone slab arrives, but I’ve managed to fill the top section (the baskets need sorting) and the small fitted shelves on the left.

Even with so much excess stuff, it’s going to be a lot easier to manage, and to know exactly what I’ve got, than it was before.

Wednesday, 19 July 2017

Walk-In Pantry–Shelf Factory Complete

Against my best expectations, I managed to finish making the extra shelves today. I thought it would take me at least another day. OK, I’m exhausted, but triumphant!

Here are all the shelves in the pantry. Of course, the stone slab isn’t there yet, so I have put stuff on the bottom shelf for now.

The bottom shelf. The four small shelves stacked up are the side shelves for the slab. I have balanced the two long slab shelves on the battens which will eventually support the slab, to show how they fit in.


On the bottom shelf on the left is my new bread bin, which fits quite nicely that way around. It is larger than we need for just the two of us, so I will be storing something else in there with the bread – not sure what just yet, but there’s room for perhaps a container for an opened bag of bread flour.

I am happy to have some deep shelf space for things like my hubby’s cereal packets.

At the back of this bottom shelf you can see a single narrow shelf. There won’t be any side shelves on this shelf. I have a plastic shelf unit on order from Ebay for storing smaller items, and this will sit alongside the bread bin.

The left-hand side of the pantry. You can see I’ve put one or two things on the original shelves. The bread bin is designed with a flat top for storing jars or canisters. I’ve put my two jars of bread seeds on there for now.


The right-hand side, showing the new shelves and the spice rack.

The electrician called round today to discuss the light for the pantry, as well as one or two other jobs that need doing. He is hoping to fit the light on either Monday or Tuesday, depending on how this week’s work schedule goes for him. We discussed different options for a sensor light, and he is going to fit one that detects movement, and comes on when you open the door.

Still no news about the slab, but I am hoping for a phone call before the weekend. I also have to fix the magazine racks for my paper rolls.

In the meantime, I am going to start bringing things in – I won’t put the spices on the spice rack until the electrician has done the work as they might get knocked off, but things further in shouldn’t come to any harm. All he’s going to do is run a cable up the right-hand side from the power point near the floor on the right, and run it into the middle of the pantry ceiling, where he will mount the light and sensor. He will put a fused spur for the light, beside the power point.

My hubby has mended the section of the wine rack that he removed in order to make it small enough to go under the bottom shelf. He has re-affixed it temporarily, bringing it back to its original size, so that the kittens can use it as a climbing frame. Once they have finished with it, he will remove the extension part and store it in the loft, and I can have the reduced sized one to go back in the pantry. This is what I originally intended.

I am very, very pleased with how it’s all looking, and I’m pleased to have been able to use up pretty well all of the left-over timber from the construction of the pantry. My hubby has used other bits of it for his garden kitty-proofing project, which is also nearly finished. Only a few days now before we’re fully back in the big kitchen, with a fully stocked walk-in pantry!

Tuesday, 18 July 2017

Walk-In Pantry–Shelf Factory!

I’ve started making some additional shelves from the wood left over by the carpenter after he had finished building my pantry. I decided to keep it simple and make free-standing ones that can be removed if necessary. They are of very basic construction – just a shelf with uprights at either end, glued and screwed, with a triangular metal bracket across the corners for reinforcement.

I say “I” am making them, but my hubby very kindly cut the wood up for me. I worked out how much I needed and what measurement, and marked all the pieces in order to get the maximum out of what was left. Unfortunately there wasn’t enough decent timber left (my hubby had raided the pile before I decided I wanted more shelves) so some of the bits are made of less attractive plywood, but once they are filled with stuff I don’t think it will matter.

After he’d cut them I applied a couple of coats of linseed oil and finished them with a bit of beeswax polish to seal them, as I’d done on the ones the carpenter fitted, and today I began assembling them, completing the ones for the top shelf.

The ones on the right are made from the Conti-Board offcuts from the shelf pieces which are going in the bedroom for my books. They stick out a bit further than the uprights but I’m not too worried about that. I just had to use them in the pantry because they were exactly the right length to fill that space!

They’re a bit rough and ready but they will serve their purpose. I should really cover all the end-grain to make it look nicer… Not sure if I can be bothered, though!!!

Here’s a view of the pantry showing the new shelves installed on the top shelf, and the wine rack now under the bottom shelf.

It was falling apart because the wood had shrunk and if there had been any glue on it in the first place, this had dried out. It had to be reduced in size to fit under the bottom shelf in the pantry, and we decided not to bother with the rest of it – it is a bit smaller but the kittens won’t know the difference, and they will enjoy using it as a climbing frame while they are tiny.

On the right-hand wall you can just see my big spice rack. I am so delighted to have this in the kitchen at last – until the pantry was built, there was nowhere for it and it was in the utility room.

The other day I bought these three wire magazine racks. They are going to be attached flush to the inside of the door and will be used to hold my rolls of kitchen foil, baking parchment, freezer bags etc. This was an idea I saw on Pinterest. It will free up one of my kitchen drawers which will be useful.

I shall also fit a hook for my apron to hang on, and somewhere to hang the clipboard with my shopping lists.

Still no news on the stone slab, but hopefully that will arrive this week. Also, I heard back from the electrician who was supposed to call round to see me to discuss the work today but he didn’t turn up – no doubt running late on his last job. I’ve decided to press on and if I have to move everything back in before he comes to fit the light, so be it – I don’t suppose he’ll make much mess. I really want everything to be back before the end of next week when the kittens arrive.

It’s really starting to come together now!

Saturday, 15 July 2017

Walk-In Pantry–Planning the Finishing Touches

Looking at what has been done, and thinking about just how much stuff I’ve got, it occurred to me that there might not be enough shelves in my new walk-in pantry. There are a lot of off-cuts left by the carpenter, so I have worked out a way to utilise these by making some stacking free-standing shelves. I have marked out all the timbers and my hubby says he will cut them out for me. Unfortunately there isn’t quite enough of the pine left so some of it will have to be made from the remaining plywood (of which there is plenty) but this doesn’t look quite so nice.

Once he’s cut out the pieces, I will treat them as I have treated the rest – with linseed oil and a final buff up with wax polish. It shouldn’t take long to assemble them as they are very basic – just a shelf with a couple of uprights which will be glued and screwed in place. They will be removable if I find I don’t need them, but having 3 large shelves at the back which are quite high, I think there will be a fair amount of wasted space. The new moveable shelves will stand around the 3 sides of the space, leaving plenty of room in the middle for larger, taller things. I shall store things I don’t use very often at the back – spare supplies etc. – and it will be quite easy to access them because the shelves are at most only 5 3/4 inches deep, and the ones at the sides will only be 4 inches deep.

We went to B&Q the other day and I bought some long lengths of Conti board to make more shelves in the bedroom for my books – the existing shelves are fairly widely spaced and there’s room for two more, which I need as I am starting to lay books horizontally on top of the ones on the shelves! We got B&Q to cut them to length for us, and the off-cuts are exactly the right length to fit in one side of the pantry, and will make a nice pair of shelves once they’ve got their uprights attached.

I’ve also got some wire magazine racks to attach to the inside of the door, for storing rolls of kitchen foil, baking parchment, etc. This was an idea I found on Pinterest. I also need to fix a hook inside the door, for hanging my apron, and another one to hang the clipboard that has my shopping lists on it.

The wine rack is in a sorry state. It’s a wooden one, made of square section pieces connected with fluted dowels and all the joint have dried out so it’s falling to bits. My hubby is going to mend it so that it’s ready for the kittens when they arrive – two generations of kittens have already used it as a climbing frame and they love it! After our new little ones have decided they are too grown up for it, it will go on the floor under the bottom shelf of the pantry and be used for what it was originally intended for!

I am hoping that the stone slab will be ready for collection at the beginning of next week.

I have not heard back from the electrician after leaving a message so I think he must be away on holiday. I expect he will be able to fit the light once the pantry has got stuff in it – I really don’t want to wait too much longer to get things moved in, and to move back into my kitchen, because this needs to be done before the arrival of the kittens at the end of the month. Doing the job would be a nightmare with them under my feet!

Monday, 10 July 2017

Walk-In Pantry–Day 6

Yesterday morning, Gary came back to finish off the painting while we were out. When we got back he’d let himself out, and left a note to the effect that all the paint he’d put on the left-hand side had had to come off – this was the melamine surface of the panel on the side of the double oven unit. This stuff is extremely hard and shiny, and even if you sand it to give it a bit of key, it is virtually impossible to paint. I wasn’t bothered about this because it won’t really show once there is stuff on the shelves, but I was sorry for Gary, having worked so hard, all to no avail! The rest of the painting was fine, though, and he’d finished off the picture rail, and everything looks hunky dory!

Now it was my turn. In the afternoon I painted on the first coat of linseed oil, slightly diluted with white spirit to help it penetrate the raw wood more easily. Gorgeous smell!

Today I applied another coat. In the meantime, I’d discovered a good way of doing this online – to rub it in using wire wool, which helps the oil settle into the grain and removes any slight roughness from the surface. They recommend three coats, allowing the oil to dry in between, and finally, after the third coat is dry, to rub it over with a light application of wax polish. Tomorrow I shall do the third coat, and then leave it for a day or two to make sure it’s as dry as possible. Any oily residue can be wiped off with a soft cloth. It’s already looking a nice pale honey colour.

I have also been applying the same treatment to the new quadrant along the skirting board.

For the rest of the time today I cleaned the kitchen, which had got very dusty with all this work going on. It’s now spick and span and ready for everything to go back, once the slab is in place.

I also phoned the electrician and he is going to get back to me with a time when he can come and have a look at the job, and the other couple of things I’d like him to do as well.

Another little job I did today was to clean up Mum’s old kitchen scales, which are a nicer shape than my more modern (but still old-fashioned) ones. Originally I had thought of repainting them and smartening them up, but having seen a programme on TV where they restore old junk, I rather liked the idea of preserving the patina of age and celebrating the vintage nature of these scales. So I followed their advice and gave the scales a really good rub down with fine wire wool, and then dusted it off with a damp piece of kitchen paper. Once I was sure the whole thing was dry and clean, I buffed it up with some wax polish. It now has a dull gleam, and the green paint looks a lot better, but all the scuffs and worn out bits are still there, celebrating its age and vintage quality!


I forgot to photograph them before I cleaned them up.

I shall apply the same treatment to the weights. Once the pantry is completed and everything has gone in, there should be fewer things out on the worktops, and I think these scales will look very nice displayed there.

I’m counting the days now, till I can move back into my kitchen.

Saturday, 8 July 2017

Walk-In Pantry–Day 5

Today, Gary, our neighbour, came in to paint the inside of the new pantry. He masked off most of the shelves and with the ones on the left, was able to unscrew the small units that Phil had made, and remove them so that he could paint the wall in one go, and then replace them, thus saving himself considerable work and time, and a very neat job as well. He used a matt white emulsion for this.

Painting the wall on the left, he used eggshell because that wall is the side of the cooker unit. This panel is pretty shiny, and even with sanding, it didn’t cover that well so he will need to add one, if not two, more coats – this paint also takes longer to dry, being oil-based.

Painting the ceiling, also in white emulsion.

Having everything except the shelves in white is a good decision. I wanted the space to be as light and bright as possible. Even though bits need another coat, it is great to see a uniform white finish on the walls instead of the patchy plaster.

Gary’s other job today was to fill the holes around the replaced piece of picture rail, and to paint the wall to match the rest. This picture rail was never a good fit, and was also made from a different moulding, so anything that Phil and Gary did was going to be an improvement! Phil had trimmed off the bottom of the moulding so that at least it’s the same size as the other, even if not exactly the same profile. It’s certainly an improvement on what was there before, and it will look better once the paint is touched up..

He is coming back tomorrow morning just to add more coats where necessary, and to clean up.

After this, I shall treat the wood with linseed oil – today Gary gave me some hints about that – and contact the electrician on Monday regarding the light, and await the arrival of the new slab. Nearly there now!

Friday, 7 July 2017

Walk-In Pantry–Day 4

Phil, the carpenter, finished constructing my walk-in pantry by lunch time today. It was just a question of fitting the final small shelves and one or two other bits and pieces. The major work is now all done.

I love how the door opens to about 170 degrees at its fullest extent – this makes access much easier, and also allows more light in.

Phil also re-attached the piece of picture rail that had been removed when the old cupboard was demolished. I asked the damp proofing man who did the work to retain this in case it was needed. It never was a very good fit, and still isn’t, but once it’s filled and touched up, it shouldn’t be too noticeable.

I do love the laminate floor panel on the right of the door! When the door is closed it looks like a stone wall, and it’s a lovely feature. I think it looks a lot more interesting than more of the same stuff as the door. The whole thing looks great, and fully integrated into my kitchen. I shall soon find it hard to remember what the old cupboard looked like!


In some ways I feel quite nostalgic about it, because it was an original feature of the house that I was quite keen to retain, but it was a real pain to use, so on balance I’m glad it’s gone. My heart sank and I was appalled when we first heard about the dry rot, but in the end it has proved a blessing in disguise because it has given me the pantry that I’ve always wanted, and the damage caused by the rot was considerably less severe than we’d expected.

All the small shelves on the left of the pantry are now completed. You can see that the ones at the top are not too high – the right height for standard tins. Below that, he has constructed some taller ones to accommodate larger items. We agreed that no small shelves were necessary below the level of the bottom large shelf.

You can also see the frame of the shelves at the back, sticking out further than the shelves at the front. This is because of the small amount of wall projecting beyond the side of the double oven unit. In order to make shelves at the back that were of useable depth, this had to be done. Also, Phil has attached some edging strips along the fronts of the larger plywood shelves, to cover the somewhat unsightly end-grain. This has improved the appearance greatly. He has filled all the nail and screw holes with wood filler, for appearance and practicality – nice to be able to wipe the shelves down and not have holes to trap dirt.

Finally, a picture of the bottom shelf, and the supports ready or the stone slab.

After lunch, my hubby and I drove to Newton Abbot to visit the stone masons on one of the industrial estates. They make natural granite and composition stone worktops for kitchens, and have offcuts in every conceivable colour and finish. We have chosen a very pale whitish marble effect slab, because I want to keep the general feel of the pantry as light as possible. Phil had cut me a template from thin ply and marked it “Top” and “Front” and we took this in. They will cut the stone for us and we should get a phone call letting us know it’s ready in the next week to ten days. All we have to do then is just slot it in. Phil said he’d come back and put a bit of silicone sealant around it if I wanted, and I think this would be a good idea, to prevent crumbs being caught around the edges.

Tomorrow morning, Gary is coming around to paint the walls. They will be white, in order to keep the interior of the pantry as light as possible. I have decided not to paint the shelves, but to seal them with linseed oil, which I think will give a pleasant, natural appearance.

Phil suggested getting a light with a sensor. This means the light comes on when you open the door, because it senses the movement. I think this would be a very good idea, not just for convenience (one’s hands are often full of stuff, going in and out) but also for energy-saving – all too easy to forget to turn off the light! I shall phone the electrician early next week, and also ask him to do one or two other small jobs that need attending to as well, such as fitting a two-way switch in the airing cupboard – at present the light can only be operated from the flat, which isn’t very convenient. I also want him to wire in the control for my clothes airer. More details of this in due course – I don’t think I’ve blogged about that one yet!

I keep going in the kitchen and admiring my new pantry, and can’t quite believe it is pretty much finished at last, and once the painting is done, I can begin moving stuff in. I can use it without the slab for the moment. I have also started cleaning up the kitchen after all the work. Phil was very good and hoovered up after himself but there is still quite a bit of dust on the horizontal surfaces in the room, and sawdust has been trodden through into the hall, which will need cleaning up, too. I cleaned the right-hand side of the kitchen from the door to the new pantry this afternoon, and brought all my recipe books back in and installed them in the wall unit again, and it’s already looking much more like home! Over the next few days I’ll work my way around the rest of the kitchen and start bringing things back in. I think I should be fully back in by the middle of the week, all being well.

Thursday, 6 July 2017

Walk-In Pantry–Day 3

Phil was originally going to come on Friday, but to save packing all his tools up and moving them to the other job, and then back again, we agreed he should come today instead. He was hoping to have finished the job today, but unfortunately things took a bit longer, mostly because none of the angles inside the space are square! There was a lot of fiddling around to get things to fit, but he’s done a brilliant job, and he hopes to get it all finished by the end of tomorrow morning.

An update on the floor – it turns out that Howden’s haven’t after all changed the design of the laminate panels – they have just expanded a bit over time, making it hard to match them up with the new ones. Sorry Howden’s – we take it all back!!

Here is what it looked like by lunch time. He had fitted the supports for the large shelves at the back, and installed the top one. There’s also an end panel onto which the shelves at the sides will be attached.

The middle one will be a granite slab to keep things nice and cool. We are hoping to get that cut to Phil’s template early next week.

The top shelf will be for things like cereal packets, and baskets of miscellaneous stuff if there isn’t room on the other shelves. The bottom shelf will be used to store my various machines, so that I can clear the worktops a bit. They will be easy to get in and out.

Underneath the bottom shelf we are planning to put the wine rack. At the moment this is a bit too high to go underneath, but if we remove the top layer, it will fit OK. We don’t want to do this straight away, though, because it is going to be used as a kitten climbing frame for a while! Kittens adore climbing on the wine rack.

The state of play at the end of the day. On the left, Phil has started to fit the small shelves. There is a step in the side where the original wall sticks out a bit beyond the side of the oven unit, and you can see this below the shelves he’s already fitted. This has caused more problems than if the thing had been flat from front to back. The large shelves and the side shelves which are level with them, are cut from a single sheet of ply, with the angle cut out to accommodate this bit of wall sticking out.

On this photo, you can also see the end panel he has put in to support the small shelves, butting up against the frame with the door hinges on it. There are more small shelves to go underneath as well. There will also be shelves beyond these ones, attached to the projecting wall, and they will extend out into the space a bit further. Making them flush with the front ones would not have allowed them to be deep enough to put anything on them.

Behind the side panel, he has fitted a lovely lot of small shelves, of varying depths to accommodate bottles of oil, spare spices, etc. etc.


It was very hard to photograph these because I had to get right inside the space and couldn’t hold the camera far enough away to get them all in! To the left of these shelves, you can see my spice rack. Phil moved this a bit further into the space to make enough room for shelves of reasonable depth behind the side panel.

Here is the spice rack, and the end piece which supports the shelves behind the side panel. If you look closely, you can see the screw heads where the shelves are.

This is a general view of the pantry at the end of the day, with the door open:

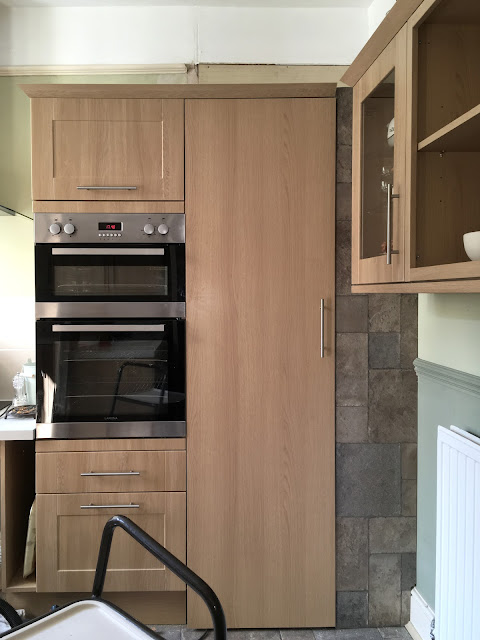
and with the door closed. I am thrilled with how the side panel looks, made of the spare laminate floor panels. It really adds character and contrast, and it also enables us to have further shelves behind it – no wasted space here!

There is a small gap between the side panel and the wall unit on the right, and there is just enough clearance when opening the door of the pantry, not to knock into this. The door had to be narrow or it would not have opened. I am delighted that the hinges enable it to open beyond 90 degrees, which makes access to this narrow space a lot easier.

A detail shot of the cornice.

We both agreed that the door of the pantry needed the same cornice over it. Phil wasn’t able to source any new pieces of this, but there was just enough from the right-hand side of the oven unit to go to the right-hand edge of the door, and he has attached this to the top frame of the pantry – you can hardly see the join! He has cut the side panel high enough not to leave a gap. It looks fine.

Tomorrow he will complete the fitting of the small shelves, and do any necessary finishing off.

Gary, our neighbour, will be coming round on Saturday morning to paint inside the pantry with white emulsion. I have decided not to have the shelves painted because I like the wood. Gary suggested sealing them with linseed oil and I think this is a very good idea – it will also smell fabulous while it’s being done!

We have also got to have a light installed.

After we’ve got the granite slab fitted, I can start moving all the food back in. In the meantime I shall get everything cleaned up, because there’s a lot of dust about, and I can start moving my recipe books back onto the wall unit on the right of the kitchen, and other stuff that I won’t be needing for a day or two. Not long to go now! I am going to have such fun getting it all how I want.

Wednesday, 5 July 2017

Walk-In Pantry–Day 2

The day began with Phil finishing the fitting of the new quadrant along the side of the floor to make everything neat, and then he began on the frame for the door, and for the top of the pantry.

The door is made from a full-length end panel which Phil was able to find still available at Howdens – it’s a really good match. He also fitted a matching handle.

The door has soft-closing hinges and it opens wider than 90 degrees, which is exactly what I wanted, making access easier.

He moved my spice rack from the utility room, which was the only place available for it, and not very conveniently situated, to the right-hand side of the pantry. A much better location for it!

Phil is very conscientious about tidying up and I was highly amused to catch him in the act of hoovering the garden!! Had to get a photo of that – I’d never seen anyone doing that before! He had made a lot of sawdust out there – he had his bench set up out there to prevent too much dust in the house.

We had some discussion today about the shelves – how many, how to fix them, whether or not they should be height-adjustable. In the end we decided on the simple option of having them fixed – it will be easier to do, and will look better. I am going to get out some sample items tomorrow so that he can judge how far apart they should be. There are going to be a good number of narrow shelves along the left-hand side, and fewer, deeper ones at the back. The central one will be a granite slab. Phil is going to make a template for this, and he has spoken to the supplier and we can visit them and choose what we want.

I have also had a word with our neighbour Gary, who is going to call in tomorrow afternoon and arrange a time to come and do some painting, hopefully over the weekend.

Phil has patched up a few bits – he boxed in the space above the new pantry where the top cupboard went right up to the picture rail; unfortunately there is now some dead space up there but it would be very inaccessible so I don’t mind – its loss is more than compensated for by the additional space below – much more than in the old cupboard. There is a missing section of picture rail that needs replacing. He said he would also try and source some more of the Howden’s cornice so that it continues right across the top of the double oven unit and over the new pantry, but it may not be possible to obtain this as the kitchen is no longer in their catalogue.

Tomorrow he will be working on the side panel to the right of the door, and fit the shelves. He is going to add some small shelves inside the panel – no point wasting that space, is there! The finished space will be quite narrow but manageable.

So far I am very thrilled with it. It’s lovely to see so much progress made, and to visualise how it will be when completed. Hopefully we’ll be able to get the granite slab next week, and in the meantime I shall be able to start moving some things back into the kitchen. I am anxious to get everything sorted before we get the kittens at the end of the month.

So much to look forward to!

Related Posts Plugin for WordPress, Blogger...