I’ve now added Infusions to the stencil sample pages I made the other day.
I used a maximum of three colours on each one, keeping to a similar palette.
For the first set of three samples, I began with Emerald Isle and Black Knight from Set 1, and Slime from Set 2. I’m afraid this photo is rather out of focus for some reason.
The first one I did was the one at bottom right in the photo below. This was done with the PaperArtsy Stencil PS024 and I made the card very wet before applying the three colours, adding more water afterwards. The effect is soft and muted.
The second one was the one at bottom left. I used my own Small Leaf stencil that I cut myself. To begin with I used it to mop up the colour from the craft sheet. After this I added more of each colour with plenty of water, with quite a bit of the Black Knight along the top edge, and I allowed this to drip downwards. The effect is of a leafy branch across a forest background. To emphasise the leaves a bit more, I added a small amount of gilding wax. (I think if I do this dripping technique in future, I shall heat-set it first, so that the drips are narrower and don’t bleed outwards so much.)
The third one is at the top in the photo. This was using another stencil from the PaperArtsy set PS024 as before. I used only the Emerald Isle and Slime for this one and didn’t make the card as wet. I used a wet brush to drag the colour between the leaves to define them.
The second set I did had a reddish colour scheme and for these I used my own Brick stencil. The colours I used were Golden Sands from Set 1, and Terracotta and Rusty Car from set 2.
Here are the three sheets. The first one I did is at top left. I spritzed the card until it was very wet and then applied the Infusions, spritzing with more water. The second one is at bottom left. I used this to mop up the colour from the craft sheet and added more of the Rusty Car only. This one was also pretty wet. The final one, on the right, was less wet, and for this one I used Rusty Car alone.
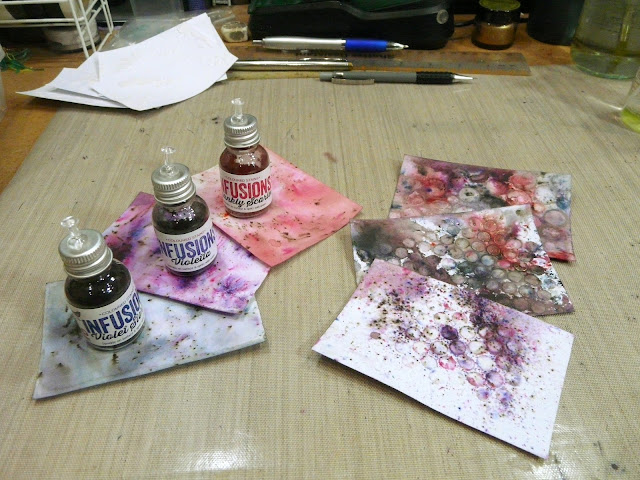
The next set has a purple colour scheme, and for this I used Violet Storms from set 1, and Violetta and Simply Scarlet from set 2.
The first one I did, at top left in the photo below, was done with my own Decreasing Circles stencil that I cut myself, and again it was very wet, and I spritzed it further after adding the colour. The other two were both done with my own Small Circles stencil. The one at bottom left was used to mop up the colour from the craft sheet, and I didn’t add too much more water after applying the Infusions. I added some more water at top left and let it run down diagonally through the circles. To emphasise the circles a bit more, I added some gilding wax at top right and bottom left. For the final one I used much less water, and used Violetta only. There was a little more colour added by mopping up a bit at the top edge of the card.
Here is a detail shot of the one with the gilding wax to show the effect.
The penultimate set had a dark greenish-blue colour scheme, and I used Black Knight from set 1, and Sleight Blue and In the Navy from set 2.
The first two both used my own Hexagons stencil. The first one, top left, was medium-wet. The second one, bottom left, was used to mop up the colour from the craft sheet, and after adding the colour, I added more water and more Black Knight. The final one in this set, on the right, was done with the Tim Holtz Splatters stencil, THS009. It was medium wet, and I used Sleight Blue only. I think this is my favourite of all the samples.
The final set consists of two sheets only, and uses a yellow colour scheme. I used Golden Sands and Orange County, both from set 1.
The first one, at the bottom in the next photo, was also done using my own Small Leaf stencil, and was very wet, and I swirled the colour around. Afterwards I blotted off the leaves with kitchen paper. The second one, at the top in the photo, was done with Andy Skinner’s Sunburst stencil, and was not so wet, and I heat-set it before adding more colour and water. I blotted this off with kitchen paper.
Finally, here is the full set of samples.
There are plenty more techniques to try, using these very versatile colours, so watch this space!


Wow, these are amazing! I'm very impressed with your results, Shoshi! These will make wonderful backgrounds or even focal points, if you crop them and use them as toppers.
ReplyDelete