Wednesday 29 March 2017

Infusions Mini-Album–Miscellaneous Techniques

Over the past couple of days I have discovered some further techniques you can do with Infusions.

Kissing

This name always amuses me! It refers to applying a medium on one surface and then pressing another surface onto it while still wet, and then pulling it off so you get a mirror image mono print. Not only is it fun, but it saves on paint etc. too! Here it is with Infusions.

71 Kissing

The colours I used were Royal Blood and Golden Sands from set 1, and Olive Tree from set 2, sprinkled onto the card and then spritzed with water.

72 Kissing

Dripping

Self-explanatory.

73 Dripping

74 Dripping

I used Are You Cerise from set 1 as a background, sprinkling the Infusions onto the card and then spritzing it with water fairly liberally to get full coverage, and then heat set it. Then I applied plenty of water along the top edge with a brush, and sprinkled on Black Knight, also from set 1, and held the card vertically so that it ran down. To encourage it to drip where I wanted, I touched the wet edge with the brush. The drips will otherwise tend to follow the course of previous ones and you need to break the surface tension of the water in different places to make new drips flow. Working with the brush, you get more control. I kept applying more water along the top edge with the brush, and tapped the card’s bottom edge on my work surface, which encouraged it to continue flowing.

Infusions with Glimmer Mist

I haven’t used my glimmer mists for ages. When I first started, I made up some home-made ones with distress ink re-inkers and Perfect Pearls in little spray bottles, and was pleased to find that they still worked and hadn’t dried up.

75 Infusions with Glimmer Mist

76 Infusions with Glimmer Mist

I sprinkled the Infusions onto dry paper as normal – in this case Lemoncello from set 1, and the instead of spritzing with plain water to activate them, I used my spray bottle with a mixture of water, Chipped Sapphire re-inker and Perfect Pearls (the “Perfect Pearl” colour which is a silvery-pearl). I sprayed it on fairly liberally and the blue has mixed with the yellow of the Infusions to create a soft green colour.

Here’s a detail shot in an attempt to show the shimmeriness of this effect.

77 Infusions with Glimmer Mist Detail

Painting as watercolours

78 Painting as Watercolour

I tapped out a little of the Infusions on my non-stick craft sheet and made a puddle with water, using a fine brush, and then painted with this onto a stamped image.

79 Painting as Watercolour

I used a couple of stamps from the StampAttack “Fanciful Fans” set using black archival ink. The Infusions I used were Violet Storms, Lemoncello and Emerald Isle from set 1, and Rusty Car and Violetta from set 2. When I had finished, the images looked rather stark against the white card, so I used an Inkylicious Ink Duster to apply Fossilised Amber distress ink around the edges of the card, blending the ink towards the middle.

Infusions on wet paper

Applying the Infusions to wet paper, rather than to dry and then spritzing with water, gives a different effect.

80 Wet Paper

For this sample, I made the paper good and wet and sprinkled on Royal Blood from set 1 and Green Man from set 2. I heat set this and then decided it needed a bit more colour, so I added a small amount of A Bit Jaded from set 1. This method is a lot more difficult to control. You get a wonderful burst of colour but on the wet card this soon disperses and you have to dry it fairly rapidly to keep the radiating pattern. I have been using my old heat gun lately, as it dries things a lot faster than the Tim Holtz Heat Tool, but in this case it would probably be better to use the latter because the blast of hot air is much more gentle and doesn’t move the wet colour around so much.

81 Wet Paper

Brayered Gesso

For my final sample today, I combined Infusions with gesso applied with a brayer.

82 Brayered Gesso

I used Rusty Car and Slime from set 2, sprinkling the Infusions onto dry card. I put some gesso onto my non-stick craft sheet with a palette knife and spread it out a bit, and then ran my brayer through it so that the roller was covered, and then I rolled it over the Infusions on the card. I spritzed it with water and watched the Infusions begin to activate.

83 Brayered Gesso

The effect is quite subtle and chalky, with a slight grain to it, indicating the direction of the brayer.

I have a couple more miscellaneous techniques to cover but at this point I ran out of energy and had to stop! I will do these at the beginning of the next session, in which I shall be concentrating on the effect you can get combining Infusions with acrylic paint.

WOYWW 408

My desk on Tuesday night.

WOYWW 408 29-3-17

I have been continuing to work on my Infusions samples and the desk shows the end of the evening’s session. You can see the blank sheets on top of the toilet paper roll on the left, my bubble wrap stamp under the tape rack, and then two piles of completed samples. My Versamark pad and a piece of Cut-n-Dry foam, a failed sample, and at the front, a sample created by stamping with Versamark and then applying Infusions which are then lightly spritzed with water. There’s a small sheet of notes of ideas to try, and the usual detritus of a busy desk!

Here are the latest samples I’ve completed.

68 Recent Samples

Ones of particular interest are the stamped ones at the front, for example:

55 Stamped Water Droplets

and the ones using texture – firstly, textured gesso:

66 Gesso Sample with Gilding Wax

and then textured gel mediums, for instance glass bead gel medium.

48 Glass Bead Gel Medium Dried

I also tried the woodgrain technique, painting on the Infusions that have first been mixed with a little water.

65 Crackle Paste Completed

This was quite an interesting one as it incorporates some Golden crackle paste which I had fun experimenting with.

I also created some interesting textures by pressing into Polyfilla and applying other materials:

35 Close-Up of Royal Blood on Textured Polyfilla

39 Mulberry Bark with Orange County - Detail

47 Fruit Net Texture Trimmed

You can read about all these by scrolling back through previous posts.

Dry Rot in the Kitchen

Last Thursday the damp expert came round (I mean, the expert in damp – he didn’t arrive in a rainstorm!) and had a look at our problem in the kitchen cupboard. He confirmed at first glance that we have dry rot. He explained what will need to be done, but cannot tell us the extent until he takes the floor up in the corner of the kitchen. Best case scenario is that it is confined to that corner only, but he will have to cut back the timbers well into the healthy part to make sure it won’t spread again, but it means the fitted double oven has got to be moved. Worst case scenario is that it has spread under the sitting room. I am not allowing myself to worry too much till we know what we are dealing with. He sent us his estimate which was more or less what he told us verbally, and today he rang to say he hopes to start the work a week on Thursday (6th April).

We are fortunate in that we have Mum’s kitchen to decamp into while this is going on, and her sitting room if he has to work in ours. Over the past few days I’ve gradually been clearing the old cupboard in the kitchen and moving stuff into Mum’s kitchen, so I won’t have to do it all at once and in a rush.

I’ve been doing some research into walk-in pantries and am quite excited now about what we might end up with! Hopefully the kitchen fitter will be able to start work as soon as the damp expert has finished.

Health Update

On Monday, Kermit, my stoma, celebrated his second birthday! I cannot believe that it is two whole years since I went into hospital for my bowel cancer surgery which left me minus my entire colon and with a permanent ileostomy. Unfortunately, having been so poorly recently and in hospital, I’ve had a lot of catching up to do since I’ve turned the corner with my recovery, and haven’t had time to do any baking, so this year he didn’t have a birthday cake or a party – last year the Allerton Three got together and pigged out on cake – we all met on Allerton Ward having our bowel cancer surgeries and have remained firm friends ever since.

10 Kermit's Birthday Cake

Apart from the usual problems in the early days, and recent problems caused by the hernia (recently repaired, and requiring further surgery), I have had no problems with Kermit and am very happy to have him. Life is much better with an ileostomy than with miserable ulcerative colitis, I can tell you, and having him has saved my life into the bargain!

Phoebe

Last week I reported that the vet had said she thought Phoebe had bowel cancer. Over the following days she picked up and started eating again, and has seemed quite well again, so after the weekend my hubby took her back to the vet to see if she’d been wrong and it was a blockage that had got shifted by all the palpations she did, but she confirmed that there is still a mass there. She said that as long as she seems well and is managing to eat, we don’t need to worry, but obviously we are to keep an eye on her. If she doesn’t eat for a day or two, she does tend to lose weight rapidly. The vet weighed her again and she had regained some weight which is good news.

Beatrice is getting quite wobbly on her legs (at 16 1/2) and so we’ve put a stool under her radiator hammock to give her a bit of a leg-up! Her balance isn’t as good as it was and she’s got a lot less spring in her legs. I think she needs a granny frame. The trouble is she thinks she can still do all the things she did when she was young! Just like humans do…

Two sunbathing kitties.

Sunbathing in the Flat 2 26-3-17

Phoebe at the front, Beatrice at the back. They love the flat sitting room that gets all the sun.

Finally – we were in a rush to get to church on Sunday and when we arrived we could hear them singing, so we crept in, only to find they were singing the final hymn! Yes, you’ve guessed it… we BOTH completely forgot to change the clocks!! Duh. We arrived just in time for coffee!

Tuesday 28 March 2017

Infusions Mini-Album–Finishing Recent Samples, and More Stamping

After the last session there were a couple of samples that needed further work. I had left the samples under heavy books overnight and for most of today and they are more or less flat now, although the one with the gesso texture still has a tendency to curl.

Looking at the weathered woodgrain sample with the crackle paste on it, I was delighted to find that where the paste was thicker, cracks had indeed appeared against my expectations. As it says on the crackle paste pot, this finish is fairly fragile so I handled it carefully. I applied the same infusions onto the sample again – Sunset Beach, Golden Sands and Black Knight – as before, creating a puddle on my non-stick craft sheet and using a fan brush to create horizontal brush-strokes, going over the top of the crackle paste. The Infusions settled into the cracks, showing them up nicely.

64 Crackle Paste Completed

Once it was dry, I painted on a thin coating of soft matte gel medium to stabilise and strengthen the surface. Golden recommends that some sort of top coat is applied to protect it.

65 Crackle Paste Completed

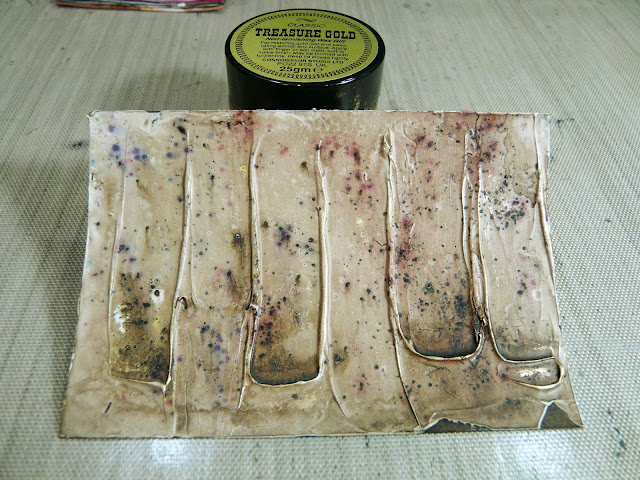
Looking at the gesso texture sample, I was pleased with how it had turned out, but decided it needed something extra, so I applied a very light touch of gold gilding wax over the raised parts. This is a lot more shiny and gold than shows in this photo.

66 Gesso Sample with Gilding Wax

Here’s a detail shot which shows the gold a bit better.

67 Gesso Sample with Gilding Wax Detail

These are the recent samples I made, now all completed.

68 Recent Samples

A while ago I noted down a couple of techniques I’d seen online, and decided to try them. The first was to stamp with Versamark or other embossing ink, and then to apply Infusions, stippling them on with a dry brush, and tapping off the excess. After this, the sample was lightly misted with water, taking care not to saturate the sample.

I used Olive Tree from set 2, and the stamp was from StampAttack’s “Real Leaves” set.

69 Stamping with Versamark

I was quite pleased with this result.

70 Stamping with Versamark

I did another one, using a ginkgo leaf stamp from the same set, and Emerald Isle Infusions from set 2, but the result was very unsatisfactory because the colour was too light. This technique obviously works best with the darker coloured Infusions – you can see from the above sample how subtle the result is. Also, I think stamps without too much detail work best. I am not sure this is a technique I shall use very often.

The other technique I found was to apply Versamark with a piece of Cut-n-Dry foam through a stencil, but I didn’t have any success with this so abandoned the attempt.

I think I’ve more or less explored all the different ways of using Infusions, apart from mixing them with paint/gesso/gel mediums – I’ll have a play with these and see what happens!

Monday 27 March 2017

Infusions Mini-Album–Texture Samples Dried, and Stamping

The pieces I made with different textures are now dry, and it’s interesting to see the results.

First of all, the sample with the thick layer of gesso.

52a Gesso Before and After

I added Lemoncello Infusions to the piece once the gesso was dry, and spritzed it with plenty of water so I could move the Infusions around. I propped up the piece so that the Infusions would pool in the texture. Unfortunately the gesso has badly warped the card so I had to hold it in order to photograph it adequately. Time for the heavy books treatment again.

The sample with the piece of fruit net, duly dried and trimmed.

47a Fruit Net Before and After

The glass bead gel medium sample.

48a Glass Bead Gel Medium Before and After

The gel medium has dried crystal clear, showing the glass beads to their best advantage. Here’s a detail shot of the piece.

49 Glass Bead Gel Detail

I tried to photograph this to show how the glass beads catch the light, but as usual, anything sparkly or reflective really doesn’t photograph well.

The other pieces didn’t look that different once dried.

Last night I had some fun doing some stamping on Infusions. The Inkylicious clear stamps that I’d ordered had arrived, so I primed them ready for use. The set I used for this project is called “Create a Collage – Meadow” made up of several different stamps that you can mix and match together to produce any selection of wild grasses.

01 Inkylicious Clear Stamps, March 17

For all the stamped samples I used black archival ink.

For the one using these wild grasses stamps, I created a background using The Sage from Infusions set 1. I really like how this one has turned out.

54 Wild Grasses Stamps

For the next one, I was really keen to try Ryn’s stamp “Textures – Water Droplets CM-T3” with Infusions. The background was created with In the Navy from Infusions set 2.

55 Stamped Water Droplets

I used a wet brush to lift as much colour as I could from inside each water droplet. This proved to be not as easy as when you use the technique with distress inks, but after several applications with the wet brush, I achieved the desired result. Removing the colour in this way makes this extraordinary stamp look even more 3-dimensional, an effect which is further enhanced by the addition of a tiny catchlight on each droplet, using a white Uniball Signo marker pen. I love how this one turned out!

My final stamped piece was created with Heartfelt Creations “Botanical Rose” stamp. This was done on a background made with Frankly Scarlet Infusions from set 2.

53 Stamped Flowers with Watercolour

Again, I lifted the colour from within the flower outlines using a wet brush. I deliberately left several flowers in this state to show how effective this is. To colour the two large flowers, I used watercolours, and added a little highlight on the centre of each one, using my white Uniball Signo pen again.

Here are the completed stamped samples all together, with the gesso piece at the rear.

51 Stamping Samples

The next technique I wanted to do was the woodgrain effect. I think it might have been the card I’ve been using, but this wasn’t as effective as the first time I used it. Here is the page from my Mamhead Mini-Album which shows it best.

85 Woodgrain Backgrounds with Infusions

With the current samples I struggled to get the desired effect although I used exactly the same method – tapping some Golden Sands Infusions from set 1 onto my non-stick craft sheet and adding a little water, and then applying this with a fan brush in parallel strokes.

56 Preparing to Create Woodgrain Effect

This is the finished piece after three applications of the Golden Sands Infusions.

57 Woodgrain Effect

I tried another sample, this time using Sunset Beach  and Golden Sands Infusions, both from set 1. After this was dry, because it didn’t look right, I added some Black Knight Infusions, also from set 1, using the same brushing on technique. It looked like weathered painted wood. I decided to try to enhance the effect with some crackle paste. This is the first time I’ve used this, and I thought it would dry clear, but it didn’t, and it doesn’t seem to have crackled either, but the effect is somewhat interesting.

58 Experimenting with Crackle Paste 1

In an attempt to make it crackle, I added some more to give a thicker layer.

59 Expermenting with Crackle Paste 2

Here are the two samples together.

60 Two Woodgrain Effects

On the pot it says it takes quite a while to crack, so maybe something will happen! If not, at least I’ve tried and after all, a lot of these samples are experimental and it doesn’t matter if they don’t work; they just won’t find a place in the mini-album.

My final samples today used the same brush-on technique, but using both horizontal and vertical brush strokes to create a mock tartan effect. Again, the effect wasn’t a dramatic as I’d hoped, and I put this down to the card I was using. I must try and remember what sort of card I used for the Mamhead album and try it with that, but in the meantime here are my samples.

The first one was done with two shades of Infusions from set 1, Sunset Beach going on horizontally, and Royal blood going on vertically. The latter had the effect of dramatically darkening the whole sample – quite an interesting effect but not entirely what I wanted!

The second one was done with Are You Cerise Infusions from set 1 being laid down horizontally first, and then Violet Storms from set one going vertically. This over-dominated the piece so I added more Are You Cerise vertically, and some more Violet Storms horizontally. The effect is definitely tartan-like, if a bit subtle!

61 Creating a Tartan Effect

Here are both samples together.

62 Tartan Effect

I do like the vertical blue stripe and the horizontal turquoise one in the one on the left.

I would like to redo all these last brushed-on samples on different card to see if the brush strokes appear more defined.

Still to come: I want to experiment a bit with embossing ink with Infusions, as I have seen some interesting videos on Youtube about this, either stamping, or using Versamark through a stencil.

Saturday 25 March 2017

Infusions Mini-Album–Various Textures

A fun session this evening playing with different textures on my sample pieces.

Getting stuff out to start – a couple of textured gel mediums, gesso and Polyfilla, some palette knives and my little glue applicator, and some blank sample cards.

24 Gel Medium, Gesso and Polyfilla

To begin with I selected two Infusions from set 2, Violetta and Frankly Scarlet. Here they are sitting on their original sample pieces.

25 Violetta and Frankly Scarlet Infusions

I spread a thick layer of gesso onto one of the sample cards with a palette knife, and then used my glue applicator to create vertical bands all or part way down.

26 Thick Gesso in Bands

I added the two colours of Infusions.

27 Infusions Added to Thick Gesso in Bands

Some time later, the sample looked like this.

28 Infusions Maturing on Thick Gesso in Bands

The Infusions have spread a little, but not much. I want to add something further to this sample once it is dry. The gesso should have fixed the Infusions so they won’t reactivate when I add more water.

The second sample was spread with Polyfilla after I’d spritzed the card lightly ith water to help the Polyfilla to stick. I had to add some more water because it wasn’t spreading well – possibly because the Polyfilla at the top of the pot was rather dry. Once I was satisfied I’d got a nice layer on the card, I dried it slightly with the heat gun until a skin had formed on the surface, and then took my home-made bubble wrap stamp and spritzed it with water to prevent it sticking, and lightly pressed it into the Polyfilla.

29 Stamping with Bubble Wrap into Polyfilla

This time I used Lemoncello and Black Knight Infusions from Set 1. This is what it looked like immediately after applying the Infusions.

30 Lemoncello and Black Knight on Bubble Wrap Stamping

I spritzed it fairly heavily with water and waited for it to spread and mature.

31 Lemoncello and Black Knight Maturing on Bubble Wrap Stamping

For the next sample, I got out a few of my texture makers – a crochet doiley, some fruit net and a piece of metal mesh.

32 Texture Makers

Again I spread Polyfilla on the card and dried it slightly. I then pressed the texture makers into the surface – the doiley top right, the mesh at the bottom, and somewhat disappointingly, the fruit net top left – it didn’t produce as much texture as I’d hoped.

33 Textures Pressed into Polyfilla

Time for the Infusions – this time Royal Blood from set 1. I used plenty of water, to encourage the Infusions to flow into the texture. The metal mesh is well defined, and the doiley slightly less so. I blotted off the circles formed by the doiley and used a brush to paint some more infusions into the surrounding texture of the doiley to try and emphasise it a bit better.

34 Royal Blood on Textured Polyfilla

Here’s a detail shot.

35 Close-Up of Royal Blood on Textured Polyfilla

For the next couple of samples, I applied different materials to the surface, using regular matte gel medium, to create interesting textures.

The first one used bleached mulberry bark. I’ve got quite a bit of this, which I bought from a craft show a few years ago.

36 Bleached Mulberry Bark

Here it is being applied to the card.

37 Mulberry Bark Applied with Gel Medium

I used Orange County from set 1 for this one, spritzing it well with water. I love how the gel medium has acted as a resist.

38 Mulberry Bark with Orange County

Here’s a detail shot.

39 Mulberry Bark with Orange County - Detail

For the next sample, I used Violetta Infusions from set 2, after applying a piece of fruit net to the surface of the card with regular matte gel medium.

40 Fruit Net with Violetta

Once this sample is dry, I shall trim off the excess net. Again, I am pleased with how the gel medium acted as a resist in places.

The next sample used coarse pumice gel medium – I love this stuff – really gritty! For this one I used The Sage Infusion from set 1.

41 The Sage with Coarse Pumice Gel Medium

Again, a great resist effect, and I love how the Infusions have spread at the bottom of the sample, reminding me of a receding wave on the seashore. Here’s a detail shot. Once it is dry, it probably won’t look so white.

42 The Sage with Coarse Pumice Gel Medium Detail

For my final sample tonight, I used Slime from set 2, and glass bead gel medium, another favourite textured medium of mine. This one has come out really well.

43 Slime with Glass Bead Gel Medium

A detail shot. If you look carefully you can see the glass beads which look a bit like tapioca! I shall be very interested to see what this one looks like when it’s dry, as the gel dries crystal clear.

44 Slime with Glass Bead Gel Medium Detail

Finally, all the samples I made this evening.

45 The Day's Samples Drying, Some Needing Further Work

Very much a work in progress. Some of the pieces need further work once they are dry. It will be interesting to see what they look like after drying overnight.

Related Posts Plugin for WordPress, Blogger...