Showing posts with label Shi-Sha Embroidery. Show all posts

Friday, 29 September 2017

Various Updates

I missed this week’s WOYWW unfortunately, and I’d have posted this if I’d managed to join in. I had a very busy day on Wednesday with a lunch out with friends, and after that, all I felt up to was editing a backlog of kitten videos. Yesterday I felt wiped out again and brainfogged. It’s a bit demoralising at the moment – I’m really busy on certain days, and then when I get a few days free to do the things I want to do (like art), I’m feeling too exhausted to do them and all I can do is rest. You’d think after nearly 11 years of ME (Myalgic Encephalomyelitis) that I’d be used to this but there are times when it’s deeply frustrating…

First, our lunch out. Here’s a photo of my dessert!

It was called “Chocolate Trio” and consisted of a chocolate brownie, white chocolate mousse and Bailey’s crème brulee. I love how they’ve decorated the plate with swirls of melted chocolate and fresh raspberries. I started with whitebait and for the main, I had their lamb and mint pie – the whole meal was absolutely delicious. We had a great time together – we are the Allerton Three – the three friends who met in hospital (Allerton Ward) back in March 2013 when we were all in for our cancer operations. We’ve remained firm friends ever since, and try to meet up regularly, although it doesn’t always happen because we are all so busy!

I haven’t taken many photos or videos of the kittens lately – also due to busy-ness and fatigue. They are now 18 weeks old and are getting so big! Lily is still larger than Ruby, and over the last week I’ve noticed a change in her – she is growing the most fantastically soft coat! Her fur is fluffier than Ruby’s and feels like silk chiffon – very fine and just fabulous. It’s probably developing as she starts to grow her first winter coat.

Lily is also proving to be more intelligent than Ruby. She is doing really well with her clicker training, but Ruby tends to get confused, and do things I’m not actually telling her to do at that moment! They both vary as far as their attention span is concerned – if there’s anything else going on (like a fly in the room, or if they are too wild, or too sleepy) they get very easily distracted and wander off! Also, they are pretty good during training sessions, but during the rest of the day they are hopeless and seem to forget everything they’ve learnt!! Never mind, I shall keep persevering, because I know from what loads of people online are saying, this really does work, and a bit of hard work reaps great rewards. They will improve as they get older, I think, when they are less babyish and easily distracted by things to play with!

My hubby says Ruby is a happy little kitty who says “Hello sky, hello clouds…” and is very loving and affectionate. Lily is more independent but she enjoys a cuddle too.

The latest photos.

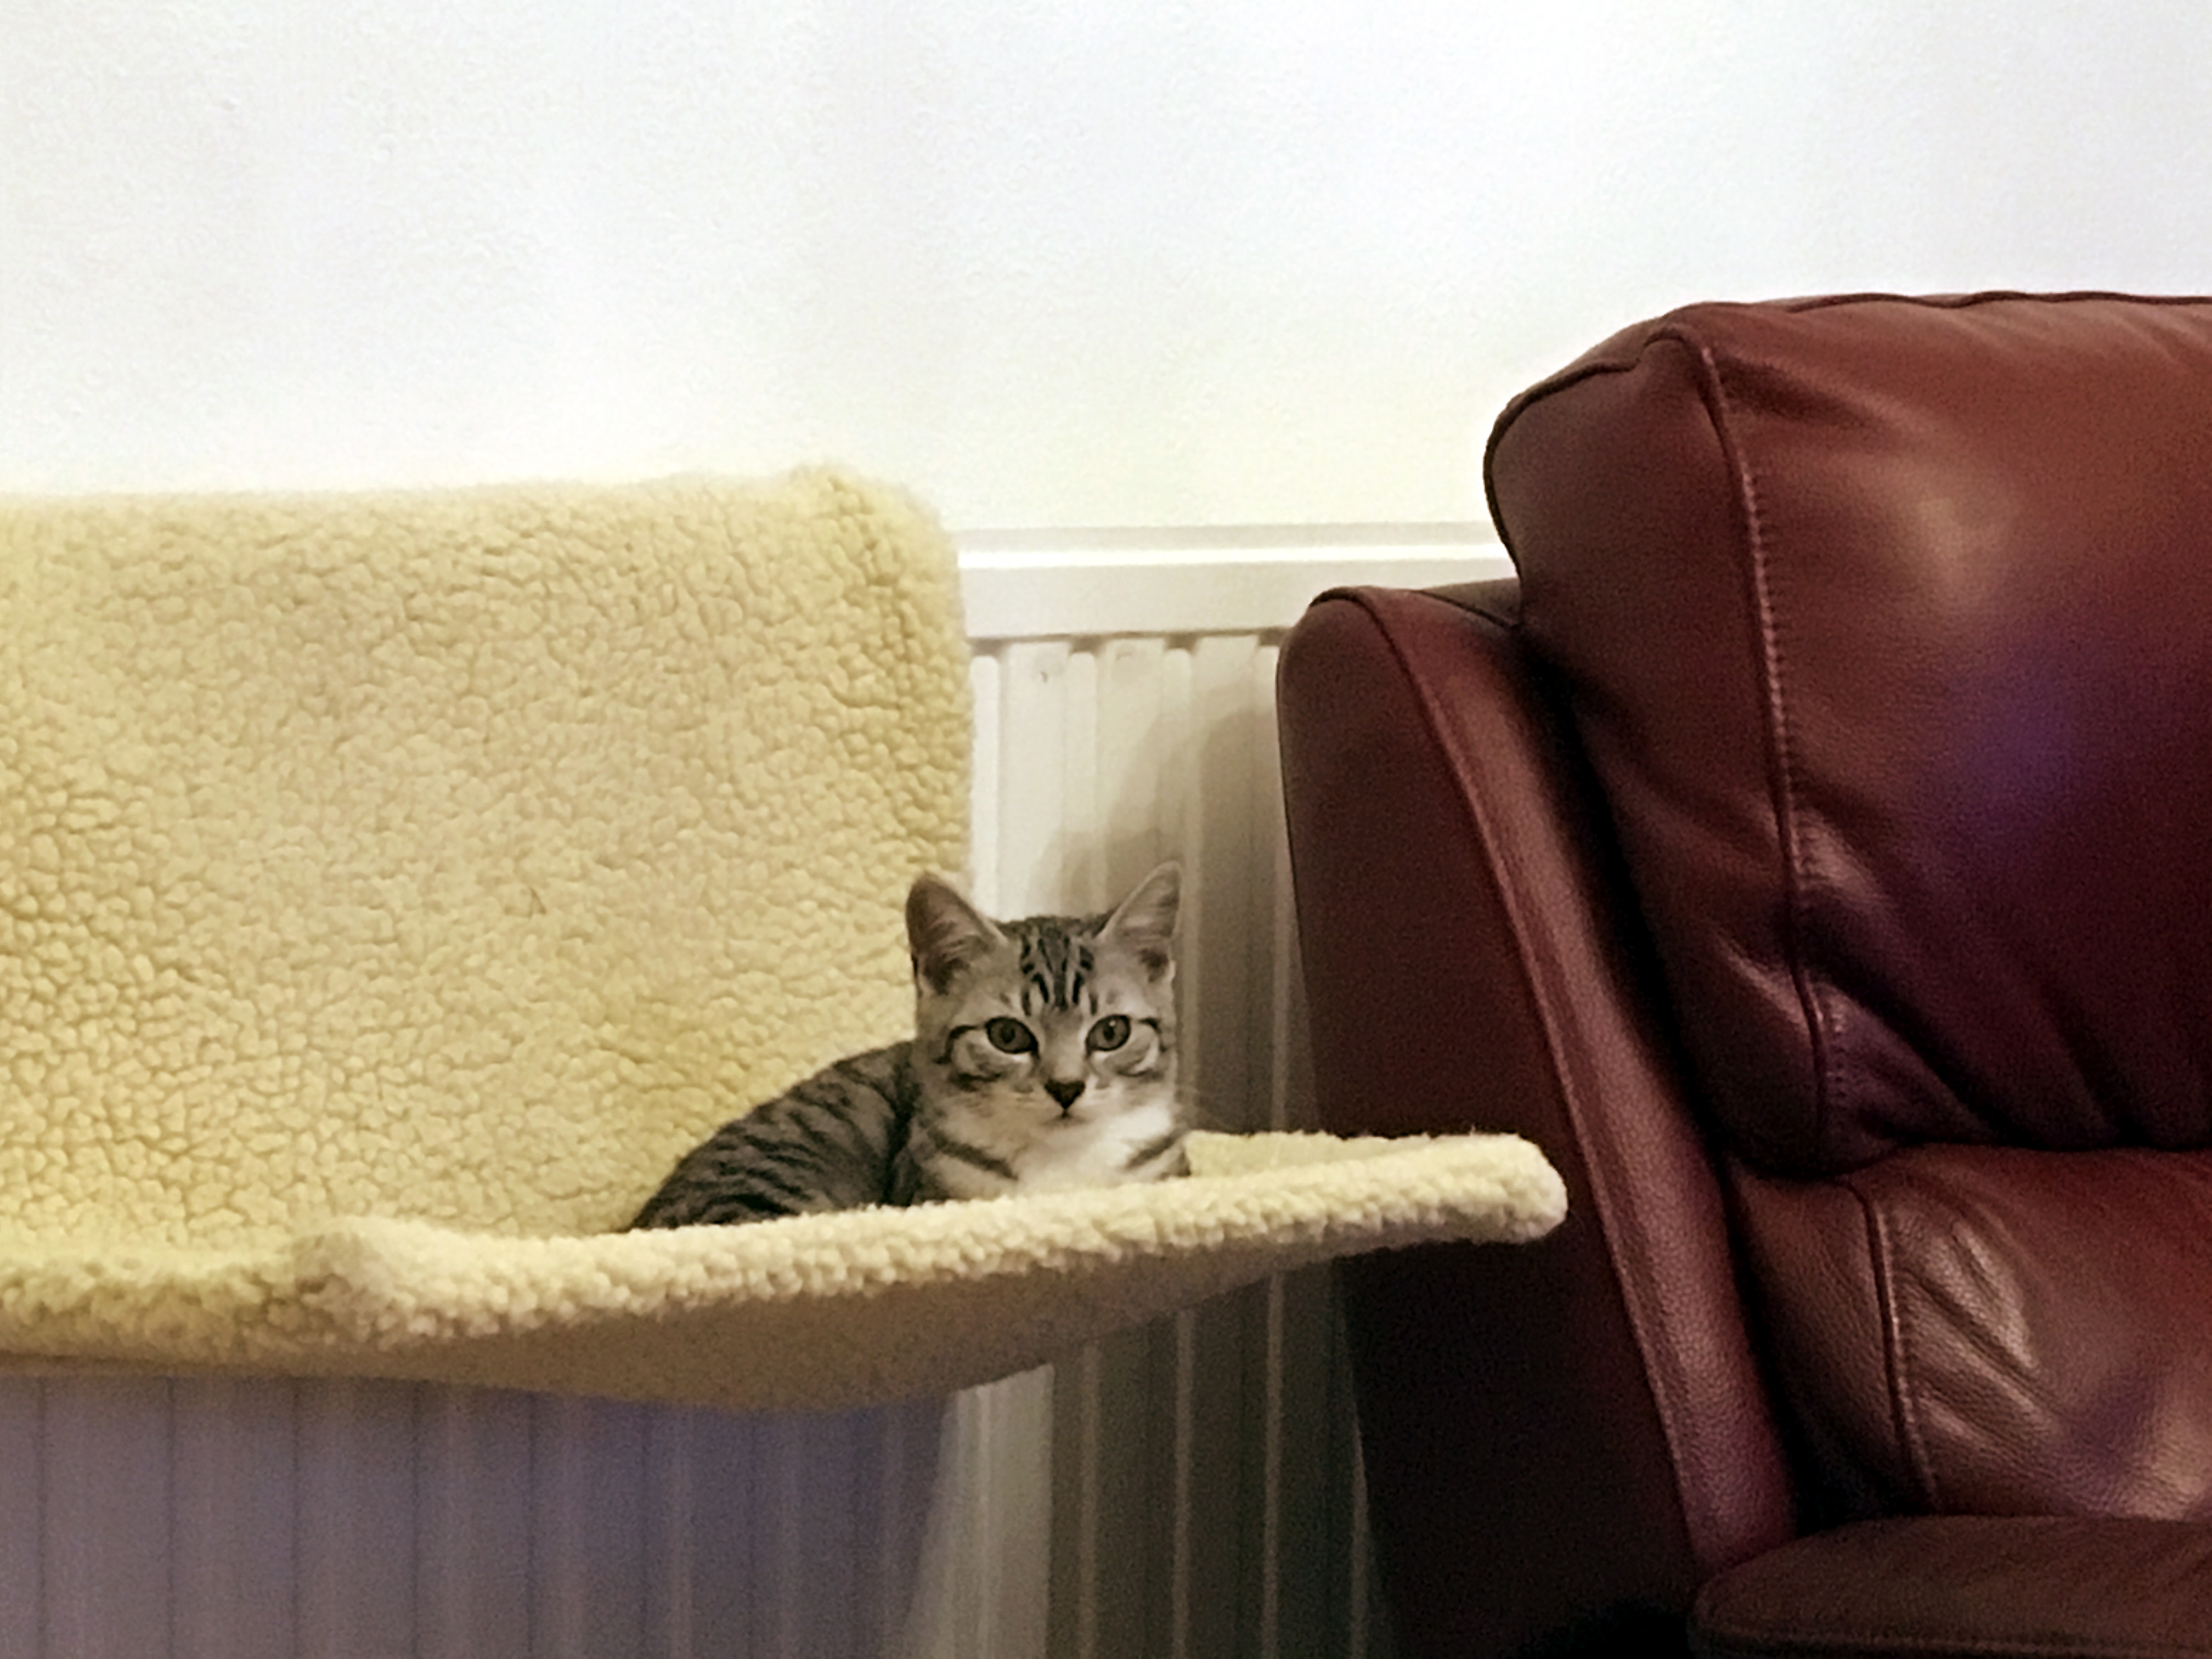
Lily in the hammock, aged 15 weeks.

Lily relaxing on the cat tree at 16 weeks. With her arms hanging down like that, she reminds me of Chloe, who was Phoebe’s sister – she always used to lie like this!

Here’s Chloe doing it.

Also at 16 weeks, here is Ruby sitting on the cat tree. Queen of the Castle.

This is what happens when I try to work on my laptop. They both want to come up for a cuddle and there isn’t a lot of room – I have to push the computer away a bit. They are 17 weeks old here.

Here they are together on the cat tree. Ruby on top, Lily below.

The final two were taken on Wednesday. Here is Lily with her head stuck in my shoe! They say cats have a much more sensitive sense of smell than we do. If I needed it, here’s the proof that I haven’t got smelly feet!

Not sure what she thought was so interesting in there!

Unfortunately, the kittens have now discovered loo paper…

Not sure who was guilty of this little feat, but we discovered it when I got home from my lunch out on Wednesday. I had put a new roll up in the morning. I have now wound it all back on! We are now making sure that there is no “tail” hanging down from the roll to tempt them. Anything that dangles is fair game, it seems.

They can now get up on the kitchen worktops so nothing’s safe up there any longer either!

This morning a friend from our monthly cancer Cakeathon meetings held one of the national coffee mornings in aid of Macmillan Cancer Support, and several of us from the group went along. I wish I’d taken a photo of her table, groaning under the weight of so much CAKE!!! I’m afraid I made a right pig of myself – cake is so irresistible! I justified it by reminding myself that it was all in a good cause! I took along a lemon drizzle cake. Her house was full of her lovely friends and we all had such a great time. She was thrilled that we’d turned up to support her. When we arrived, she’d strung bunting outside her house – supplied in the pack that she got when she signed up to host a coffee morning, and there was more bunting inside, and balloons.

As usual, no time or energy for art, but I did manage to put a few stitches in my embroidery. Here’s the latest piece I’m working on. The French knots around the design are worked in gold – unfortunately this doesn’t show up as shiny on the photo as it is in real life.

I’ve still got quite a lot of these little pieces to do before I can assemble them into the bed drapes I’m making.

I’ve also been very busy preparing sessions for my Bible study group which resumed meeting formally again this month. It takes much longer to prepare each session than it does to teach it!!

Last Sunday we were invited back to our old church to share in their harvest celebrations. I’ve done a separate post about that. It’s such a lovely little church and special because Dad’s funeral was held there.

We are going to the harvest at our new church this coming Sunday.

My poor studio has reverted to a dumping ground and is gathering dust. I really hope I can get back in there during the coming week – this is getting ridiculous!

Monday, 1 May 2017

A Brightly-Coloured Embroidered Piece

Having a bad day today with my ME, probably as a result of everything that went on last week – going to the hospital was a bit stressful, and being left in limbo regarding whether or not I have to have further surgery. I’ve also been pretty busy with things, and this week doesn’t look too different, with two separate visitors.

I spent most of the day resting on the recliner, trying to catch up with some of the TV recordings that have been mounting up, and being on the computer. I did manage to do another piece of embroidery for the bed half-tester, though.

I am very pleased with this brightly-coloured piece. I didn’t put any sparkly thread on this one.

Here’s a detail shot.

I really wanted to spend some time in the studio today but I was just too wiped out. Hopefully tomorrow I shall feel better again.

Wednesday, 11 February 2015

WOYWW 297

To find out how to join in the most fun nosey fest on the web, click on the WOYWW logo in my sidebar and you will end up at our hostess Julia’s blog, where all will be revealed.

Well, better late than never… About half an hour to go before this would be WOYWT – What’s on your workdesk Thursday!

In answer to that question, a repeat of last week: not a lot. Well, a tiny bit more than last week.

WOYWW 297 11 Feb

On the far right is a large acrylic block that has been out for weeks, waiting to be put away. On the mat is my iPod, and its case with the neck strap, and the earbuds. They have sound-reducing rubber tips which are supposed to stay pushed on, but in the past I have found they have a habit of popping off and getting lost, so I started gluing them on with Pinflair glue. This works extremely well, but after several months they work loose again. Today I stuck them back on again – I want them working properly when I go into hospital, and I’m going to make sure I’ve got lots of nice music and audio books on my iPod to keep me going. The case had also got a bit worn and developed a split, and I’ve mended that with Pinflair, too.

On the left of the iPod are three stamps, and at the back left, the wood blocks I have just pulled them off. These are all Stampotique stamps, and for some reason they only supply them mounted on wood blocks, which I don’t like, so I always peel them off and stick them on EZ-Mount Foam to use with acrylic blocks. The large one is the Kitty Squad stamp I bought several months ago and still haven’t used, and the medium one is their Medium Bee, which comes with the tiny bee on the side of the block. I’ve had their Large Bee for some time and have used it quite a lot, but it really is a bit big for a lot of projects, and these two smaller ones are gong to be very useful.

So much for my desk. In the past fortnight I have done precisely one embroidery piece for my bed decorations. Here it is.

21 Red and Green Paisley

Here are some detail shots.

22 Red and Green Paisley Detail

23 Red and Green Paisley Thick End Detail

24 Red and Green Paisley Thin End Detail

I do wish photos would pick up shiny stuff. The red triangles between the shi-sha mirrors, and the French knots between the small circles, are all worked in red lurex thread which sparkles, but in the photos it looks really dull. The photos simply don’t do it justice.

Mr. Mojo is still on his extended holiday (probably having a naughty vacation in some obscure south coast seaside resort with Mrs. Muse) so this is all I’ve managed to achieve, I’m afraid. It looks more and more likely that my poor hubby is not going to get the special Valentine card I promised myself I would make for him this year, to show how much I appreciate all he is, and does, especially at the moment… Maybe it will be OK for him to have it late?

Cancer update… On Friday the specialist nurse phoned after their meeting to say that the scan revealed that the cancer is confined to the bowel and has not spread, which is a great relief. This news was followed by a brief period of high elation, followed by total exhaustion and a long sleep in the afternoon, and when I woke up, I felt all unsettled again… I have it on good authority from other cancer sufferers that this emotional rollercoaster is perfectly normal, so I’m not fretting too much. I have also received my appointment to see the surgeon, and I will be going tomorrow lunch time, after which we should know a bit more. I’ve got a whole sheet of questions for him, some of which I am sure he will cover, and I shall be sure to write down all the answers!

Despite the reassurance by the anaesthetist last week that they take post-operative pain management very seriously these days, and I can expect a lot less pain than after my hysterectomy 20 years ago, I am still dreading the operation and feeling very nervous about it. I hope that he will tell me tomorrow when I shall be admitted. Watch this space (or at least, my Cancer Diary page) for updates.

The anaesthetist said it was essential that I kept stress to a minimum during this whole period, but this is proving more difficult to achieve than I thought. Things are not good with Mum again at the moment, after a period of much better behaviour, and we are making plans to deal with this, and I am intending mentioning this to the surgeon tomorrow and getting his opinion. I can’t say more at the moment but hopefully we’ll manage to achieve some peace and quiet, and the opportunity for me to have a good convalescence.

We seem to be so busy at the moment with all these hospital appointments and other things – we managed at last to get to the dentist this afternoon, having postponed so many appointments because of problems with Mum, and I now have the back of a couple of my front teeth thickened up with the new filling material they use these days – they had apparently worn very thin. At the moment it feels weird and I can’t bite down very well, but he says it will wear down a bit in the coming days and weeks. My hubby now has two collapsed teeth as a result of the delay, but the dentist says he can fix them and he doesn’t need any further extractions, which is good.

Wednesday, 28 January 2015

WOYWW 295

For details of how to join in “What’s on your Workdesk Wednesday” please click on the WOYWW logo in my blog sidebar, which will take you to our hostess Julia’s blog, where all will be revealed.

Nothing on my desk this week, I’m afraid. Since my cancer diagnosis just over a week ago, I find myself unsettled and sans creative mojo, but I don’t suppose this is very surprising. I am not overly concerned  because I am sure it will return in due course. I am already thinking about a card for my hubby for Valentine’s day if I can only get sufficiently motivated!

Meanwhile, I have been enjoying relaxing on the recliner with my newly rediscovered embroidery – an ancient UFO (UnFinished Object) which I am coming to with renewed enthusiasm. Here are some pictures of the pieces I’ve done over the past few days, for anyone who hasn’t been visiting my blog in the meantime.

12 Purple Piece

13 Yellow and Purple Piece

14 Yellow and Purple Piece Detail

15 Large Shi-sha with Whipped Fly Stitch

17 Large Shi-sha with Whipped Fly Stitch Ultra Detail

18 Asymmetrical Whipped Fly Stitch

20 Asymmetrical Whipped Fly Stitch Ultra Detail

They will eventually be made up into decorative pieces for the new half-tester over my bed. The focal point on each piece is Indian mirror work (shi-sha). I am able to complete each one in a few hours. Although each piece is part of a much larger project, I can treat them as separate projects which are small enough to cope with! I am experimenting with new stitches, and am thrilled to find some variations on the basic shi-sha stitch which I have been doing for years. As with a lot of my projects, it is a learning curve and I always enjoy learning new skills! (I had a fun comment from Princess Judy who thinks shi-sha sounds very energetic, like doing the cha-cha but with thread! ROFL!!! Judy can always guarantee to make me laugh! I can assure you it is very relaxing, and much easier to do than dancing!!) I love the little mirrors and the gorgeous rich effect they give. I think shi-sha is my favourite form of embroidery.

I am going for my CT scan on Friday afternoon, after which they will know better exactly how to proceed. I definitely have to have surgery, whatever they find, but the scan should reveal how much, if at all, the cancer has spread, and what further treatment may be necessary. For those who have not visited recently, I have started a new page on my blog (see the tab “My Cancer Diary” just below the blog heading) where I shall be documenting my progress, treatment, and feelings. I am very grateful to our own lovely Shaz for her ongoing support and advice!

A happy WOYWW to everyone!

Monday, 26 January 2015

Shi-Sha Embroidery with Fly Stitch

Continuing my exploration into variations on the basic shi-sha stitch, I found a very pretty variation, which combines the basic shi-sha stitch with fly stitch, which is a bit like an open-ended detached chain stitch. After completing the stitches all round the shi-sha mirror, the overlapping fly stitches are whipped with a contrasting thread – I used double thickness to make it stand out a bit better.

This is a very pretty effect! For my first piece, I used one of my extra-large shi-sha mirrors, that measures about an inch across. Some of this is covered by the stitches holding it in place, of course.

15 Large Shi-sha with Whipped Fly Stitch

I didn’t actually do the middle quite right, and had to fudge it a bit, which makes it a bit messy. Just to make sure the mirror didn’t drop out, I added an extra row of stitching inside the “setting” – a row of detached buttonhole stitch in the red lurex thread (the sparkliness doesn’t show up on the photo, of course). I used the same thread for the inner outline of the motif. I also added a detached chain stitch on the point of each fly stitch. This single, large shi-sha mirror makes a lovely focal point to the design, I think.

Here are a couple of detail shots.

16 Large Shi-sha with Whipped Fly Stitch Detail

17 Large Shi-sha with Whipped Fly Stitch Ultra Detail

The green and red centre, covering the edge of the shi-sha, is actually more raised than shows in the photo. The whipping over the fly stitches is done with double thickness yellow thread, and I have used the same thread for the detached chain stitches around the edge.

I decided to do another one, this time getting the stitch correct, and adding an extra dimension by making it asymmetrical. This worked very well, and when I added the contrasting whipping, I added extra rows over the longer fly stitches.

18 Asymmetrical Whipped Fly Stitch

Again, a couple of detail shots.

19 Asymmetrical Whipped Fly Stitch Detail

20 Asymmetrical Whipped Fly Stitch Ultra Detail

In this second one, I added some French knots and other embellishments in my turquoise lurex thread. On the three circles below the main motif, in reality there is a lot more contrast between the centre and the edging but this doesn’t show because the camera won’t pick up the sparkle of the lurex thread. I also added a stitch in the centre of each of the larger overlapping fly stitches, using the same thread, to draw the design together.

Like with my recycled mini-album, this project is a learning curve and I am developing my skills as I do it! I love learning new things. I am very pleased to have found this website which has some brilliant tutorials on different embroidery stitches.

I am finding this embroidery project very therapeutic. Like Zentangle, there is a certain rhythm to embroidery, which is very absorbing and calming, and time seems to stand still! I am enjoying this particular project very much at the moment, because I am feeling pretty unsettled after hearing the news that I have cancer, and I am finding it impossible to settle to anything in my studio. Each of these motifs which make up a much larger whole, are like individual small projects and each one can be completed in a few hours. I am averaging about one per day, with the applique ground work having been done several years ago. I am working on them in the sitting room on the recliner, spreading my materials out on my small work table which lives in front of me. My creative mojo hasn’t exactly departed, I realise – it’s merely changed direction a bit.

I have updated my Cancer Diary page today.

Saturday, 24 January 2015

A New Shi-Sha Stitch

I have been doing shi-sha (Indian mirror) work for many years, and have always done the regular shi-sha stitch which alternates between buttonhole stitches worked very close together, and chain stitches which run around parallel to the edge of the mirror. This is what I did in this example.

09 Detail 2

You can see the basic shi-sha stitch worked in turquoise in the above photo – I added another two rows of chain stitch around this in yellow afterwards.

After so many years of always doing it this way and never varying it, last night I discovered a variation! This is very exciting.

Instead of working the chain stitch parallel to the edge of the mirror, you work it at right angles, inserting the needle some distance away from the mirror and coming up next to it, and as you work around the mirror, you arrange these vertical stitches so that they radiate outwards. This gives a great effect like sunrays!

This is what I did last night, and I think so far, it’s one of my favourite pieces for the bed decorations I am making.

13 Yellow and Purple Piece

Here’s a detail of the shi-sha work, done in yellow.

14 Yellow and Purple Piece Detail

I really like this effect! I am exploring shi-sha stitch further, and have found several other variations, which I shall be experimenting with in due course.

In this latest piece, the light-coloured thread which outlines the central motif, and creates the cross-shape, is actually gold lurex thread. I wish you could see how sparkly and bright it is. At least in this photo, you can see the little mirrors a bit better. As usual, I have added some French knots, and used chain stitch as a filler (I’ve never been able to do satin stitch – it always looks a total mess), and added four detached chain stitches in the very centre.

I am trying to source small glass shi-sha mirrors to buy in bulk. I’ve still got quite a lot (can’t remember where I bought them) but most suppliers only sell them in bags of 10 or so, working out at about 10p each, which is more than I want to spend. I’d like to buy bags of 100 or 500 but haven’t yet found any on the Internet, even from India. I would like to make a curtain to hang against the wall under the half-tester above the bed, and cover this with mirrors. Curtains covered with shi-sha work wink and sparkle with the movement of the curtain. It’s a fabulous rich effect.

Sometime I must dig out the bridesmaid’s cap I made, which is covered all over with shi-sha work, done in a variety of bright colours, and photograph it. These caps were quite heavy with all the glass mirrors.

Saturday, 17 January 2015

Decorations for Half-Tester, New RUBs and a Health Update

I haven’t been blogging much lately because we’ve had major problems at home with Mum and I’ve had a bit of a reaction and felt very poorly, and the stress has made my creative mojo take a walk! However, I’m feeling a bit better now, and now I’ve started the embroidery on my bed decoration pieces, this is something I can do while in the sitting room, and I am making slow but steady progress, and really enjoying it.

Embroidery

I have completed the embroidery on a few more pieces – one or two I had worked on before, but felt they needed a bit more, and some starting from scratch on the machine applique. Here are the four latest pieces:

07 Four Pieces with Completed Embroidery

and here are the detail shots of each one.

08 Detail 1

I added a lot of French knots on this one! Love the bobbly texture.

09 Detail 2

10 Detail 3

11 Detail 4

It’s very disappointing how photos never show up sparkly stuff – the metallic threads look quite lost in these photos, looking more like raffia! The top one has red and gold lurex thread, the second two gold, and the bottom one has copper. The little shi-sha mirrors don’t show up that well, either, but they really twinkle in the light.

If you look closely at them, you can see that the shi-sha stitch encases the edge of the little mirror, like the setting of a cabachon jewel. The stitch is a variation of chain stitch with two parts to it – you stitch alternately around the four-sided scaffold you work initially to hold the mirror in place, and into the background fabric. I love doing this stitch. You can use it to attach other things too, and I’ve done experimental pieces in the past, attaching shells and flat pebbles. I’ll have to dig out the piece sometime and photograph it, because I don’t seem to have any photos. I did a talk on shi-sha at the embroidery group I used to belong to in Plymouth and this was one of my demo pieces. I also made this purple bodice with a mount-board frame as an example:

Dress Bodice

Dress Bodice Detail

Here is a little box I made, using the technique. To open the box, you squeeze the ends together. There is a shi-sha mirror on each of the three sides.

Embroidered Pinch Box 1

Looking back at this work, it makes me think I really should be getting back into embroidery again – I love it!!

Hopefully I’ll have some more photos of the bed decorations to show you soon. I’ve got a lot of work to do before I can start making them up, and then I shall make tassels to go on the end of each one – something I am really looking forward to doing, and I am already collecting images on Pinterest for my inspiration.

ARTHaven Organisation – RUBs

I have started adding to my existing collection of Really Useful Boxes (RUBs) again. Eventually nearly everything in my ARTHaven will be stored in these, and I am also collecting them for the shelves under the counter in my en-suite bathroom. I am delighted that after doing a lot of research and endless measuring and comparing, I have discovered that there are boxes that fit exactly in the various spaces I have! The effect is so much tidier than my endless scruffy cardboard boxes; they also keep the stuff better, and you can see through the box to see what’s in it. They have a nice uniformity of appearance whatever their size, and are starting to make my ARTHaven look really good! As the pennies allow, I shall add more in time.

On the RUB website, the prices are quite reasonable, but you have to pay postage if your order is less than £500 (and I certainly can’t afford to pay £500 all at once for boxes!). I have discovered a lot on Ebay, and you can sometimes buy multiple packs (2, 3, 5, 10 etc.) of a particular size, and many of them have free postage. Even when the price per individual box is a bit more than on the RUB website, in the long run it saves money because the postage on the RUB website bumps the price of each box up quite a lot, and also, you don’t have to buy a whole lot at once, and there are some good deals to be found.

In this photo of the floor units under the window, you can see I’ve supplemented my 9-litre collection, and also got some of the 9-litre XL boxes, which have tall lids. These are very good for storing bottles and jars, and anything that sticks up above the top edge of the box. The capacity of the box itself is the same as the regular box. The shelves in the floor units are just right for both these sizes. On the left, this large pull-out unit on casters had been a complete mess since we moved, full of a mixture of Dad’s old workshop tools, some of my tools, brackets and fixings, and my decorating stuff. This has now gone into the RUBs and once I manage to spend some time organising the contents properly, I should be able to lay my hands on what I want with ease.

01 9L and 9L XL Under Window

I love how the blue handles clip in place, locking the lids.

Moving over to the storage area on the other side of the room, I have the free-standing cabinet that the previous owner of the house left in my bathroom. I am delighted that each of the open shelves in the centre exactly accommodates one 19-litre RUB. I had a couple of these, and have now completed the set.

02 Completing Set of 19L in Bathroom Storage Unit

Unfortunately, because the doors occupy some space, I cannot get them in the cupboards, but that doesn’t matter because when closed, the contents don’t show anyway. The cupboards are full of fabrics, picture frames and Ikea mirrors for altering, amongst other things.

On the wall opposite the window is the large wall unit, and in this picture you can see the progress I am making. On the left, the shelves are filled with plastic containers that I got years ago from our local supermarket – they had contained things like coleslaw for the deli counter, and I asked them to save them for me, and some of them had margarine in them – I used to buy large quantities for baking, and saved all the boxes which have been incredibly useful over the years – in their first incarnation they were kitchen storage boxes, and like many of my kitchen things, eventually found their home in my ARTHaven! These containers will remain, and not be replaced by RUBs. They contain haberdashery. The centre shelves now house two 9-litre RUBs end-to-end, and one of several of the long 22-litre boxes I have, which are useful for storing rolls of paper. Not all the RUBs stack with each other, but I have found that I can stack two 9-litre boxes end to end on top of a 22-litre box. The contents won’t necessarily stay as they are – the whole thing is still in a state of flux.

03 Progress on Large Wall Unit

I am so looking forward to replacing the untidy cardboard boxes! I shall be getting some 25-litre boxes to go on top of this wall unit, and on top of my mixed media wall unit over the other side of the room as well. The shelves on the right of the large wall unit will continue to be used for drawing stuff (my Zentangle stuff is there) and I shall keep the pretty box on the top shelf, which houses my metallic embroidery threads and embroidery sequins and beads. It all just needs tidying up and organising a bit better.

The bottom shelf in the middle at the moment holds all my soap making stuff. The brown plastic box on the left has essential oils and other liquids for soap, beauty and cleaning products I am going to make. The rest of the soap stuff will go in RUBs once I get them.

Once I get the large black shelf unit in the storage area better organised, I will show you photos of that. I am very thrilled that this unit, which is all that remains of a much larger unit which came out of a shop that was closing down, is exactly the right size for some under-bed storage boxes I had (not RUBs), and also accommodate the 22-litre RUBs end-wise, and the 9-litre and 19-litre boxes.

Health Update (Not TMI, I hope!! No need for the more squeamish among you to read on…)

I am now in the throes of preparation for my regular two-yearly colonoscopy which is taking place on Monday morning. On Wednesday I stopped taking my colitis medication and also my iron, and yesterday was the first day of the special low-fibre diet you have to go on. Today is the second day. During these two days I am not allowed any fruit or vegetables, and can’t have my lovely breakfast porridge (oatmeal) and have to have cornflakes instead – I always say there’s more nourishment in the packet than in the actual cornflakes! They are soooo boring… I can have white bread (I am eating French bread which I love) and butter and other dairy stuff (milk, yoghurt, rice pudding etc.). I can have potatoes with no skins, and white rice but no whole grains or nuts. I can have protein such as chicken and fish, and I can drink apple juice, tea, coffee and plenty of water.

On the final day (tomorrow) I cannot eat any solid food except jelly, for 24 hours before the procedure, but if I have my breakfast at a reasonable time that will be OK. For the rest of the day it will just be clear soup, apple juice, water, tea or coffee without milk (which I don’t like so will avoid, apart from green tea with honey). I am allowed jelly, and jelly babies for energy! I am encouraged to drink plenty of fluids right up to the time of the examination.

Tomorrow the worst part will be taking the powerful laxatives to purge my system. I have to take a bottle of senna, and then twice during the day, a sachet of Picolax dissolved in water. The effect of this is severe and acute diarrhoea, so I intend camping out in the bedroom so I can make frequent quick dashes into my en-suite bathroom! Previous experience has shown that my rear end gets very sore, and they recommend the application of Vaseline (petroleum jelly) to soothe the skin, and I am also prepared with two packs of unperfumed moist toilet tissue. The whole business is most unpleasant, and to make it easier, I am planning on surrounding myself with my laptop, a collection of DVDs that I’ve been saving for the purpose, my embroidery, books and my iPod!! Also containers of jelly, jelly babies, a Thermos of my best Jewish chicken soup (of which I could drink gallons, no problem!) made in advance, and jugs of water and apple juice!! With the kitties for warmth and company, I should be fine.

On Monday morning my hubby will drop me off at the hospital, and they will give me a sedative before inserting the camera into my bowel. They usually need to pump you up with CO2 (they used to use air, but with the muscle relaxant drug they give you, this caused an unacceptable amount or discomfort from wind retention afterwards – the CO2 is absorbed painlessly into the body). Because people who suffer from ulcerative colitis are at higher risk than the normal population of developing bowel cancer, they will look for pre-cancerous polyps and remove any they find, and will probably take a biopsy as well. The procedure really isn’t too bad, and afterwards, because of the sedative, one remembers very little about it. There is a recovery period, and then they will give me some food. Last time I asked for brown bread egg sandwiches and a cup of tea (I had two large cups) and it tasted like a king’s banquet – even the disgusting hospital tea!! Once I am home, I can start eating normally again, and go back on my medication.

I’ll let you know how I get on…

Monday, 5 January 2015

Decorations for Half-Tester

My first post in 2015! One of the things I have resolved to do this year is to try and clear the backlog of UFOs (UnFinished Objects) in my ARTHaven, and also to get back into some more textile-based work. One of my oldest UFOs was a project to create decorative drapes for our pine four-poster bed – something I started and never finished. I made the curtains but not the decorative top part. Last autumn I got a new adjustable bed to help with my various medical conditions (I am sleeping a lot better these days) so the four-poster had to go, which I was very sad about. The whole of the top section lifted off and could be disassembled, leaving the bed intact, so we kept the top and disposed of the pine bed base. A local carpenter used the timber from the upper part to create a new half-tester which is attached to the wall above the bed.

01 Half-Tester Construction

As before I have a small strip-light wired to the inside of the frame, and in the picture you can see the pull-cord hanging down. You can also see the velcro strips attached to the framework, to attach the fabric drapes – I will need to add some more for the decorative top part.

When I started making the pieces for the top, I also cut some smaller pieces in the same design and fabric, and used them to decorate a bag that I made:

02 Bag

You can see the separate flaps, each embellished with machine applique and hand embroidery, and each one finished with a different style of tassel.

These are the card templates I made for the bed project. At the back, underneath, you can see the two templates for each piece – the larger one is for cutting the fabric, and the smaller one for cutting the heavy interfacing. After cutting these out, I tacked the fabric onto the interfacing so that the applique and embroidery would go through both layers, and to finish each piece off, the edges of the fabric would be turned in over the interfacing, and a backing piece added.

03 Templates

The smaller templates are used for cutting out the applique pieces which are first ironed onto some Bondaweb.

What I have decided to do now, is to make each finished piece double-sided, and to attach the tops to the outside and the inside of the frame, respectively. Hopefully they will hang properly, but if not, I shall have to make separate pieces for the inside and outside, and maybe add tassels only to the outside pieces.

The next picture shows the pieces I have already started, with the machine applique. Top right is a pile of more pieces – no room to spread them all out to be photographed.

04 With Applique

The next photo shows some of the embroidery materials to be used to embellish the pieces. I have a collection of coloured threads with lurex – as usual the photo doesn’t show the sparkliness of these yarns – they are the large spools at the back. In the front of the basket is a selection of different coloured embroidery threads, and on the table in front, scissors, my mother-of-pearl stiletto and some crewel and chenille needles, and on the left, a selection of Indian shi-sha mirrors.

05 Embroidery Materials

I have done a lot of embroidery using these in the past, including on my wedding dress. These little circles of mirror have quite rough edges, and no holes for sewing them down as you’d find with sequins; there is a special shi-sha embroidery stitch which anchors them onto the surface of the fabric, rather like a rubbed-over setting of a gemstone in jewellery. When these tiny mirrors catch the light, they wink and flash, which is very dramatic on any fabric in motion such as a curtain, and they give a very rich, exotic look. I love them! Originally they would have been made of flakes of mica, but they are made of glass these days – the mirrors are far from optically perfect and look rather dull and grey before they are attached, but they do reflect the light wonderfully well.

Here are the pieces to which I have added embroidery so far. Some of them require further embellishment. The stitches I am using are fairly simple ones – chain stitch with variations, and stem stitch. I have never been any good at satin stitch or long-and-short stitch, and love using chain stitch to cover areas with colour, and for outlining shapes.

06 With Embroidery

As I progress with this work, I shall be showing some detail shots of the embroidery, but at this stage, this is just showing what I have done so far, after opening up the box and reminding myself what I have already achieved. I did all this so many years ago that I couldn’t really remember at all what I had done, and when I opened the box, was surprised to find my book on tassels, and also some wonderful notes from an embroidery day I attended when we lived in Plymouth – probably back in the 1980s! It was like Christmas, opening the box and finding all the lovely fabrics and shapes. This has to be one of the oldest UFOs in my possession, and high time it got an airing and was finished!

Related Posts Plugin for WordPress, Blogger...