Showing posts with label Toilet roll mini-album. Show all posts

Wednesday, 2 August 2017

WOYWW 426

I surprised myself yesterday afternoon – I managed to tear myself away from our new kittens and actually did some art!

On the left you can see my crib sheets to tell me what’s on which page, and how I did it. Resting on top is the first lot of pages from Vol. 1 of the mini-album I’m making, some complete with their tags, which are still awaiting some sort of yarn tassel.

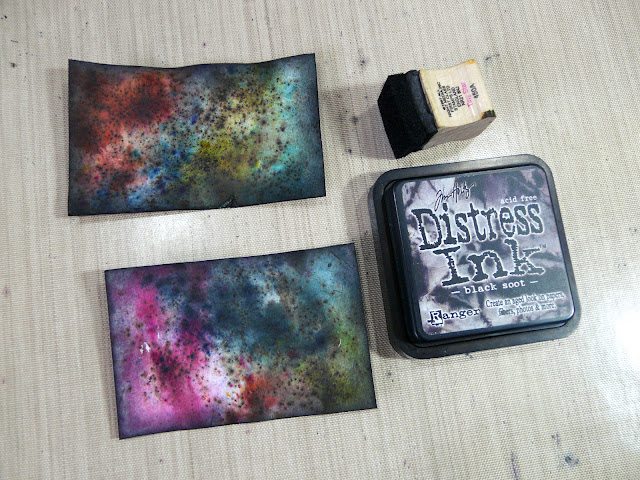
Beyond the sheets are the pages for further volumes of the album, and in the centre of the desk are My Inkylicious Ink Dusters, the Black Soot Distress Ink and its home made ink blending tool. To the right of that are the small blot-off sheets that I am making from the mess on the craft sheet. Beyond that are the pages of Vol. 1 which still need tags.On the right, water spritzer, jar of water, acrylic paints, and in the foreground, pens. Apart from that, all the usual detritus of a busy desk!

Not sure when I’m going to get another chance in the studio but I’m keen to make progress on this project now. For more details of what I did yesterday, click here.

Now for the moment you’ve all been waiting for (or perhaps not!!) – KITTENS!

We got them last Thursday, and today they are 10 weeks old – I can’t believe we’ve already had them almost a week!

If you keep scrolling down, you will come to all the kitten posts since we got them, with photos and videos.

As you can imagine, we are both totally smitten with these tiny creatures. You wouldn’t believe how much personality they are already showing, and how they make their wishes known, in no uncertain terms!

It is so, so good to have kitties in the house once again. Someone on the forum I am on said (being married to a vet): “When we get new animals after the previous ones have died, we are not replacing them, but honouring the ones that have gone by giving a good home to the next generation.” I don’t think for one moment that Beatrice and Phoebe would approve of them, though! “Who are these young whippersnappers taking over our house in our absence!” We miss our old girlies and will never forget them, but we are overjoyed by our new little arrivals! They are called Lily and Ruby, and are silver tabby British shorthair cross. Their father is a pedigree silver tabby, and their mother a brown and white tabby. She had five kittens, and here they all are, asleep together in the basket, awaiting our arrival on Thursday to pick up our two. The lady we got them from very kindly sent me this photo.

Happy WOYWW everybody, and have a great week.

Wednesday, 28 June 2017

WOYWW 421

These photos of my desk were taken last night, after I’d had a short session working on the tags for my Infusions Mini-Album.

The first is taken from further back than usual, to show the stuff spread out on either side – my two Really Useful Boxes (RUBs) of Distress Inks on the left, and the larger RUB on the right, which contains all my Infusions, Brushos, Dylusions sprays and paints, with their applicators. The central area of the desk is fairly clear because the picture was taken just after I’d finished a tag and inserted it into the page of the mini-album – you can see the pages to the left of the craft sheet.

Here’s a closer view. You can see my Inkylicious Ink Dusters all out on the desk as well – I am using these for applying Distress Inks to the tags to create the backgrounds.

The big box of Infusions etc. on the pull-out unit to the right of the main work area. Beyond, you can see a bit of my little gallery (including a Zentangle picture I did) and my sewing machine in the corner.

Tucked behind the Cuttlebug is my new Tim Holtz/Tonic Stamping Platform, and beyond that, in the red magazine racks, lots of large envelopes with all sorts of bits and pieces in them such as recycled waxed paper and shiny paper, die-cuts etc. The white box and the cardboard box on top of that both contain ribbons, and the red unit underneath with the drawers contains sandpaper and various other bit and pieces. The dark green tubular metal thing is my little stepladder propped up against the further side of the pull-out unit. Also on the pull-out unit is an ice cream box containing all my ink blenders.

For more information on the tags, please see the previous post.

Kittens

Very exciting news – we have found some kittens! They are a pair of sisters, silver tabby BSH-cross (father is a pedigree silver tabby, mother tabby and white). They are very similar in appearance – silver tabby like little tigers, with white bibs, mits and socks. They live near Yeovil in Somerset, about two hours’ drive from here, and I found them on the Pre-Loved site online. They are extreeeemely dinky and pretty and we can’t wait to see them! We are going up on Thursday to view them but we are absolutely sure that these are the ones for us. They are only about 4 weeks old so won’t be ready to come to us till the end of July. They have two little brothers and another little sister too. I spoke to their owner this evening and she says one of the two girls is quite feisty and lively and was the first out of the box. I hope to take lots of photos of them on Thursday.

Knowing we’ve got a bit of time, we have been preparing for the New Arrivals. The other night my hubby sat down with me and we watched some Youtube videos together of various systems for kitty-proofing the perimeter of your garden. We have had various attempts at this in the past, none of which have been very successful. I found a UK-based company which does a very good job, and you can either get them to come and do it, or buy the kit to do it yourself, but my hubby said he could reduce the cost to at least a third by making it up himself, so he’s been doing a lot of drawing and planning, and experimenting with a few samples. He’s also been very busy clearing the back of the garden of a huge amount of ivy, so that he can block up any holes in the fence and start preparing to put up the brackets that he is making, which will hold the stiff plastic mesh. It will only look like Colditz if we put search lights up!!

As for me, I’ve ordered a few things on Ebay, and yesterday, the first of these arrived – a massive kitty tree!

I spent about 1 1/2 hours putting it together, and I can’t wait to see our new babies having fun on it! For full details, see here.

I’m finding it hard to think of anything other than kittens at the moment!

Infusions Mini-Album–Beginning to Colour the Tags

The first of two posts for today.

Working on the tags last night.

Because the Infusions give a rather busy and textured background, I decided to simplify the background on the tags and use Distress Inks instead, so that the text would be more visible, and then add some infusions at the sides.

The first tag is for the “Colours” title page.

For this I applied a selection of green inks with an Inkylicious Ink Duster, and added a small amount of A Bit Jaded and Black Knight Infusions on the right hand side of the tag. The edges were distressed with Black Soot Distress Ink, using a home-made ink blending tool; I did this on all the remaining tags as well.

This is the reverse side of the first tag.

For this I used purple Distress Inks and added some Violet Storms Infusions for a bit of texture.

I used some of my small offcuts of card to mop up the mess on the craft sheet each time, and edged each one with Black Soot Distress Ink – I can make these up into cards or something else in future.

The text added to the first tag, using a permanent black marker pen. I added a bit more of the A Bit Jaded and Black Knight Infusions to the bottom of the tag.

The completed tag.

Here is the tag slipped into the title page for the “Colours” section of the album.

The reverse side of the page, with the back of the tag showing.

Moving on to the second tag, again I created the background with a variety of Distress Inks, this time in reds and oranges, and added some Rusty Car Infusions. Again, you can see the mop-up sheet. For this tag, after creating the Distress Ink background, I sprinkled it with some water and then blotted it off with some kitchen paper, leaving a mottled effect.

The water spattering was added to the reverse of the tag as well, which was coloured with Evergreen Bough and Stormy Sky Distress Inks, and some In the Navy Infusions added.

The front of the completed tag.

This is the tag in place in the “Wet Paper” title page.

The reverse of the page.

The mopping up sheet from this tag.

To create a nice mottled effect when mopping up, I heat set it after each mopping.

There are still a LOT of tags to do! This is going to take me some time.

Wednesday, 14 June 2017

WOYWW 419

My desk after I’d finished the latest session on my Infusions Mini-Album. Please see previous post for details. The pages of Book 3 are all laid out so that various ones can dry, and if I don’t lay them out, I shall get them out of order. On the craft sheet is an experiment – I’ve stuck down some cling film with transparent gel medium – this may or may not work! Beside it is the open box of my pens. You can also see the pages of Books 1 and 2 stacked up and secured with rubber bands, and the little pile of rejects/spare pieces which I am glad to say I am managing to use up for title pages.

Last week I also completed a spur-of-the moment project, my “Second Wind” mini-album. I had great fun with my first attempt at a Coptic binding.


Beatrice

(Photo taken in 2010.) We are getting very concerned about Beatrice. She has been grieving for Phoebe and over the past few days we’ve had a job to get her to eat anything at all. My hubby is taking her back to the vet again tomorrow – he took her a few days ago and she gave her some medicine that smells like Marmite, to keep things moving – she was producing very small hard little poos – and to give her some extra nutrition. She hates having anything put into her mouth (giving her pills has always been a complete nightmare!!) so doesn’t relish this being squirted in with a syringe and shakes her head and spits it all out, and since she’s not really eating, it’s hard to get it into her on her food. We think her time may be rapidly approaching now, only three weeks after Phoebe, but we’ll see what the vet has to say tomorrow. We thought we would probably lose both of them this year but I didn’t think it would be so close together.

Walk-in Pantry


The plaster is now all completely dried out, since the above photo was taken.

If the carpenter is able to stick to his schedule, he should begin work on my pantry on Monday, and I am so looking forward to this. I’ve coped very well in Mum’s little kitchen but can’t wait to spread my wings a bit and be able to do some more adventurous cooking again. At the moment if I do more than the basics, I am walking to and fro all the time between the two because what I want is always in the other one! I am very much looking forward to bringing the food back into the main kitchen and organising my new pantry, and I’m keen to know what the carpenter has planned for the door and one or two other details. Discussing it with my hubby the other day, I’ve decided to bring the small fridge through from Mum’s kitchen and ask the carpenter to allow space for this underneath the stone slab. After Mum moved here, my old fridge, which exactly filled the space under her counter, decided to give up the ghost (probably didn’t like moving house!) so we got her a new one, but it’s too small for the space really. If we need to equip the little kitchen fully in the future, we can always get another one, and in the meantime, I might as well have the use of it in a more convenient location. It’s very useful as an overflow, especially now the summer is coming, and I have never had anywhere to put it in my kitchen.

Garden

For my birthday, my hubby gave me a water feature for the centre of the lawn. Several months ago we’d looked at them and found that the ones that were big enough to make any impact were too expensive. Unbeknownst to me, he decided to make me one – from an upturned plastic plant tub from B&Q, a zinc tray from Ebay, and some rocks from the garden centre, and a fountain unit given to us!

It’s a huge success. The water flows down over the sides of the pot (which of course doesn’t show up properly on the photo). The other day we went to the garden centre and got the little wooden edging (which looks like sponge fingers lol!) and some extra rocks, and the plants. They should grow and spread, and fill the circular bed. Isn’t he clever?

The climbing rose is now in full bloom. It looks better this year than ever before.

We have got our first sweet pea out!

Diet

Red Letter Day yesterday! Tuesday is my normal day to weigh myself, and yesterday I had reached the grand total of exactly 4 stone lost since I started the 5:2 diet 3 years ago, at the end of June, just after we returned from our holiday! Only a few more pounds to lose and I’ll reach my target weight, after which it will just be a question of maintenance. I am feeling extremely chuffed with myself, not to mention feeling better physically for having shed all that awful excess weight, and enjoying wearing some of my favourite old clothes that I can now get into again after many a long year! It’s like having a new wardrobe.

Have a great week, everybody.

Tuesday, 13 June 2017

Infusions Mini-Album–Completing the Title Pages

This afternoon I made the title pages for Books 2 and 3 of my Infusions Mini-Album. One or two of them had to be left to dry, and I will complete them after this.

Again, I used up some of the reject/spare pages. For the first one, I should have chosen a stencilled one that didn’t use Polyfilla because there was one of those to come, but once I realised, it was too late! I added text with the white Uniball Signo marker pen and a black archival pen, and added some white Rub’n Buff and Treasure Gold to the raised parts.


I did the text in the same way on the Stencil with Polyfilla title, and added some Treasure Gold to the raised parts.

Simple text on the next one. I think I had it in mind to add some hand-embossed leaves and flowers to this one so I hope I’ve left room for them!

For the Added Texture title page, I thought I’d use a mixture of textures. From left to right: bleached mulberry bark (I tore off a tiny fragment), coarse pumice gel, regular matte gel (for attaching the mulberry bark), glass bead gel medium, and finally crackle paste. These have to be left to dry overnight, especially the crackle paste which needs time in order for the cracks to develop.

Acrylics title page. In addition to the usual pens, I also added some shading to the text, with a soluble graphite pencil and a fine wet brush to blend it out.


For the Gesso title page, I decided not to add any card, but simply to spread gesso onto the squashed toilet roll, taking the gesso over the black painted edges. As I needed two pages for this title (to make the page numbers work), I added some texture by patting the surface gently with the flat of the palette knife, taking this effect over onto the right-hand page a little, but leaving a smooth central part for writing on. Once this was done, I sprinkled on some Black Knight Infusions from Set 1 and some In the Navy from Set 2, and spritzed it with water and left it to stand for a bit, before drying the surface with my heat gun. These pages will have to be left overnight for the gesso to dry completely.


Finally, the Cling Film title. I am not sure whether what I have done will work! I wanted to leave some cling film on the page, so I scrumpled some up and attached it with a thick layer of heavy body clear gel medium. Once it is dry, I shall trim off the excess cling film. This was attached to a spare stencilled piece with a very blurry image on it, from about the third impression of a wet stencil. We shall have to see how this turns out after it’s been left to dry.


Monday, 12 June 2017

Infusions Mini-Album–Beginning the Title Pages

I resumed work on the Infusions mini-album today, and made the title pages for the various sections of Book 1.

I used the backs of some reject pieces from when I was making the sample sheets, and also cut new pieces of card to size for these. I began by making a title for the colours, made of Infusions from both sets, before remembering that I was going to make a separate title for Set 1 and Set 2, so I put this aside to use elsewhere. I had some fun with this, as I wanted to created  rainbow striped effect, so used pieces of scrap paper to mask off areas where I didn’t want the Infusions to go.

I made two more pieces using colours from Set 1 and Set 2 respectively, and after drying them, distressed the edges with Black Soot Distress Ink – I followed this pattern for the remaining title pages, too.

Adding the text to the colours title pages, using a white Uniball Signo marker pen, and a black archival pen to fill the letters.

Here are the remaining title pages for Book 1.


The next one was done with a small flat brush and white acrylic paint, and outlined with black pen.

I also wrote the names of the colours on all the colours sample pages. I didn’t photograph these as they will be done when I photograph the finished project.

The next task will be to repeat the process for Books 2 and 3, and then I can start working on the tags.

Today I had an idea to deal with the problem of Book 2 being thinner than 1 and 3. It will be bound between the other two, and the addition of some 3-D paper flowers on its front cover will make quite a nice focal point, I think, and they won’t be squashed by the large cover which will bind the three mini-books.


Wednesday, 17 May 2017

WOYWW 415

An extremely busy week and I’ve been out all day today, so only had time to snap a photo of my desk and get it on the computer, but I think 11.30 p.m. still qualifies to enter a Wednesday blog hop! Unfortunately I’m not going to have time to visit any desks, and it may be a while before any visitors to my blog get a reply, but I’ll do my best!

It’s not a very interesting desk this week, I’m afraid. On the left are the info sheets about the Infusions Mini-Album page order. Details here. To the right are the three bundles of pages which are now in order to make three separate books, which will be bound together into one cover. There’s still quite a bit to do on them as I have to make title pages for each section, and the tags to go into the loo roll centres. There are some reject pages on the far left of the picture – some of these are failures and others are ones I decided to omit from the album, which will go in my stash to be used for other projects.

Talking of which, a couple of days ago I used one to make a birthday card for my hubby, as it’s his birthday on Friday. Full details here.

Busy busy busy this week with something on all day most days! Yesterday and today I attended a Christian conference which ran all day, with evening sessions too. Quite brilliant and my head is still buzzing with it all. Plenty of new material to incorporate into my teaching sessions, and a lot to think about. Dashing home at tea time and getting a simple meal on, and then dashing out again!

Tomorrow we are off to the Devon County Show, which is one of my favourite days out in the whole year. It will be another long day, with a meal out at the end of it. We are more or less celebrating my hubby’s birthday tomorrow because I’m busy again on Friday with the Cancer Cakeathon meeting in the afternoon – our regular monthly get-together of friends who have met through our cancer. We sit about and chat and laugh and eat a lot of cake! I am quite relieved that my Bible study group has been cancelled in the evening because by then I shall need a long rest, I think! However, it’s not to be, because I’m singing at church this coming Sunday and the next, so have practising to do – having been busy with a lot of other things recently, my guitar playing needs brushing up a bit.

Health Update

On Sunday we went to the private hospital in Torquay which takes NHS overflow, for my CT scan to see if my hernia has returned. Details here. It was in the mobile scanning unit, which I’ve never been in before – I’ve had MRI scans in the past in the mobile unit but not a CT scan. It went smoothly and I was in and out pretty quickly – a lot more quickly than previous scans at Torbay Hospital where you are sitting around for hours! Not sure when I shall get the result but soon, I hope. It will confirm whether or not I require further surgery to do a more permanent repair on the hernia, to prevent any further obstructions.

On Monday we had to go to the GP’s surgery for a blood test in advance of my oncology appointment next week. Having had the cannula in the vein in my arm the day before, she went in slightly above, and because I’m on rivaroxaban (an anticoagulant) I’m a terrible little bleeder and I’ve now got a lovely red wheal on my arm! Pretty.

In the middle of all this busyness I was not best pleased when my hubby came home with a cold. I tried to keep away from him, but unfortunately I have caught it. Fortunately it’s not too bad and I’ve managed to keep going, but it’s inconvenient and a huge bore.

Kitty Health Update

Phoebe still up and down. She had a very subdued day a couple of days ago and didn’t eat, and was very clingy, but the next day she was better again and eating well. We continue to keep a close eye on her.

Same with Beatrice really – some days she walks as if drunk, and then the next day she’s rushing about like a crazy kitten! She’s no good at jumping up on things any more as she seems to have lost the spring in her back legs, and she falls off things. If she was a person, she’d probably have a granny frame by now.

They both seem contented enough and neither seems to be in pain, so we will keep them going as long as we can, our two old ladies!

Have a great week, everyone, and I’ll try and catch up with you later.

Tuesday, 25 April 2017

Infusions Mini-Album–Prepping the Pages

A couple of days ago I put a whole lot of toilet paper rolls into my flower press to flatten them, and a few under a pile of heavy books. The ones under the books didn’t flatten too well, but those from the flower press did pretty well. I bought this flower press at a village fete last year for a song, thinking it might be useful for just this sort of job.

The ones that had been under the heavy books, I put into the flower press for a bit more squashing. Not sure how many I shall need, but I can always do more if necessary. I’ve got thousands of the things knocking around in my studio (they keep falling on the floor!) so it will be good to use them up.

Making albums out of them, you do have to make sure they are all the same size. I use 2 different kinds of loo paper – one is soft and posh and expensive (the middles of which I am using for this project) and the other is real el cheapo stuff (£1 for 6 rolls) for cleaning the drainable bags for Kermit (my stoma) – after all, you don’t need anything posh for this so why waste money? Ha! The cardboard rolls for the cheap stuff are bigger (bit of a cheat, really, because the full rolls look nice and big, but the hole in the middle is bigger, so you’re actually getting less). Since getting Kermit just over 2 years ago I’ve become quite an expert on loo paper… but I digress…

Since the edges of the rolls and the inside of one end (where the tags will go) will be visible, I painted these with black gesso. Here are the insides done.


I used a narrow palette knife for this, and realised after doing both ends of the first one that I only needed to do one end, since the other end will be closed by the album binding, and invisible.

I used a small foam brush to apply gesso to the edges of the outsides of the rolls, making sure I coated the edge of each roll because this will show, both ends.

They were still not 100 percent flat, but I hoped that once I got the samples stuck onto them and they were bound into the album, they would eventually flatten completely.

This proved to be a messy job!

Thank goodness for washing up liquid and kitchen scrubbies! I got nicely cleaned up in time for a cup of tea!

Coming back later, I touched them up with more black gesso where they needed it, using a grotty old brush I’d already ruined using it for gel medium… You live and learn. I also started pairing the samples and working out which ones needed to be stuck to the toilet rolls that will contain explanatory tags, and which could be stuck back to back. I began the messy and somewhat tedious task of sticking the samples and assembling the pages. More photos tomorrow.
Sunday, 19 December 2010

Toilet Roll Mini-Album - Flowers

Over the past couple of days I’ve made all the flowers and leaves for the album – if I run out before I’m finished, I’ll just have to make some more!
Here are all of them together, inked and embossed, but without centres as yet, together with the leaves.

Here is a more detailed view of some of the yellow and orange ones.

Here is a close-up of the leaves.

I then added centres to the flowers, using Stickles (glitter glue) which had to be left overnight to dry.


Here is page 1, complete:

and page 2, almost complete – I have yet to add flames to the menorah (lampstand).

When I realised it was going to be quite impossible to finish this before Christmas, I contacted my friend to let her know and she was very understanding! I have temporarily set this project aside and started on another one – another explosion box, which I hope to complete before Christmas for another friend.
Related Posts Plugin for WordPress, Blogger...