Showing posts with label Card. Show all posts

Tuesday, 18 December 2018

WOYWW 498–Mystery Project Revealed

Writing this on Tuesday afternoon.

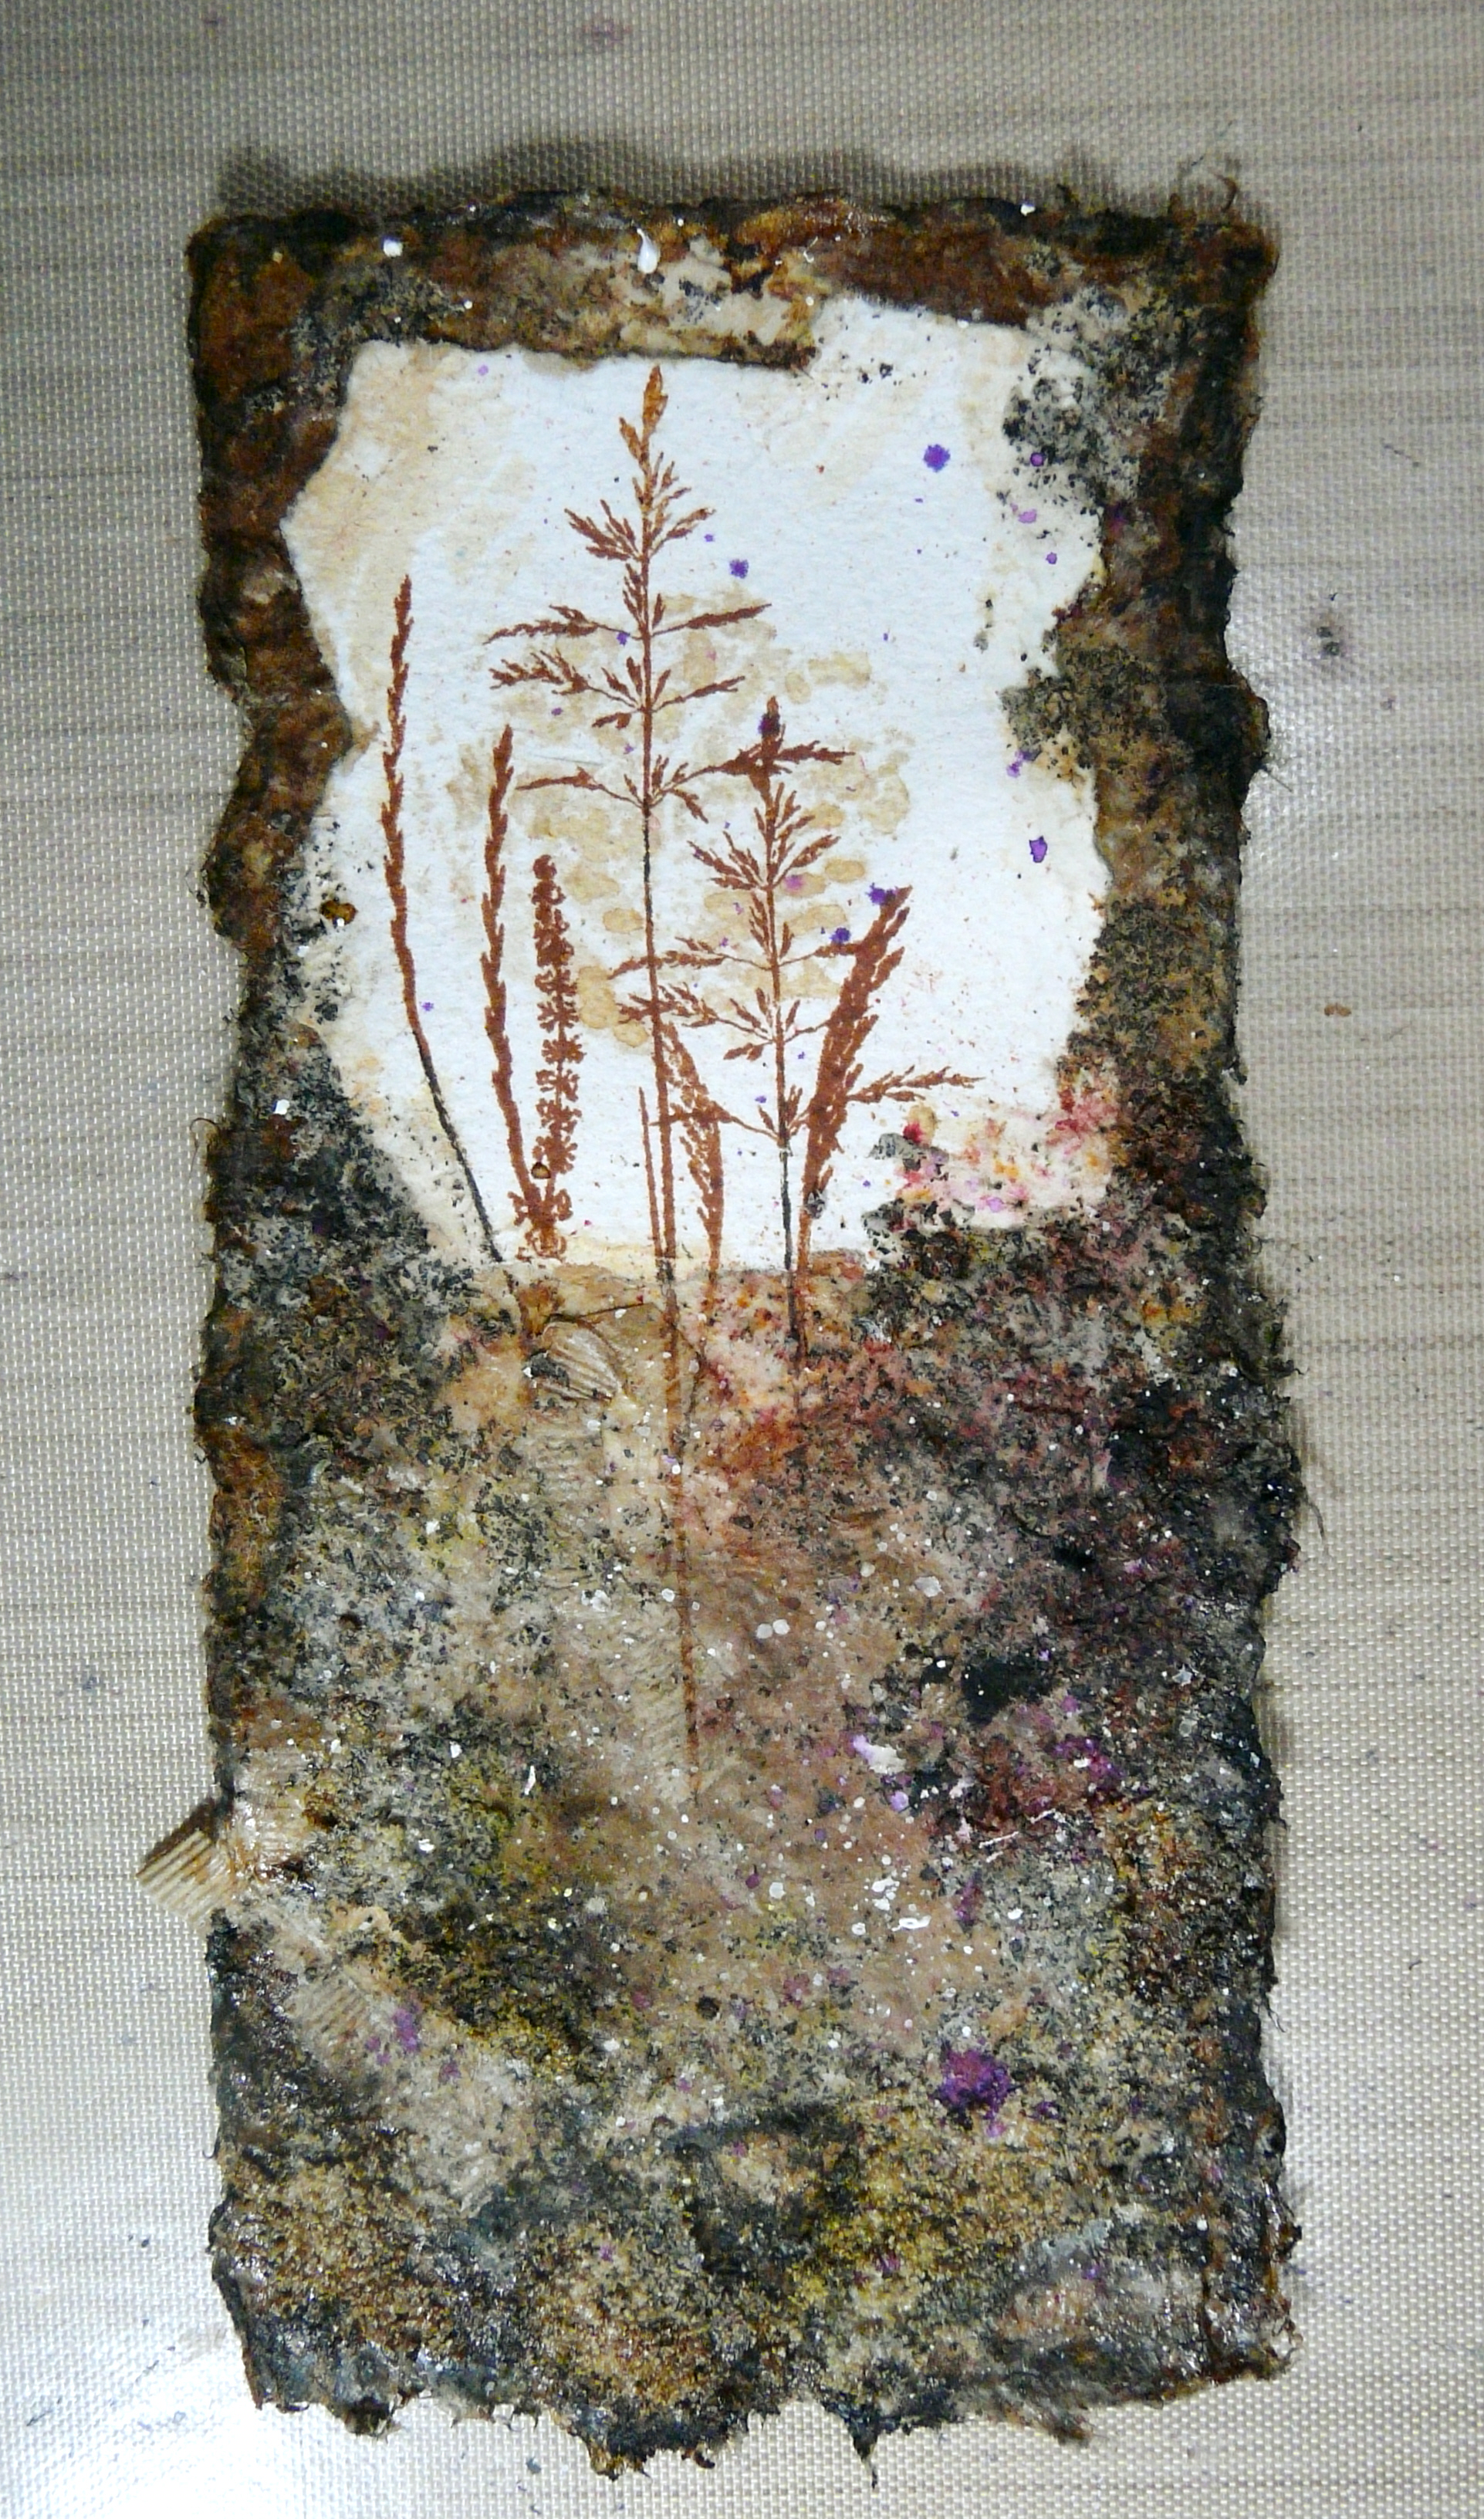
Three little hanging heart ornaments for friends, from this:

01 Three Small Heart Frames from Ebay

to this:

06 Two Completed Hearts

11 Completed Heart 1

Here are some closer details.

11 Brown Heart Complete

05 Painting the Corrugated Cardboard

08 Mesh and Jute String

06 Completed Turquoise Heart

04 Painting the Terracotta Pots

Can you guess what I made the little terracotta pots from? Bet you can’t… Details in an earlier post.

05 Background, Lace and Pumice Gel Medium

11 Completed Heart 1

03 Wallpaper Pieces Stuck to Music

10 Inking the Leaves

The purple heart was for one friend’s birthday, so I also made her a card.

07 The Finished Card

09 The Card and Present

I have uploaded all the posts about the making of these hearts and the card and you can scroll down to see them if you are interested.

Some Fun with Photo Manipulation

The other day I was preparing some fruit for my normal “diet day” platter and cut a peeled clementine in half. I thought it made such a beautiful shape.

01 Cut Clementine

I thought I would have some fun manipulating this photo, as I did once before with a rather artistic piece of orange peel.

06 Four-in-One

Clockwise from top left, adding effects cumulatively: black background, brightened colour; posterise; paper cut-out; polar co-ordinates. Quite fun, eh? I could have done loads more with it, and spent (wasted?) all day at it. (I know, I should get out more…) Oh, by the way, it tasted good!

Sourdough

I didn’t make sourdough again this week but made some more sourdough crackers and fed Esmeralda and put her back in the fridge to cogitate for another week.

63 Esmeralda 18-12-18

She’s quite happy as long as she gets a weekly feed and a clean bed for the week!

Other Cooking

Overnight I made some more bread in the bread maker, with lots of seeds – sunflower, pumpkin, sesame and brown flax. Gorgeous and crunchy with a good nutty flavour!

Seedy Bread from Bread Maker 18-12-18

I also made a salmon and broccoli bake for our supper. Here it is, ready to go in the oven.

Salmon and Broccoli Bake 18-12-18

Computer Update

Most things are now working OK, but the computer shop have told me that both hard drives that I took in have failed. The caddies are OK though. One of them I was pretty sure was dud (very old) but the other one is pretty new and still in guarantee so I’m hoping to get my money back on that one. Some things on the computer still aren’t working properly and I need to spend time resolving these issues but I’m too busy with other stuff at the moment.

Kitties

Ruby is still grounded because my hubby has been out a lot and the weather has been too awful so he hasn’t been able to spend any time in the garden. Neither of them has been hankering to go out that much (which isn’t surprising given that it’s raining all the time) but they are obviously needing to blow off steam more than usual!

Health Update

I had a very fruitful appointment with my surgeon last Thursday, and I’ve blogged full details here so I won’t go into it all now, but suffice it to say we discussed risks and advantages of further surgery or leaving it alone, and he is going to consult a colleague in Exeter to discuss the best way forward. I came away much better informed about why things had gone wrong in the spring, and the reason for my post-operative infection, and as a result, I am no longer quite so resistant to further surgery if that is what they conclude will be the right thing to do.

This situation is pants

The pants saga continues, not having heard anything since my last conversation with them on 19th November, when I emailed the GP and requested a further prescription, and they promised they’d deal with it straight away. I phoned the rep last Wednesday and she didn’t return my call. I managed to speak to her today and she said she’d been waiting for news before calling me, and I said I would have appreciated a call to let me know at least what was happening, even if it was nothing!! This afternoon they called me back and said they were requesting another prescription as a matter of urgency, and I said I was so fed up with this and wanted the pants by Christmas. Ha ha. Tomorrow is the last dispatch day till the New Year. I was practically screaming by this point. I said that would mean they wouldn’t even be able to start making them till then, and she agreed that they usually took about 4 weeks, which would take us into February!! I said I could just about manage with two pairs (one on, one in the wash) but if I had an accident I’d be sunk. She said they’d mark the order as top priority. Again, she kept saying, as they all do, “I completely understand, I really do…” but it’s just words, words, words…

As I say, the whole thing is pants. Grrrr grrrrr grrrrr x 3,000,000. I could add a few choice words too, but I don’t want to break my laptop after all the trouble I’ve had with it recently.

Have a great time over Christmas everybody. I probably won’t be posting next WOYWW because it’s Boxing Day and we are out.

My Wife Insisted


Monday, 12 February 2018

Pop-Up Valentine Card for my Hubby

Recently I found a video on Youtube with a number of pop-up designs for Valentine’s and I thought it would be fun to make one for my hubby. This time last year I was in hospital for Valentine’s and didn’t make him one, but he gave me the biggest one I’ve ever seen, and all the hospital staff thought it was brilliant!

Anyway, this year, I’ve managed to escape being in hospital for Valentine’s although I am waiting to go in, so there’s no excuse for not making one for him this time!

I began by making the simple pop-up mechanism from white cardstock.

This is the outside of the pop-up, folded. You can see some of the construction lines.

I thought I would use some of the scraps from my mystery project for this card. Here they are, being smooshed with Fired Brick Distress Ink. This particular paper is an absolute pain to ink because it seems to have rather a waxy surface that resists liquid, and it takes ages to dry with the heat gun, too, but it’s a paper stack I’ve had from the very beginning, and I’ve never liked it much, so I thought it was high time I used it up, especially that nowadays I’ve got enough experience to know how to improve it.

For the pop-up piece, rather than leaving it stark white, I smooshed it with Worn Lipstick Distress Oxide to give a marbled effect.

After this I distressed the edges with Vintage Photo Distress Ink – I thought that a touch of brown would prevent the card from looking too girlie.

I also distressed the sides of the pop-up, masking off the surrounding areas with some scrap paper.

Then I took one of the inked scrap pieces and cut it into half-inch strips, which I wove in and out of the pop-up to create the basket.

When the weaving was finished, I trimmed off the bottoms of the strips, and left the tops at random lengths.

I have only got one heart punch, and it makes very small ones. I punched out quite a few from one of the scrap pieces, punching them as evenly as possible so that I could use the waste piece to embellish the front of the card. Then I made some intermediate and larger hearts, drawing round a little template I made and then fussy cutting them.

I also cut some hearts from some scrap gold card to mat the hearts, and also added stickles (gold and orange peel) to some of the hearts, and began to glue them onto the pop-up with Scotch Quick Dry Adhesive.

I punched the corners of the pop-up with my multi-shaper punch. It’s not designed as a corner punch, but with some careful lining up, I was able to achieve the result I wanted. I also distressed these punched corners with Vintage Photo Distress Ink to match the rest of the pop-up.

At this point I forgot to take any photos for a while. I mounted the pop-up on some pink cardstock, and on the outside, front and back, I added some red cardstock that I distressed around the edges with Vintage Photo Distress Ink, and I also added some of this ink in the centre with an Inkylicious Ink Duster. I layered a heart cut from a scrap onto more of the scrap gold card, and this embellishment was mounted in the centre of the card with a large foam pad.

I attached the punched heart strip onto a piece of gold card using Scotch Quick Dry Adhesive, and then applied the whole embellishment to the red mat with double-sided tape, folding the excess punched layer around the back, before matting the whole thing onto the pink card base.

Here is the completed pop-up, with cut and punched hearts on the woven strips and also stuck down onto the back of the pop-up to give a dimensional effect. I hand-wrote the sentiment.

Finally, the completed card with the envelope I made from more of the pink cardstock, using my envelope punch board.

The edges of the envelope were distressed with Vintage Photo Distress Ink.

Monday, 20 November 2017

Backgrounds with Infusions, Inks and Gesso

Returning to my Card Factory for this year, over the last couple of days I have made some backgrounds using gesso with infusions, and distress inks, and have die cut circles from some of these backgrounds.

The materials used to create the gesso backgrounds.

I spread gesso onto a piece of A6 card with a palette knife, and immediately sprinkled on a mixture of Slime and Rusty Car Infusions from set 2, and spritzed it lightly with water, and brayered over it, which spreads the infusions into parallel streaks. This is the sample at top left. There was quite a mess on the desk so I brayered this on to the subsequent cards, adding Infusions as I went. The colour gradually got more blended with the gesso with each subsequent sample and all are useable and slightly different.

The finished samples.

I mopped up the rest of the mess onto an A4 sheet and added more gesso and Infusions as required. For this sample, I brayered over the top of the right-hand side of the sheet and left the other side to dry naturally.

This is the final mop-up sheet, with further Infusions added, but no additional gesso.

These two A4 sheets can be used in other projects.

From the four small A6 samples, I die cut two different sizes of circles and also some larger circles from some printed card I had in my stash.

I am keen to use up quite a bit of stuff that’s been hanging around for years – much of this card is far too brightly coloured for my taste now, or not of a pattern or design that I am that keen on, being part of sets I bought many years ago. With a bit of treatment they can look perfectly reasonable.

I cut a piece of orange card 5 inches by 10 inches and folded it in half. You can see the original colour on the scrap underneath the background piece.

I applied gesso all over, using a foam brush. This left a lot of unsightly brush marks, so I spritzed it with water and then blotted it with a crumpled up piece of kitchen paper. I applied more gesso and repeated the process until I was happy with the result.

I heat dried it, and then stamped it using the Artistic Stamper Harlequin stamp (C349) without an acrylic block, stamping fairly randomly and taking care not to press the whole thing down each time. I stamped using Iced Spruce Distress Ink, and then distressed the edges with Aged Mahogany, using a home-made ink blender.

In the above photo, you can see the matted die-cut circles laid on top. This circle will be stuck down in the centre and the card base folded in half, and I will stamp something on the die cut circle and/or add some form of embellishment.

Moving on to the next piece, I took a piece of yellow A4 card and folded it to A5, In the following photos you can see its original colour, and the results of toning it down with gesso and inks, giving a much softer and more subtle effect.

I applied the gesso, again using a foam brush, but taking care to use only vertical and horizontal brush stokes, and then spritzed it lightly with water. Once I’d heat dried it, I used the same harlequin stamp, this time with Tattered Rose Distress Ink. Using an ink duster I added a bit of Cracked Pistachio Distress Ink randomly, and finally distressed the edges with some Aged Mahogany Distress Ink (visible on the photo above). Again, you can see the die cut circles chosen to go with this particular sample.

I decided to create a different background without gesso on another piece of the yellow card. For this one, I blotted off the Iced Spruce on the harlequin stamp, over most of the surface of the card until the stamp was clean. Then I added a small amount of Slime Infusions (from set 2) and repeated the stamping process, this time using another Artistic Stamper stamp: Calligraphic Mat #12, us9ing Aged Mahogany Distress Ink.

I applied a little Hickory Smoke Distress Ink with an ink duster, and also some Milled Lavender, both with an ink duster and with a home-made blending pad to distress the edges somewhat. Finally I added a small amount of Blackcurrant Infusions from set 1, randomly here and there.

Here are the three backgrounds so far, with the die-cut circles not yet glued down. I am not sure how I am going to embellish these yet, but they will all need the heavy book treatment to flatten them out properly before then.


Thursday, 22 June 2017

Infusions Mini-Album–Cutting the Tags

Several of the pages of my mini-album are made from flattened toilet roll cores, made to take tags on which there will be written instructions and explanations of the various samples of uses of Infusions.

I counted the number of tags I needed from the typed charts I made, and it came to 30. Using some scrap white card, I have cut out these 30 tags, each measuring 2 1/2 x 4 inches. They slide nicely into the flattened toilet roll centres with enough protruding to pull them out, and to allow for some yarn to be threaded through.

Thinking that pulling them out by the yarn would eventually tear the hole, I made a set of reinforcements for the holes, one to be stuck on each side of the tag.

To make these, I punched a small hole in some scrap card, using my Fiskars small single hole punch, and then lined up my 1/2 inch circle punch as best I could so that the small hole was in the centre, and punched it out. Some of them were a little offset but I’m not too worried about that.

The scraps of card left over from the punching are quite interesting so I think I’ll keep them and use them as masks/collage pieces perhaps.

The tags with their reinforcements.

Order of work:

  1. Mark centre of short edge of tag.
  2. Stick reinforcement over mark.
  3. Line up small single hole punch over the central hole in reinforcement and punch small hole through tag.
  4. Turn tag over and stick second reinforcement over small hole in tag, lining up holes.

Seems to work OK so far!

Next step: to colour the tags ready for adding text. As the Infusions give a very mottled, textured-looking surface, I thought it would be better to colour the tags with Distress Inks and Distress Stains, and add tiny amounts of Infusions afterwards if they needed a bit more interest, probably concentrating on the edges of the tags that will be visible when they are in situ. After all, the focus on the tags must be the text, not the background, which should remain less conspicuous. I can co-ordinate them with their respective pages.

Wednesday, 24 May 2017

Mixed Media Anniversary Card

Today is our 31st wedding anniversary. Goodness, is it really that long? What a lot has happened since we got married!

Last night, still catching up with myself after my busy week last week, and then having to rest a lot, I finally sat down in my studio and got a card made for my lovely hubby. I originally planned on making something quite simple because of time, but while I was resting, I came across Marta Lapkowska, a brilliant Polish mixed media artist, on Youtube, and some of her fabulous video tutorials on creating texture from anything you could think of – an absolute gift to a complete texture junkie like Yours Truly. https://www.youtube.com/watch?v=cAOJwdQqokQ and this inspired me to do something a little more challenging.

What fun I had!

Here’s what I did, step by step.

First of all, I selected one of my sheets of watercolour paper with stains on it from drying teabags, and tore one out.

In my stash I’ve got quite a few sheets of hand-made paper which I think were originally part of some wedding service sheets that I collected up after a wedding service once. I knew they’d come in useful for art – they are gorgeously soft and textured. Again, I tore out a piece, to give a nice uneven edge, and I was delighted to find that the tearing gave almost the same edge as the natural deckle edge of the hand-made paper.

Next came the teabags. I selected a few from my stash.

I cut them open and put some of the tea on my palette. The rest was thrown away. I should really have a blitz and empty all my stash of teabags (I’ve got hundreds!) and save the tea to put on the garden! Also, the teabags would take up a lot less room without the tea in them. One day, one day…

I mixed the tea with some Polyfilla One Fill, my preferred (cheap) texture paste. It was pretty dry so I added some water.

I opened up the teabags by tearing them, and saved the cut off strips which were interestingly textured.

I applied a few of the teabags to the bottom half of the hand-made paper piece, using soft matte gel medium.

I then applied the tea/Polyfilla mixture in places, to add texture, being careful not to obscure the more interesting part of the teabag layer. I wished I had screwed the teabags up more, instead of laying them down flat, as I would have got more interesting texture that way.

After drying this, I thought it needed a bit more texture added, so out came the coarse pumice gel medium – I love this oh-so-gritty stuff!

Using soft matte gel medium, I stuck down the teabag stain piece to the top of the hand-made paper, and also added a bit of this gel medium over the textured part, to make sure that it didn’t flake off.

Time for stamping. I am soooo glad I bought my wonderful Tonic Stamp Platform! I’ve never been very good at stamping and this tool makes it so easy. Also, I was able to do several test pieces (e.g. on the left of the picture) to experiment with the layout of the grasses stamps – this set is from Inkylicious, and is “Create a Collage – Meadow.” I did the stamping in several stages so that I could get the layout I wanted, using sepia archival ink.

I stamped so that the stems of the grasses extended below the bottom of the teabag stain piece, and extended them, and filled any gaps, with my fine sepia marker.

Here’s a detail shot of the stamping.

Painting with tea and coffee! I made up some strong tea and coffee for this.

Painting with the tea. I used a wide fan brush for this and dabbed it on more or less all over the background piece.

Using a finer brush, I painted the coffee around the edges and to emphasise some of the texture a bit more. I had to do this several times, drying in between with my heat gun – I don’t think I made the coffee quite strong enough.

At this stage I also painted a bit of tea over the teabag stain behind the grasses to emphasise it, as this was getting a bit lost in the design.

I thought the background needed a bit of colour variation, so I used some Infusions. To the bottom left I added some Lemoncello from set 1, and to the right, some Rusty Car from set 2, and these certainly added a bit of richness and depth.

I felt a distinct need to add a bit of complimentary colour to all this brownness, so I dug out my Crushed Grape Dylusions spray ink and spattered some of that on, and I think it improved it a lot.

The edges needed darkening, so I did this with some black acrylic paint. I also added some of this around the texture to emphasise it more.

I thought the whole thing needed lightening a bit, so I masked off the teabag stain piece at the top, and spattered the rest with white acrylic paint.

This was the result.

Originally I wasn’t going to put a sentiment on the outside of the card, but there needed to be something to balance the design, so I decided to add one. I went through my pile of rejects and spares from my Infusions mini-album project and found this one that exactly complemented my design. I tore off the bottom and wrote the text using my Uniball white Signo marker pen, and then darkened the edges, especially along the white torn top edge, with tea. I stuck this to the front of the card with regular matte gel medium, dabbing carefully over the text to prevent the water-soluble white from smudging, and afterwards touching this up where necessary.

To create the card base, I cut a piece of heavy white card and softened the edges with some more tea.

Inside, again using my wonderful stamp platform, I stamped the sentiment with sepia archival ink, using the “Memorable Moments” stamp set from Stampin’ Up.

To add a bit of interest, I made a couple of wide brush strokes across this sentiment with tea, using the fan brush.

I assembled the card using Scotch Quick Dry Adhesive which is a really good strong wet glue.

The finished card.

My hubby loves it!

Here it is, side by side with the other card I made recently, for his birthday last week.


Related Posts Plugin for WordPress, Blogger...