Showing posts with label Wedding Anniversary. Show all posts

Thursday, 24 May 2018

Wood Effect Anniversary Card

Today is our 32nd wedding anniversary. Where did the years go?

Having been so ill recently, I only managed to give my hubby a bought card for his birthday, and that was bought for me by a friend! I thought I’d better push the boat out a bit and make an effort and make a nice card for him for our anniversary.

At the County Show last Friday I was fascinated by a little wooden tag attached to the most expensive chopping board (if it hadn’t been for the price I’d have bought it because I fell in love with it!) – the little tag was made of laser cut veneer, and as soon as I saw it, I knew I could make something similar in card, and this would be the basis for my hubby’s card.

I began in Inkscape, working on my Apple Mac which is connected to the Cougar cutting machine (called Sheba). I found a free svg file online of nesting hearts, and I cut a dozen heart-shaped frames using two of the nesting sizes – unfortunately I forgot to photograph these till it was too late, but this is the paper left after they had been cut out. I ended up with a dozen smaller hearts (the bits that fell out of the frames) and most of these will go in my stash for other projects. In this photo you can also see the A4 piece with a window cut out for the front of the card.

I seem to end up using American Cardstock card for most of my cutting projects because it cuts like a dream. However, it’s not quite robust enough for a card base with lots of embellishments so this would have to be reinforced later on.

Again, I kept forgetting to photograph my progress. For the front and back of the tag I cut two hearts the same size as the outside of the frame, and these pieces also had our initials cut in them, as well as some little geometric flower petals like on the tag at the show. Propped up against the paint pot, you can see the completed frame, and the thickness I was able to achieve by laminating several layers of card together. When the edges were painted they looked like a bit of plywood! See below for the painting technique to replicate woodgrain.

The initials on the right were the pieces that fell out when I cut them from the hearts, and would be used to embellish the inside of the card.

I had intended to leave the initials in the hearts hollow as well as the petals, but you could see through and the one on the reverse was confusing, so to overcome this problem I stuck a small square of gold card on the back of each piece, so that the initials were gold, and opaque.

I glued the frame pieces stacked together to give a laminated and more rigid frame for the embellishment. In this picture you can see the linen carpet thread I used to suspend the embellishment, and the two heart pieces (front and back) ready to be attached to the frame.

Here is the first piece attached to the frame, with it’s little square of gold card glued on, to make the initial solid, and the hanging thread.

Here is the finished tag, with the side with my hubby’s initial on the left, and mine on the right.

I am so pleased with this little heart embellishment – it reminds me of some olive wood Christmas tree decorations I’ve got. I think one could take this idea further and make them in different shapes. They have a Scandinavian or Eastern European feel to them. I’ve wanted to make something like this for ages and thought of using mounting board but this is too thick to cut with Sheba, and you couldn’t cut them by hand. The laminated frame idea works well, or one could just laminate solid shapes. You could still have a design pierced through. They might make nice little Christmas gifts, or perhaps wedding favours.

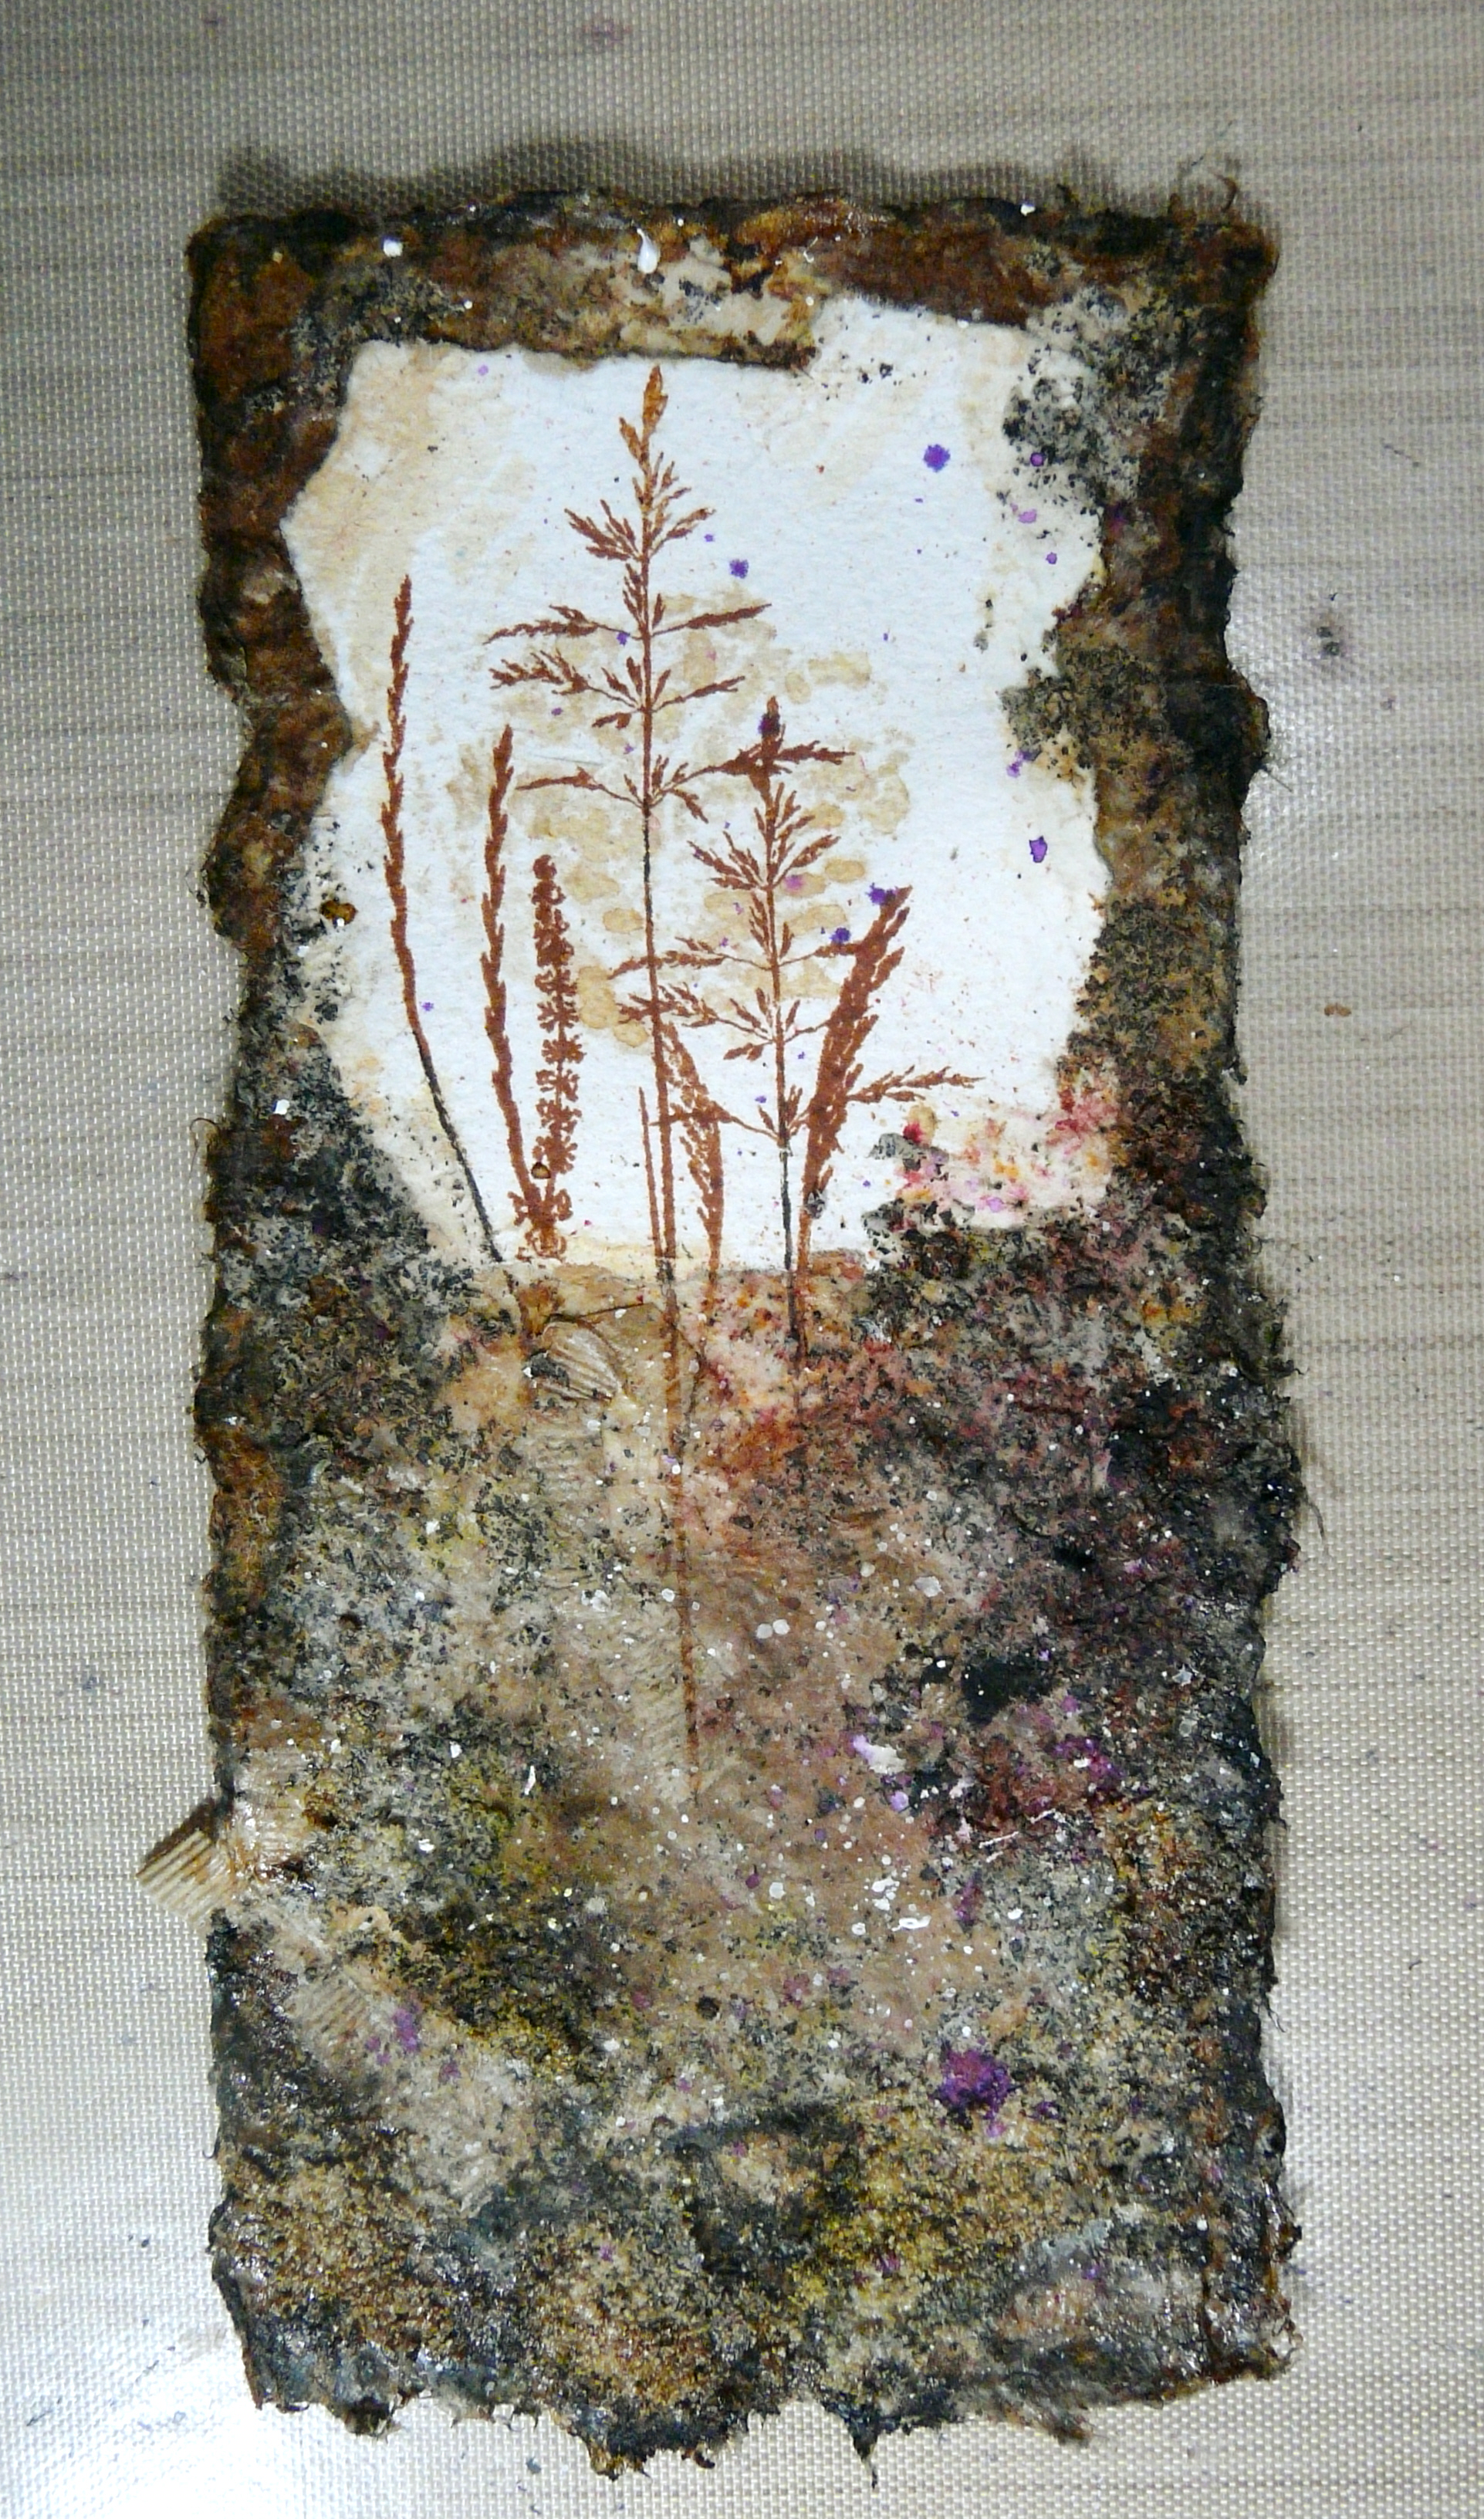
Moving on to the card base, I painted the whole of the front with beige fluid acrylic, and then with Desert Sands Infusions, taking care to paint broad vertical strips to represent the wood grain, as I did on the heart pieces.

Turning to the inside, I created another type of woodgrain background, this time with Distress Stains, to make a lighter background as a contrast. Normally I don’t much like the unevenness you get with these (the dauber bottle isn’t my favourite form of delivery) but for woodgrain the effect is ideal. I used a combination of Antique Linen and Old Paper. This is the technique I used for one of the pages in my Floral Mini Album.

Here is the main card base, and the piece I cut and coloured with Distress Stains to be stuck on the back of the card front. The hanging string would be sandwiched between these two layers. You can also see the two thin circles I cut from gold card, to frame the hole, both front and back, to give a nice finish to the card.

Here are all the materials I used to create the embellishments inside the card. I used a couple of the hearts cut from the middles of the frame pieces, and coloured them to look like wood, as for the front of the card, but this time, to add a bit of bling, I also added a light touch of Treasure Gold (gilding wax). For the sentiments I simply used some peel-offs that I’ve had in my stash for years. They were very small, but I like the effect of the gold on the woodgrain, and I didn’t want anything competing with the rest of the design.

The edges of the hearts were distressed, and they were glued together and stuck down, and some shading added. The initials were what was cut out of the front and back of the embellishment. I daubed them with Antique Linen and Old Paper Distress stains, and they also had a light dusting of Treasure Gold.

I cut a piece of plain white card and stuck it to the back of the card base for extra rigidity. Even though it was just the back, I distressed the edges with Gathered Twigs Distress Ink to take away the starkness of the white card.

Here is the finished card lying flat.

Here it is standing, so that you can see how the embellishment turns and moves as it hangs freely in the aperture of the card.

The completed inside of the card. You can see the embellishment through the aperture of the card.

I think this faux wood effect has come out very well. When I  have used Infusions in this way before (see this post for an example), I used Desert Sands Infusions straight onto white card, and it came out very orange – not a problem if you want it that way, but I wanted a more subtle approach here, so I used the Infusions on a painted substrate. You could make faux woodgrain in this way with any colour you wanted really.

Another reason I like this effect is that it is very suitable for a card for a man. It is strong and more sombre but it also has a natural effect. I used a similar theme on my hubby’s anniversary card in 2016, but this time with a woodgrain effect created with an embossing folder.

I seem to be in a bit of a brown phase again at the moment, after the bright colours of the Floral Mini-Album! I can’t wait to try replicating the effect of the absolutely fabulous wooden moths I saw at the County Show…

Wednesday, 23 May 2018

WOYWW 468

Yaaayyy! I’m back!

Sorry to be absent for so long but those who follow my blog will know that I have recently been seriously ill. However, I am now well on the road to recovery, and celebrating lots of milestones along the way – finishing my antibiotics, getting my own breakfast, starting to prepare simple meals, and generally getting back into the swing of things again. Thank you to everyone who sent good wishes for my recovery.

A major milestone was yesterday – first session back in the studio! It was driven as much by necessity as desire, because tomorrow is our 32nd wedding anniversary, and having failed my hubby miserably by resorting to a bought birthday card for him recently (shock horror) and what’s more, one that was bought for me by a kind friend, I really felt I must make the effort to make him a decent card for this occasion.

Here is my desk today.

A little explanation is necessary. Last Friday (another milestone) I made it to the County Show, which you can read about here. This was something I’d really been aiming for and it helped my recovery to have a deadline to work towards – I was darned if I was going to miss the best day out of the year because I was poorly again. Anyway, amongst the exhibits was a stand with beautiful hardwood kitchen boards (I was sorely tempted to buy one but resisted because I didn’t really need one, and not at that price) and attached to the most expensive and beautiful one was a little die-cut wooden tag that really took my fancy.

I immediately thought that I could replicate something similar with card.

I cut the pieces with my Cougar electronic cutting machine and stuck a small square of gold card behind each initial. To make the thickness of the ornament, I cut about a dozen heart-shaped frame pieces and laminated them, and threaded a string through the top before sticking the front and back pieces on, completing the piece. I will be doing a blog post about this project once it’s complete.

On my main desk photo above, you can see various cut pieces of card, and the card base being made. To create the woodgrain effect, I painted the pieces with beige fluid acrylic, and once this was dry, painted the surface with Desert Sands Infusions, using a flat brush and broad vertical strokes.

The heart ornament will be suspended in the middle of the circular aperture, and will hang and turn freely when the card is standing up. I’ve got quite a bit more work to do today to complete it – it needs quite a bit of reinforcing, and I want to add a bit of gold embellishment to the front of the card as well. Watch this space.

I shall soon resume uploading the blog posts about the process of making the mini-album about my mum. Next projects in the pipeline are to make two identical boxes to keep the two copies of the album in – Mum’s friend eagerly awaits hers as her copy of the album currently resides in a biscuit tin! – and to complete the long-overdue Infusions Mini-Album which has had to take a back seat for far too long.

As well as it being our anniversary, tomorrow is also our kitties’ first birthday!

I cannot believe that they are now officially grown up, and I had a little pang when I bought their first pack of adult cat food this week, marking the end of their kittenhood. I feel like a mother sending her child off to school for the first time… A real sense of bereavement as they were such adorable babies and the kitten stage lasts for far too short a time. I am glad I’ve got all the videos of them, though. They are both so big now, and very heavy – I find it quite difficult to pick them up – that is, if naughty teenage Ruby will even let me near her which isn’t often these days – she’s turning into a real independent little Miss. We will soon be letting them outside for the first time, something which always makes me anxious with new kitties. Hopefully my hubby’s kitty defences around the garden will be 100% effective – 99% won’t do because kitties are designed to find that 1%, you can bet on that.

It is so good to be back, and just in time to celebrate WOYWW’s 9th anniversary. Sorry not to be taking part in the ATC swap, but I wish you all joy in your giving and receiving of each other’s miniature works of art.

Happy WOYWW!

Wednesday, 24 May 2017

Mixed Media Anniversary Card

Today is our 31st wedding anniversary. Goodness, is it really that long? What a lot has happened since we got married!

Last night, still catching up with myself after my busy week last week, and then having to rest a lot, I finally sat down in my studio and got a card made for my lovely hubby. I originally planned on making something quite simple because of time, but while I was resting, I came across Marta Lapkowska, a brilliant Polish mixed media artist, on Youtube, and some of her fabulous video tutorials on creating texture from anything you could think of – an absolute gift to a complete texture junkie like Yours Truly. https://www.youtube.com/watch?v=cAOJwdQqokQ and this inspired me to do something a little more challenging.

What fun I had!

Here’s what I did, step by step.

First of all, I selected one of my sheets of watercolour paper with stains on it from drying teabags, and tore one out.

In my stash I’ve got quite a few sheets of hand-made paper which I think were originally part of some wedding service sheets that I collected up after a wedding service once. I knew they’d come in useful for art – they are gorgeously soft and textured. Again, I tore out a piece, to give a nice uneven edge, and I was delighted to find that the tearing gave almost the same edge as the natural deckle edge of the hand-made paper.

Next came the teabags. I selected a few from my stash.

I cut them open and put some of the tea on my palette. The rest was thrown away. I should really have a blitz and empty all my stash of teabags (I’ve got hundreds!) and save the tea to put on the garden! Also, the teabags would take up a lot less room without the tea in them. One day, one day…

I mixed the tea with some Polyfilla One Fill, my preferred (cheap) texture paste. It was pretty dry so I added some water.

I opened up the teabags by tearing them, and saved the cut off strips which were interestingly textured.

I applied a few of the teabags to the bottom half of the hand-made paper piece, using soft matte gel medium.

I then applied the tea/Polyfilla mixture in places, to add texture, being careful not to obscure the more interesting part of the teabag layer. I wished I had screwed the teabags up more, instead of laying them down flat, as I would have got more interesting texture that way.

After drying this, I thought it needed a bit more texture added, so out came the coarse pumice gel medium – I love this oh-so-gritty stuff!

Using soft matte gel medium, I stuck down the teabag stain piece to the top of the hand-made paper, and also added a bit of this gel medium over the textured part, to make sure that it didn’t flake off.

Time for stamping. I am soooo glad I bought my wonderful Tonic Stamp Platform! I’ve never been very good at stamping and this tool makes it so easy. Also, I was able to do several test pieces (e.g. on the left of the picture) to experiment with the layout of the grasses stamps – this set is from Inkylicious, and is “Create a Collage – Meadow.” I did the stamping in several stages so that I could get the layout I wanted, using sepia archival ink.

I stamped so that the stems of the grasses extended below the bottom of the teabag stain piece, and extended them, and filled any gaps, with my fine sepia marker.

Here’s a detail shot of the stamping.

Painting with tea and coffee! I made up some strong tea and coffee for this.

Painting with the tea. I used a wide fan brush for this and dabbed it on more or less all over the background piece.

Using a finer brush, I painted the coffee around the edges and to emphasise some of the texture a bit more. I had to do this several times, drying in between with my heat gun – I don’t think I made the coffee quite strong enough.

At this stage I also painted a bit of tea over the teabag stain behind the grasses to emphasise it, as this was getting a bit lost in the design.

I thought the background needed a bit of colour variation, so I used some Infusions. To the bottom left I added some Lemoncello from set 1, and to the right, some Rusty Car from set 2, and these certainly added a bit of richness and depth.

I felt a distinct need to add a bit of complimentary colour to all this brownness, so I dug out my Crushed Grape Dylusions spray ink and spattered some of that on, and I think it improved it a lot.

The edges needed darkening, so I did this with some black acrylic paint. I also added some of this around the texture to emphasise it more.

I thought the whole thing needed lightening a bit, so I masked off the teabag stain piece at the top, and spattered the rest with white acrylic paint.

This was the result.

Originally I wasn’t going to put a sentiment on the outside of the card, but there needed to be something to balance the design, so I decided to add one. I went through my pile of rejects and spares from my Infusions mini-album project and found this one that exactly complemented my design. I tore off the bottom and wrote the text using my Uniball white Signo marker pen, and then darkened the edges, especially along the white torn top edge, with tea. I stuck this to the front of the card with regular matte gel medium, dabbing carefully over the text to prevent the water-soluble white from smudging, and afterwards touching this up where necessary.

To create the card base, I cut a piece of heavy white card and softened the edges with some more tea.

Inside, again using my wonderful stamp platform, I stamped the sentiment with sepia archival ink, using the “Memorable Moments” stamp set from Stampin’ Up.

To add a bit of interest, I made a couple of wide brush strokes across this sentiment with tea, using the fan brush.

I assembled the card using Scotch Quick Dry Adhesive which is a really good strong wet glue.

The finished card.

My hubby loves it!

Here it is, side by side with the other card I made recently, for his birthday last week.


Friday, 2 October 2015

Diamond Wedding Anniversary Card

My hubby reminded me we were invited to a diamond wedding tea party today. When we were invited some time ago I wasn’t sure I’d be well enough to go, because it would be less than a week after a chemo treatment, but because I am doing so much better on the reduced dose, I felt just about able to go.

I had forgotten about it in the meantime, and suddenly realised I needed to make a card! This is one of the reasons for wanting to start my card factory – to avoid having to make cards at such short notice as this.

Even though I am feeling better than usual at this stage in a cycle, I am far from 100 percent, and this morning I was suffering badly from chemo brain and made soooo many mistakes, it was driving me nuts! I did succeed in making a card, but managed to leave out one bit which I found after I’d finished! Also, recently I bought some circle dies which I simply cannot find, and I thought I had a music embossing folder, which I didn’t, so I had to rethink the thing on the fly! It was rather a frustrating morning all round, but I got there in the end.

It was rather difficult to photograph because it is white and sparkly. The glitter and silver don’t show up as much as in real life.

This card is not my usual style, but I wanted to do something silvery and sparkly for a diamond wedding. The couple are retired musicians, so I decided to add something to give a musical theme. The wife later said, when she opened the card, “Oh! It’s a record!” I hadn’t thought of it like that, but it does look a bit like a CD!

11 Finished Card

I began by creating some mat layers, using silver mirror card and some white card which I inked around the edges with Hickory Smoke distress ink, using a home-made ink blending tool. I got this distress ink quite recently (one of the new ones for this year) and am surprised how much I am using it already – it’s a lovely soft grey, and a very useful colour.

01 Matting, Layering and Inking

Not being able to find my circle dies, I had to resort to my Martha Stewart circle cutter, a tool I really don’t much like. The die would have produced a nice embossed edge, which of course this does not.

02 Cutting the Circle Mat

I cut a 4-inch circle and stamped and heat-embossed it using the “Music Background” stamp from the Artistic Stamper, using Cosmic Shimmer glitter embossing powder, which came out slightly pink from one direction, and a shimmery green the other way – very pretty! I haven’t used this for ages and had forgotten how nice it was.

03 Glitter Embossing the Circle Mat

Here is the circle mount. Rather difficult to see but you can just see the pinkness of it!

04 Circle Mat

I made a circle with “60” in it to go in the centre. I used stamps from the Stampin’ Up set “Memorable Moments” – a very useful set because it has separate words for the sentiments, and numbers, and “rd,” “nd” etc. so that you can mix and match, and a nice little scalloped oval shape to stamp them in as well. I chose the number 60 for the front of the card, stamped it on white card and heat embossed it with silver embossing powder. I then went over it with a glue pen and added some Hunkydory Diamond Sparkles Angel Whispers fine glitter. I cut out the circle using a plain 2-inch circle punch.

I find the best way to make sure that glitter is well stuck down is to put a piece of paper over the top, and then run a brayer over it several times. I find very little loose glitter falls off that way.

05 Making the 60

Here is the completed “60” layered onto a slightly larger piece of silver mirror card punched out with a scalloped circle punch.

06 The 60

Turning back to the background again, I found some ice sparkly silver and organza ribbon in my stash and stuck this down vertically across the mat with double sided tape.

07 The Ribbon on the Mat Layers

Using two sizes of butterfly stamps from the Stamping’ Up “Papillon Potpourri” set, I heat-embossed two of each, using the same glitter embossing powder as before, and silver embossing powder respectively, and then fussy-cut them out with fine scissors.

08 Making the Butterflies

I added the Diamond Sparkles glitter with the glue pen as before, to the silver-embossed butterflies.

09 Glittering the Butterflies

To stamp the inside of the card, I used stamps from the Stampin’ Up “Memorable Moments” set, using Wendy Vecchi Archival Ink in Watering Can, which tones very well with Hickory Smoke distress ink.

10 Stamping the Card Inside

I stuck down the two glitter-embossed butterflies using Scotch Quick Dry Adhesive in the centres so that the wings were loose, and attached the antennae using the glue pen.

12 Card Inside

The finished card, showing the glittered silver-embossed butterflies, attached in the same way.

11 Finished Card

We got to the party OK and it was great. I was so glad I went – the couple were surprised and delighted to see me as they didn’t think I’d be able to come. It was lovely seeing lots of other old friends too, and catching up. A very happy time. The card went down well, too!

I felt a lot better when we got home, and spent the evening relaxing on the recliner. We’d had plenty of gorgeous canapes at the party so we just had some stewed apple and cream later in the evening. I’m hoping to feel better again tomorrow, but I am not pushing it. I intend to rest and get over the busy day I had today.

Related Posts Plugin for WordPress, Blogger...