Showing posts with label Painting. Show all posts

Monday, 17 December 2018

Mystery Project–Part 3–Turquoise Heart

For the second of the three hanging heart ornaments, I chose a turquoise and terracotta colour scheme. As I started making this, I decided to give it a suggestion of a Spanish theme, because the friend for whom I was making this one loves visiting Spain. I also wanted to make a more colourful, and perhaps more illustrative and pictorial, frame than for my other friend, the artist, for whom I made the brown frame.

This colour combination as a new one for me, and I was inspired by Zsuzsa of InkyDinkyDoodle blog – she uses a lot of these colours and I’ve always thought how lovely they were! Thanks, Zsuzsa. I’ve been meaning to try these colours for a while now.

I began by getting out various bits and pieces in order to choose what to use for the various embellishments on this frame. I didn’t use the poultry grit (broken up bits of shell) in the end.

01 Possible Embellishments for Turquoise Heart

I decided I wanted to add a couple of small terracotta pots as embellishments, and knew I didn’t have any such ready-made embellishments in my stash, and slept on it for several nights, wondering how to achieve the look I wanted. When I started rummaging in my mixed media oddments box, I came across a bag of empty silk cocoons that I’d bought several years ago at a craft show, and thought, “Perfect!” Not only were they exactly the right size, but they also had just the right texture, too! I trimmed them down to shape so that I could stick them to the frame.

02 Making the Terracotta Pots

To create the top edge of the “pots,” I stuck down two different thicknesses of string. This proved to be a very fiddly job and I couldn’t get the string to stick at first, and then I tried doing it with Glossy Accents, which eventually worked. You can see that I have cut one of the little pots to look as if it was broken. They look a bit dirty around the top because the cocktail stick I used to help me stick on the string was a bit grubby! No matter – they were going to be painted anyway.

The first step was to paint them with gesso.

03 Gesso on Terracotta Pots

Now they were ready for painting with acrylics. I used Burnt Sienna and created shadows with Burnt Umber.

04 Painting the Terracotta Pots

On a scrap piece of watercolour paper which I’d cut to fit the recess in the frame, I painted a simple seascape and fixed it in place.

05 Background, Lace and Pumice Gel Medium

I cut a short length of black lace and stiffened it with some watered-down PVA glue and stuck this in place – reminiscent either of a Spanish mantilla or of the black wrought iron balconies so commonly seen in Southern Spain.

To create an impression of sand, I added some pumice gel medium and painted it with acrylics.

The frame was then ready for the rest of the embellishments.

Here are the flowers and leaves I used.

44 All the Turquoise Flowers

48 Terracotta Leaves with Some Flowers

To stick the little pots in place, I filled the backs with hot glue and then stuck them in place with more hot glue.

Here is the finished piece, with all the embellishments stuck down with hot glue.

06 Completed Turquoise Heart

I shall be giving my friend this little heart in the New Year when we are planning our lunch get-together which had to be postponed from before Christmas. She doesn’t visit my blog so I thought it would be safe to post about it before she receives it!

Here are the first two hanging hearts together. At this stage I hadn’t done more than the basic preparation on the third one.

06 Two Completed Hearts


Tuesday, 23 October 2018

Best Meal Ever

Tonight we went out for the best meal I have ever eaten. We were given a voucher for a three-course meal for two at a local Michelin starred restaurant and I have to say I have never eaten food like this! The food was cooked to perfection and the presentation and service second to none. Some people eat out like this all the time and probably don’t think twice about it but for us it was such a treat. It would be a shame to become blasé about such delights, I feel!

The restaurant is The Elephant, and its many accolades are well deserved.

We added a few extras to what was covered by the voucher and were happy to spend the extra for the superb side dishes, wine and petits fours to accompany our coffee after dinner.

The restaurant is an interesting mix of traditional and quirky modern. It is one of a terrace of beautiful houses just off the sea front in Torquay, with iron balconies and arched entrances, and inside, high ceilings with plaster cornices. The décor is understated and the plain tables are finished with a very interesting paint effect to co-ordinate with the room décor in colour.

Immediately inside the front entrance, one is confronted with a dramatic wooden carving of an elephant on the stairs.

01 Entrance Hall with Elephant Carving

Elephants feature elsewhere as well.

04 Elephants Above Bar

The lamp on the bar, with the attractive domed shade, is an elephant, too.

03 Bar

05 Steps to Upper Restaurant

The table surface.

02 Painted Table Surface

The edges are nicely distressed and the finish is semi-gloss with a silky feel. They were obviously hand-painted and included some interesting marks and occasional geometric stencil shapes in brighter colours.

Here is the à la carte menu.

06 Menu 1

We began with Campari and soda as an aperitif, and while we were waiting for our meal, we were served some delicious crusty sourdough accompanied by an attractive quenelle of whipped butter (on the left in the next photo). We both had the duck liver parfait to start. This was served with wafer-thin sourdough croutons – my sourdough is never like this!!

10 Starter

We were given beautiful steak knives to eat our mains, which were a pleasure to use, although the serrated edge seemed scarcely necessary as the meat was so tender.

08 Knife

On the top of the handle, where you rest your finger, was a little bee.

09 Knife Handle

For his main, my hubby had more duck:

11 Duck Main

and I had the venison.

12 Venison Main

In both cases the meat was beautifully pink and juicy.

For the side dishes we chose fine green beans, piccolo parsnips and dauphinoise potatoes, all melt-in-the-mouth and deliciously seasoned. These were all served in small cast iron dishes.

13 Vegetables

The dessert menu.

07 Menu 2

My hubby had the cheese. On the left of the picture you can see one of the bright geometric shapes stencilled on the table top.

14 Cheese

I couldn’t resist the chocolate fondant tart. It was served with the most delicious ice cream and a piece of thin crispy stuff that I couldn’t identify but I think it was caramelised sugar.

15 Chocolate Dessert 1

16 Chocolate Dessert 2

When I cut into the tart, a sumptuous larva flow of chocolate deliciousness poured out. Was I in heaven? Almost!

17 Chocolate Dessert 3

Here is my hubby enjoying his wine. He’s looking very pink!!

18 N Enjoying Meal

And yours truly:

19 S Enjoying Meal

I decided on a small glass of rioja to accompany my meal, but my hubby chose a white wine that he was particularly fond of. I had not heard of this before, and after I had sampled it, decided this was the best wine I had ever tasted: Gewürztraminer, a delightfully fragrant wine from the Alsace region of France. He had chosen a large glass and I think I probably drank about a quarter of it – I kept telling him he shouldn’t have too much as he was driving – that was my excuse, anyway!!

This was the most sensational evening out. Next time we have something special to celebrate, we agreed that this is where we would go, and blow the cost! For tonight, we are more grateful than we can say, to our friends at church who passed the voucher on to us. What a lovely gift. What a stunning meal.

Wednesday, 30 May 2018

WOYWW 469

My desk this week, taken on Tuesday evening because today is my birthday and my hubby is taking me out. (65 today… officially an OAP for heaven’s sakes!) I am writing this in the small hours of Wednesday morning.

We were out yesterday too, and I took the album I made about Mum (bottom right) because I wanted to show it to someone. This was a rush job, and the only thing I didn’t have time to complete was a box for each of the two copies – Mum’s friend says she is keeping hers in a biscuit tin for now! I thought I’d make a start on it so that at least I’d have something to protect the album when I was carrying it about yesterday. It is made of pieces of mounting board stuck together with masking tape. I will have to disassemble it again in order to cover it but for now it has served its purpose.

Between the box and the album you can see progress on another heart ornament like the one I made for my hubby’s anniversary card. A friend asked me to make it for her to give to a family member who is getting married – funnily enough the couple’s initials are the same as ours, so I didn’t even have to alter the design!

At the bottom left are some paper table napkins from where we went out today, with a beautiful peacock feather design on them. I just had to rescue them and do something with them – not sure what yet!

UFOs

Also on the creative front this week, I have decided to tackle some of my UnFinished Objects! Remember the socks I knitted for the homeless last autumn? I completed one pair, and only managed 1 1/2 socks of the second pair before my hubby broke his leg and my life went pear-shaped from then on. I have now turned the heel of the second sock, and once they are finished, I’ll ask the person at church who initiated the sock project if he could make sure they go to a good home – even if 6 months late! If I can get this finished, then I can put my boxes of knitting yarns away again. They are cluttering up the far side of my studio and starting to drive me nuts.

They look a bit knobbly but that will all come right once they are blocked.

Garden

A couple of days ago one of our neighbours gave me a present that he’d made to cheer me up after being ill. It was two things to put in the garden – a beautiful little plaque, and some scallop shells strung together which he said would go on the gable of our summer house. He fished these shells out of the Exe estuary where the fishermen had dumped them after scraping the flesh from them. He drilled holes in the tops and tied them together with string.

Here’s the summer house after my hubby put them up. They make nice bunting, don’t they.

The string was a little bit too long, so my hubby cut off the excess and hung it over a branch of the apple tree so that the shells were touching each other – they make a lovely sound when the breeze moves them.

The contraption around the tree is a piece of stiff wire netting edged with pipe insulation (to prevent injury to my hubby while he is gardening). This is part of the kitty defences that he’s devised, to stop them getting out of the garden. If they can climb the apple tree, they would be able to get onto the roof of the garage or the summer house, and thence over the fence and onto the road.

Here is a close-up of the slate plaque.

He told me he’d cut a roof slate into two halves, and chipped away at the edges to give that lovely effect. He painted the design through a stencil with acrylic paint, and sealed it with an acrylic seal to make it weather-proof. He is apparently now selling them on Ebay and they are going like hot cakes!

What a lovely gift!

By the way, you can see more about the narrow-boat painting I did on the flower boxes hanging on the summer house here, if you are interested.

Kitties

This week we started letting them out into the garden, as they are now officially grown up (a year old). At first they were very wary and tentative, but soon started to grow in confidence. The only problem is, we have an awful job persuading Lily to come in again – we’ve never had such a disobedient kitty – she will only do what you want if it happens also to be her own idea! I suppose all kitties are like this to a certain extent but she has it to an extreme degree! You can see videos of their coming out here and here.

Another rite of passage is the cessation of a midday meal now they are no longer growing so much. At lunch time they sit by their empty bowls and look up accusingly at me as if to say, “Where are our din-dins?” I tell them kitty din-dins are for babies and they are now all grown up and don’t need them! They’ll get used to it. I feel so sad, no longer buying kitten food and deleting it from my Tesco favourites!

Having a nice rest with my hubby. Sleepy Rubes.

Finally, two fun birthday cards! For those not in the know, the “Don’t tell him, Pike” is a quote from the vintage TV comedy “Dad’s Army.”

On the back it said “Am I my brother’s kipper?” Lol!

That’s all for now, folks. It’s been a busy week! Hope you’ve all enjoyed the WOYWW anniversary ATC swap, and I look forward to seeing everyone’s efforts.

Wednesday, 13 September 2017

WOYWW 432–More on Infusions Mini-Album

Finally managed to put in some studio time! These kittens of ours do take up a lot of time! Today we’ve had visitors morning and afternoon to see them, and needing cups of tea etc. and lots of chat! I’ve also been busy with other things and very tired in between, and as usual, art ends up at the bottom of the heap, but last night I was determined to get back to it again and I’ve made a bit more progress on the tags for my Infusions samples album.

Here’s my desk as it was last night. Not a lot of change since you last saw it!

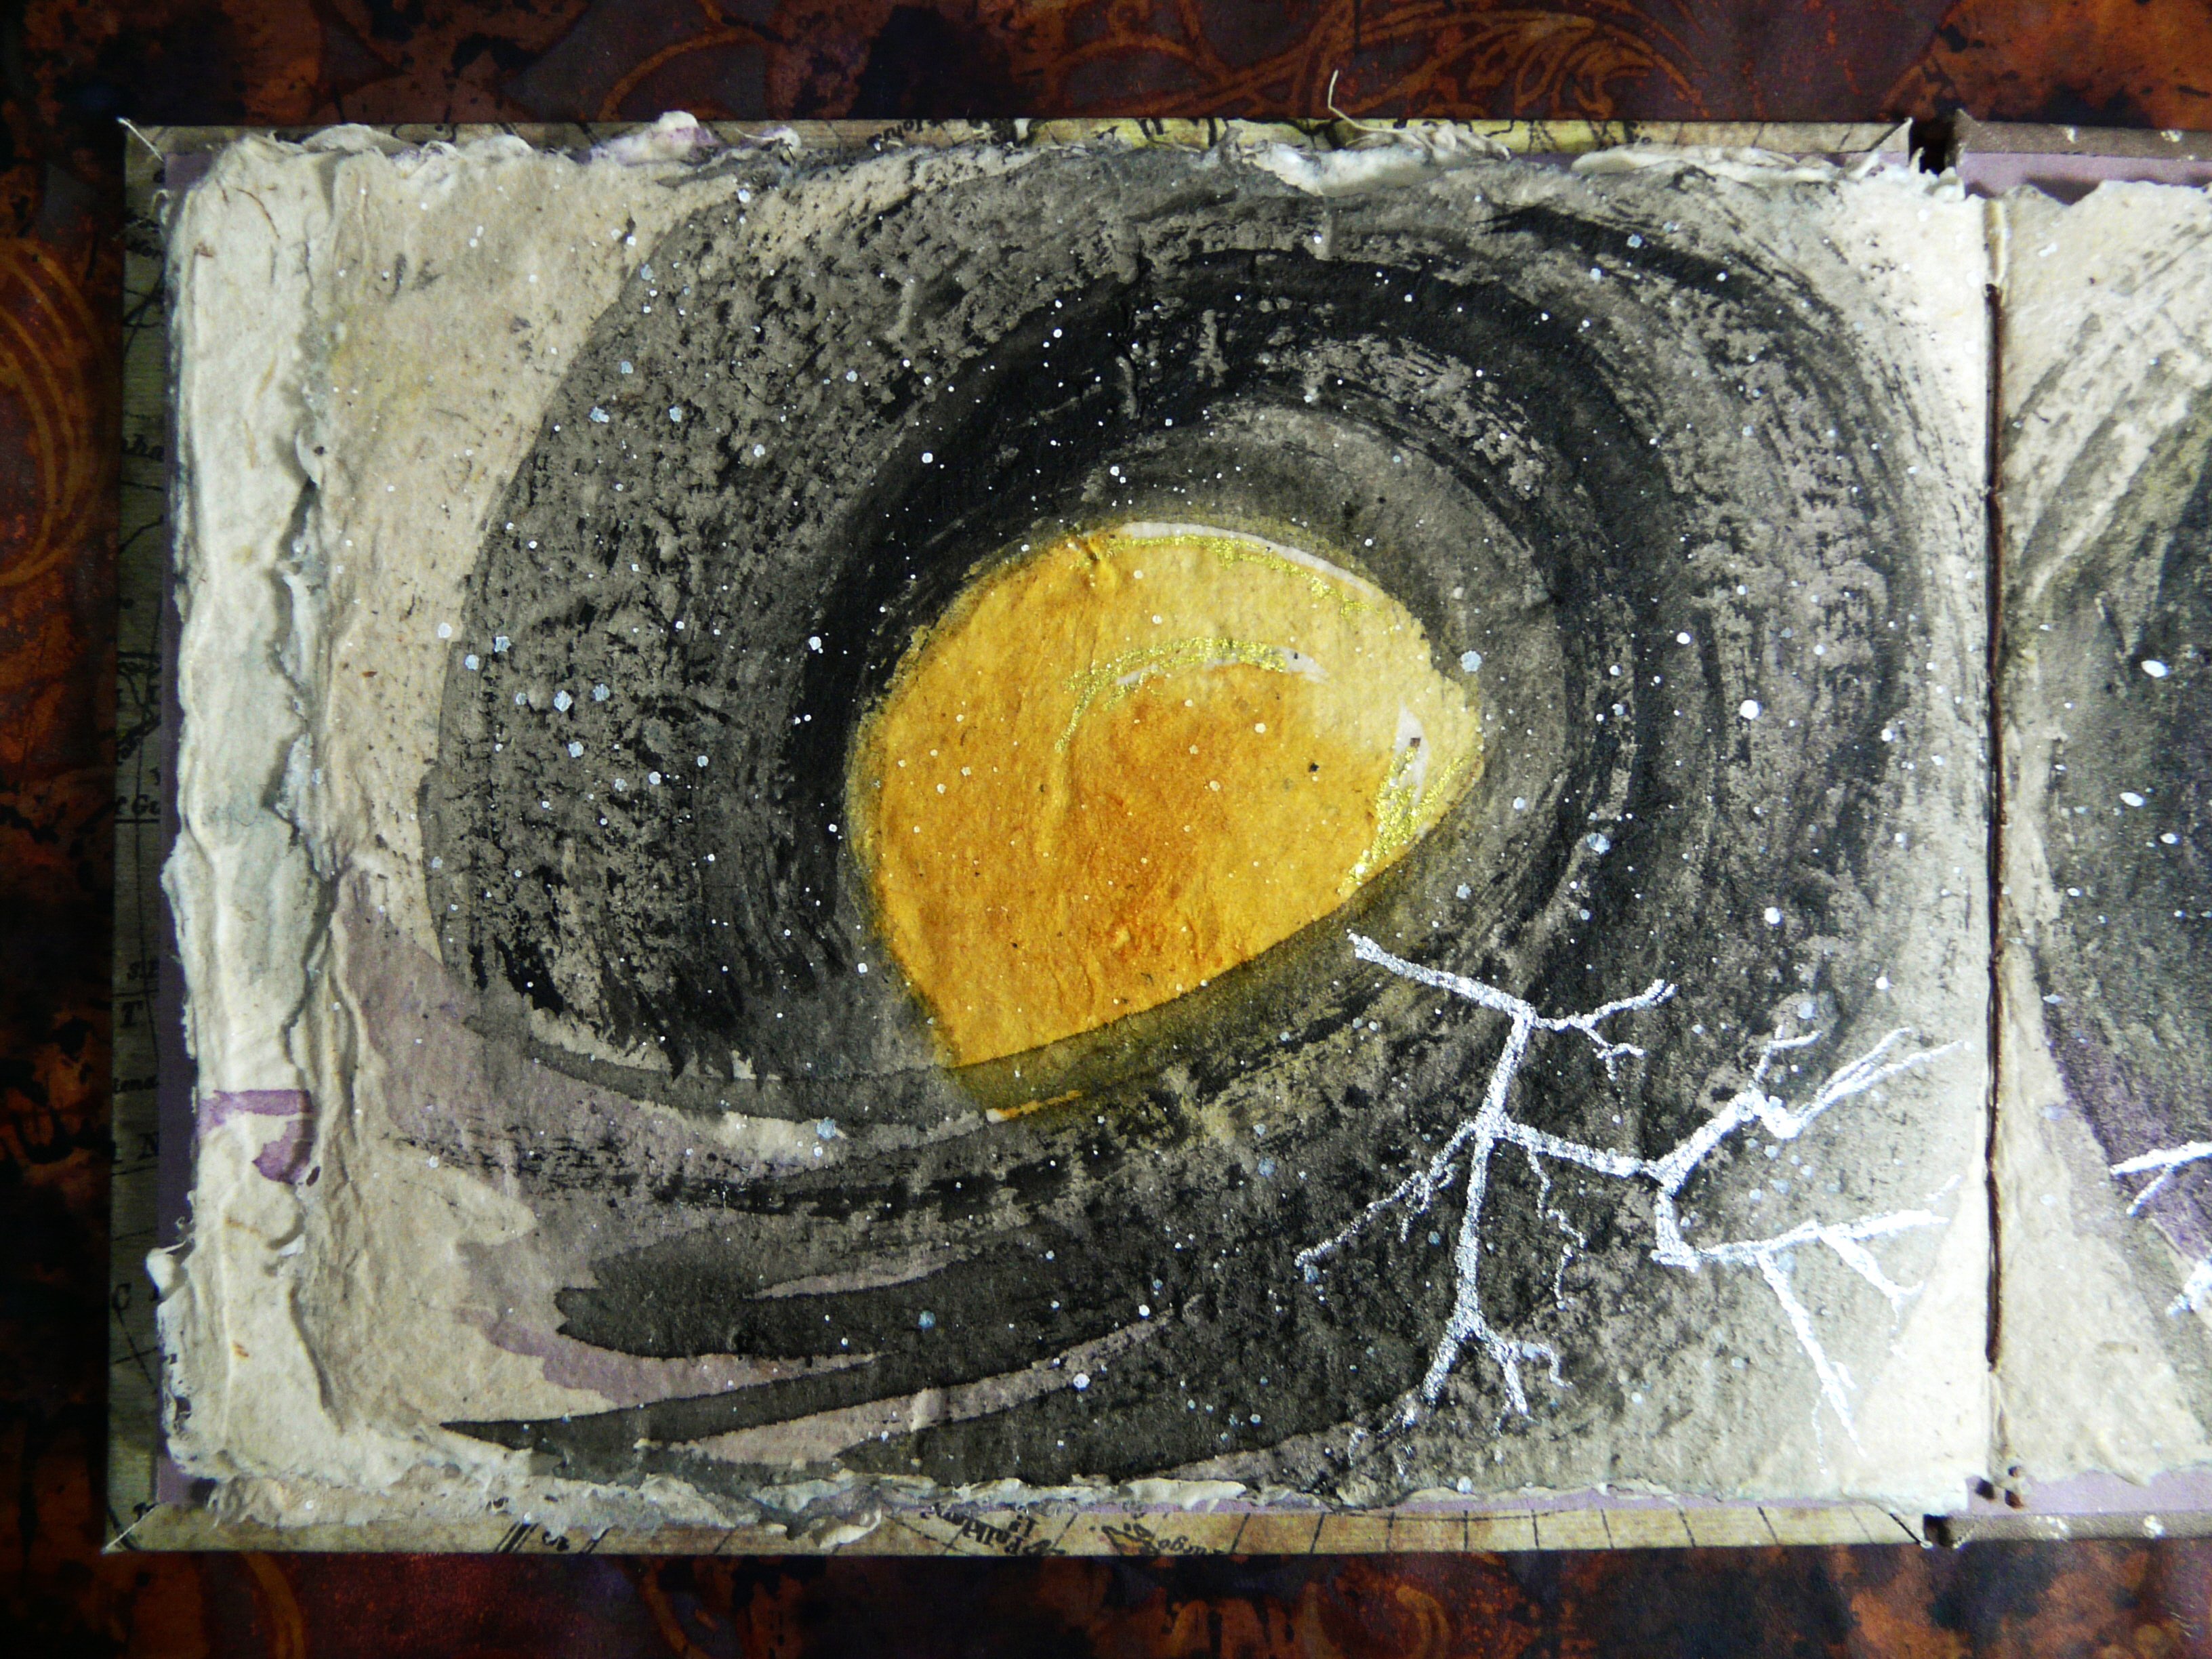
Working on the tags, this is the front of the first tag in the “Painting” section.

I drew a rough curly shape and painted it with The Sage and Emerald Isle from Set 1, and Slime and a little In the Navy from Set 2, finally sprinkling on a tiny amount of In the Navy in the circular spaces, and then added text with my white pen.

Turning the tag holder and tag over, I made a tag to go with the “Woodgrain effect” page, but instead of going straight across with broad strokes with the fan brush, I added a bit of a curve for interest. I used Golden Sands from Set 1, and Rusty Car from Set 2 for this tag, and again added some text with my white pen, and outlining the larger text with a black pen. To the right, you can see the small square I painted with what was left of the Infusions mixed with water on my craft sheet.

Below, you can see the Tartan effect tag with its page, which is the second “Painting” page. For this I used Are You Cerise and Violet Storms from Set 1, and created the text in the same way as before. The mop-up square is on the right, and I later added some more to this one.

Turning over both page and tag, I used Lemoncello and Emerald Isle from Set 1 on the tag, to echo some of the colour on the painted fans on the page, and added text as before. The mop-up sheet is above.

Moving on to the “Stamping” section, for the front of the tag to go in this title page, I just used Rusty Car from Set 2, after first spritzing the tag well with water, and adding more water after the Infusions had gone on. There is no text on this side of the tag but I wanted it to tone with the page when it was pulled out.

Finally, the back of that tag, having turned over both page and tag, to show the page with simple stamping onto a background already created with Infusions, in this case The Sage from Set 1, with text as before. Above is the mop-up sheet, which was the purplish one from above.

These mop-up sheets will be used to make cards or be used in other projects. I hate to waste any Infusions that are on the craft sheet!

Kittens

Our kittens are 16 weeks old today. How quickly the time is going. They are growing fast, and very energetic in the mornings and evenings, and tending the crash out asleep during the afternoon, so our afternoon visitors don’t see them at their most fun!

I’ve just realised that I didn’t take any photos or videos of them at all last week! They haven’t really done anything new, except grow! They are progressing well with the clicker training but it still tends to go out the window when they’re not actually in a training session and there are other distractions. They will usually come when they are called, though, and they now understand “Jump up!” and will come on my lap. I am still working on trying to get Ruby to use the scratching post, and we’ve got as far as her putting her paws on it on the command “Scratch!” but she hasn’t actually “scratched” yet! I’ve got some stuff on order which I can put on the scratching post which should encourage her to use it properly, in preference to the carpet.

We’ve had quite a few visitors wanting to see them which is very nice – everybody is enjoying them and saying how pretty they are! Ruby continues to be my baby and always wants to come and sit with me, and if Lily is already on my lap, she makes sure she comes up higher than her, so that she can have prime position as close to me as possible! It’s very flattering, especially after so many years of watching both kitties all over my hubby and not wanting to come to me – last night my hubby looked over at the 3 of us and said, “I want a kitty…” and looked sad, and I said, “Now you know how I felt all those years!” I do spend a lot more time with them than he does, as he’s so busy and is out and about a lot.

Health Update

I had my CT scan last Friday and am waiting for the result. I am pleased that my surgeon is keeping such a close eye on me, and he’s as anxious as I am to avoid a repeat performance of my emergency surgery at the beginning of this year. I’m pretty sure that hernia repair is failing as it doesn’t feel right, but it’s all pretty inconclusive. He will continue to monitor it, and I just hope that he is available when it does fail, so that he can do the operation and put the mesh in to protect the area.

Cooking

We are in the throes of dealing with masses of apples off our tree. I can hardly keep up! My hubby, being a lot braver about creepy crawlies and worms and things than I am, does the initial peeling and chopping, and then I slice them more finely. This year, I have decided to freeze them uncooked rather than stewed as I did last year, because they will be more versatile and I can use them in apple cake and other things. Once they are sliced, they are laid out in a single layer on baking parchment on baking sheets and then frozen. Once they are frozen, they are put into big bags as separate slices, so I can take as much out as I need at any one time. It’s quite a lot of work and pretty cold, dealing with the frozen slices, too! I can’t do too many at once or I can’t get the baking trays into the freezer. I’ve now got 3 big bags full and there are still quite a lot to do! It’s all taking quite a lot of time.

I haven’t done much baking recently but we’ve got our monthly Cakeathon meeting with the cancer group this Friday, and this time I’ve decided to make scones – I’ll make 2 batches, one plain to have with jam, and one cheese. I’ll probably get some cream before Friday so we can have a proper Devon cream tea!! They don’t take long to make so I’ll probably whip them up on Friday morning.

Diet and New Clothes

Getting out my clothes for cooler weather, I find that quite a lot of them are hanging off me, having lost so much weight with my diet. Several pairs of leggings won’t stay up any more (since starting my diet I’ve lost 10 inches around my waist!!) and they are all wrinkly round the legs, making me look like Nora Batty. I needed new trousers too, and new bras, so my hubby took me down to Marks & Spencer’s last week and I got some lovely new stuff! I am also no longer singing “Swing Low, Sweet Chariot” and have decent Uplift from my new bras!! I haven’t managed to shed any more pounds over the past 3 weeks which is a bit frustrating but slow and steady is best, and I have every hope that I’ll lose the final 3 pounds before long.

We’ve been out for lunch with friends this week too, and I’ve had the engineer to repair a small fault on the stairlift, and I’ve been very busy getting sessions ready for my Bible study group which resumes in earnest on Friday. This Saturday I’ve got an Ileostomy Association meeting in Somerset, so it’s all go, Chez Shosh. Hopefully I’ll get time to do some more art as I really want to finish the Infusions album now.

Have a great week, everybody.

Saturday, 8 July 2017

Walk-In Pantry–Day 5

Today, Gary, our neighbour, came in to paint the inside of the new pantry. He masked off most of the shelves and with the ones on the left, was able to unscrew the small units that Phil had made, and remove them so that he could paint the wall in one go, and then replace them, thus saving himself considerable work and time, and a very neat job as well. He used a matt white emulsion for this.

Painting the wall on the left, he used eggshell because that wall is the side of the cooker unit. This panel is pretty shiny, and even with sanding, it didn’t cover that well so he will need to add one, if not two, more coats – this paint also takes longer to dry, being oil-based.

Painting the ceiling, also in white emulsion.

Having everything except the shelves in white is a good decision. I wanted the space to be as light and bright as possible. Even though bits need another coat, it is great to see a uniform white finish on the walls instead of the patchy plaster.

Gary’s other job today was to fill the holes around the replaced piece of picture rail, and to paint the wall to match the rest. This picture rail was never a good fit, and was also made from a different moulding, so anything that Phil and Gary did was going to be an improvement! Phil had trimmed off the bottom of the moulding so that at least it’s the same size as the other, even if not exactly the same profile. It’s certainly an improvement on what was there before, and it will look better once the paint is touched up..

He is coming back tomorrow morning just to add more coats where necessary, and to clean up.

After this, I shall treat the wood with linseed oil – today Gary gave me some hints about that – and contact the electrician on Monday regarding the light, and await the arrival of the new slab. Nearly there now!

Saturday, 10 June 2017

Second Wind–Third Part

The completion of the project. I don’t think I’ve ever completed a project so quickly!

Yesterday I made the cover and did the binding.

These are the materials – originally I thought I might use some of the inked kitchen paper but in the end decided against it. The patterned papers are from my stash, both from Tim Holtz paper stacks; the purple one is the back of a printed sheet that I knew I would never use. If I hadn’t had this, I would have inked some paper myself, but I thought this was a good opportunity to start using up some of my stash that’s been hanging around for several years! For the cover boards, I used cereal packet card.

I also found a sheet from a paper stack I was given ages ago, which again I thought I’d probably never get around to using – the design on it reminded me of raindrops so I thought that would do for the back! I forgot to photograph it with the above, but you will see it in a minute.

To help me cut the world map sheet where I wanted it, I made a frame out of scrap paper. The hole is the size of the finished cover, and the surround being the amount needed to fold around to the back. I chose an area on the map where hurricanes are prevalent.

The papers cut to size.

I stuck the papers down onto the card using a glue stick, and then turned them over, cut off the corners, and stuck the folds over using double sided tape.

The finished cover boards.

I used the purple paper for the end papers. I stuck these inside the boards with double sided tape. I am pleased with this choice of paper because it really brings out the touches of purple on the pages.

The covers ready for binding.

The beginning of the binding process, with the boards and pages marked and pierced ready for the waxed linen thread I used.

After this I forgot to photograph the binding process. This was my first attempt at a Coptic binding and it was great fun to do. The advantage of this binding is that the pages will fold absolutely flat as you open the book, making it ideal for art journals etc. You can also add as many pages/signatures as you like. Because there is no cover over the spine, the stitching is visible, and can be made very attractive. As it was my first attempt I decided to keep it simple, but there are all sorts of fancy variations you can do, to make a decorative stitched spine. There are plenty of images online.

I followed along with a brilliant Youtube tutorial and once I got into the swing of it, it was really easy. https://www.youtube.com/watch?v=Z1cTB6_4w5E

After the binding was completed, I added the title on the front of the book, using my Uniball Signo white marker pen, and outlined the letters with a medium sepia archival pen.

Here is a view of the stitched spine of the Coptic binding.

The back of the book, with my blog details.

To finish the cover, I added some shading under the title to make it stand out better, using my Derwent Graphitint in Warm Grey, and blended it with a fine wet brush. I went around the edges of both front and back covers with Black Soot Distress Ink, using a hand-made blending tool.


Here is the flip-through of the whole completed book.


As a recap on the thoughts behind this project, I am pasting in what I wrote at the end of the first part.

I have been thinking about “second wind” in the context of my own life. It’s funny how while its primary meaning is something destructive and terrifying, this expression usually means something quite positive when used in a metaphorical sense. Since my cancer, which necessitated the removal of my entire colon which was already diseased with ulcerative colitis, I have definitely come into my “second wind” in a positive sense, and am enjoying many activities I thought were lost to me, and many new ones besides. The negative aspect of my second wind struck me early this year when I had a blockage and was admitted to hospital for emergency surgery. The eye of the storm was the whole of 2016 when I was pretty well, and I thought that was the end of it, not realising that the second wind was just around the corner.

Cancer very often leaves a swathe of destruction in its path, both physical and emotional, and yes, there has been destruction in my case, but what remains has enabled me to rebuild my life from the ruins, and what I now have is very much better than what I had before. While I was going through the thick of it, somehow, at the centre, I always had my own personal “eye of the storm” where I had peace and joy, and remained positive. I hope my little album in some way depicts this journey, as well as illustrating the terrible beauty of one of the most destructive weather events on earth.

I hope you have enjoyed this little project. I am really keen to do more books in the future – in the meantime I have my Infusions mini-album to finish!

Related Posts Plugin for WordPress, Blogger...